| HTML |
|---|
<span data-swiftype-index="true"> |
| HTML Wrap |
|---|
| In From the Accounts Listlist page (accessible by clicking your business name and choosing Accounts list), you can view, add, edit and delete headers and accounts (or, make them inactive). You can also enter opening balances for new accounts, and view account tax rates.  Image Removed Image Removed
Watch this video to learn more about managing your accounts list. | HTML |
|---|
<div class="wistia_responsive_padding" style="padding:56.25% 0 0 0;position:relative;"><div class="wistia_responsive_wrapper" style="height:100%;left:0;position:absolute;top:0;width:100%;"><iframe src="//fast.wistia.net/embed/iframe/cw4tjbjghb?videoFoam=true" title="Wistia video player" allowtransparency="true" frameborder="0" scrolling="no" class="wistia_embed" name="wistia_embed" allowfullscreen mozallowfullscreen webkitallowfullscreen oallowfullscreen msallowfullscreen width="100%" height="100%"></iframe></div></div>
<script src="//fast.wistia.net/assets/external/E-v1.js" async></script> |
AccountsAccounts provide a means for grouping similar transactions. For example, if your business pays rent for the use of its premises, you would create a rent account and then allocate all rent payments to that account. Accounts also include your bank and credit card accounts. Account numbersEach account is identified by a unique five digit number. The first digit indicates the account’s classification (for example, accounts starting with 6 are expense accounts). The remaining four digits determine its location within the classification. The lower the number, the higher up in the list it appears. For example, account 1-1100 appears above 1-1200. Account typesEach account must be assigned an account type before it can be used to track your business’s financial activity. You can choose from 12 different account types: - Banking, Current Assets, Fixed Assets (asset accounts)
- Credit Card, Current Liabilities, Long Term Liabilities (liability accounts)
- Equity (equity account)
- Income, Other Income (income accounts)
- Cost of Sales, Expense, Other Expense (expense accounts)
Each account type serves a specific purpose. If you’re unsure about which type you should assign to a new account, ask your accounting advisor. Note that an account type can't be changed if it has a current balance. For information on changing an account type, see Adding, editing and deleting accounts. Accounts listThe accounts you use for your business are grouped in an accounts list (also known as a chart of accounts). When you registered and set up MYOB Essentials, an accounts list was selected for you based on the business type you specified (see the FAQ below for additional info). You also reviewed this accounts list during setup. If any of the existing accounts that came with MYOB Essentials don’t meet your business needs, you can edit them so that they do. You can also make an existing account inactive, add a new account, and in certain circumstances, delete an account. | HTML |
|---|
<h2><i class="fa fa-comments"></i> FAQs</h2><br> |
| UI Expand |
|---|
| | title | What are the default accounts lists for each business type? |
|---|
| What are the default accounts lists for each business type?All accounts lists provided by MYOB Essentials include the same set of standard accounts, plus some extra accounts tailored for the specific business type. For example, a business that sells products will have a Cost of Sales account for Raw Materials, and a business involved in agriculture will have an expense account for Pesticide. System accountsSystem accounts are required by MYOB Essentials, and will be created even if you choose not to use one of the accounts lists provided by MYOB Essentials. You can’t delete these accounts. - Asset accounts: ABN withholding credits, Accounts receivable
- Liability accounts: ABN withholdings payable, Accounts payable, GST collected, GST paid, PAYG withholdings payable, Payroll deductions, Superannuation payable
- Equity accounts: Income tax, Historical balancing, Retained earnings, Current year earnings
- Expense accounts: Discounts given, Superannuation expense, Wages & salaries, Discount received.
Standard accounts listAll accounts lists provided by MYOB Essentials include the following accounts, plus additional accounts depending on the business type: Account type | Accounts included |
|---|
| Asset | - Banking accounts: Cheque account, Petty cash, Savings account
- Current Assets accounts: ABN withholding credits, Accounts receivable
Fixed Assets accounts: Furniture & fittings, Motor vehicles, Office equipment & computers, Plant & equipment.
| Liability | | Equity | | | Expense | - Accounting fees, Advertising, Bank charges, Discounts given, Electricity & gas, Insurance, Interest paid, Internet, Lease of equipment, Motor vehicle expenses, Office supplies, Postage & courier, Printing & stationery, Rates, Rent, Repairs & maintenance, Sub contractors, Sundry expenses, Superannuation expense, Telephone, Travel & accomodation, Wages & salaries, Water, Work cover insurance.
| Other Income | - Discount received, Interest income, Other income.
| Other Expense | | Additional accounts for each business typeIn addition to the standard set of accounts, the accounts list for each business type includes the following accounts: | Business type | Includes... |
|---|
I sell products | - Income accounts for Sales
- Cost of Sales accounts for Freight, Packaging, Purchases and Raw material.
| I sell services | - Income accounts for Fee income and Licensing income
| I sell products & services | - Income accounts for Sales, Fee Income and Licensing Income
- Cost of Sales accounts for Freight, Packaging, Purchases and Raw material.
| I work in building & construction | - Income account for Construction, Renovation income and Service & repair income
- Cost of Sales accounts for Building contract insurance, Building material, Contractor costs, Freight, Hire of equipment.
| I work in agriculture | - Income accounts for Grain income, Livestock income, Produce income
- Cost of Sales accounts for Feed, Fertiliser, Freight, Pesticides, Purchase of livestock and Seed
- Expense accounts for Breeding expenses, Feed, Fertiliser, Pesticides and Veterinary
| Image Added Before adding a new account, note the account names and numbers of the existing accounts in the list. They’re based on a numbering system which groups accounts by their Account Type. The existing names and numbers will help you choose appropriate account names and numbers when adding or editing accounts. Using the Accounts list | UI Tabs |
|---|
| UI Tab |
|---|
| | UI Expand |
|---|
| To add an account- In MYOB Essentials, click your business name and choose Accounts list.
- Click Add new. The Add new box appears, in the Accounts tab.
 Image Added Image Added Enter an unique Account Number. | UI Text Box |
|---|
| Don’t use your real account number for bank and credit card accounts The number you enter here is only used for tracking the account in MYOB Essentials. You don’t need to use your real bank or credit card account number. |
- Enter an unique and meaningful Account Name.
- Select an Account Type from the list.
- Select a Tax Rate from the list.
- Enter an Opening Balance for the account. For more information see Entering opening balances.
- If you want to add more than one account, click into any of the empty fields below and repeat steps 3-7.
A new blank line will automatically appear below with each new account entered. - Click Save to add the accounts.
|
| UI Expand |
|---|
| To edit an accountIn MYOB Essentials, access your Accounts list (click your business name and choose Accounts list). To edit an individual account- Click the ellipses button
 Image Added and select Edit. The Edit account window appears. Image Added and select Edit. The Edit account window appears.
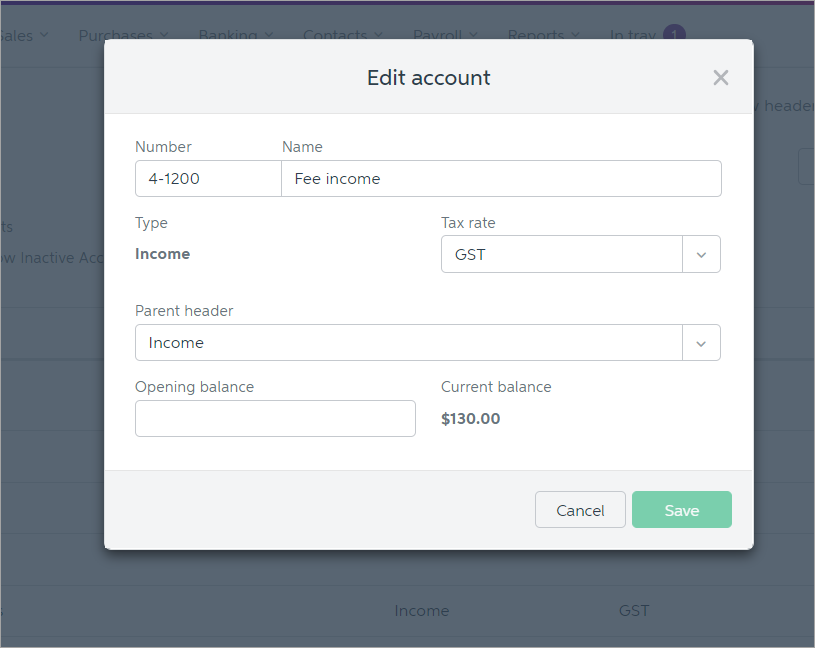 Image Added Image Added - You can edit the Account number, Account name, Type, Tax rate, and Opening balance of your accounts, with the exception of locked accounts (those marked with a padlock
 Image Added). Locked accounts, and accounts with a Current balance, cannot change Type or Tax rate. Image Added). Locked accounts, and accounts with a Current balance, cannot change Type or Tax rate. - Click Save to save your changes.
To edit multiple accounts- From the accounts list, click Edit accounts. The Edit accounts page appears.
 Image Added Image Added - If you’ve made any accounts inactive and want to exclude them from the list, deselect Show Inactive Accounts.
In the accounts list, you can edit the Account number, Account name, Type, Tax rate, Opening balance and Active status of your accounts, with the exception of locked accounts (those marked with a padlock Image Added). Locked accounts, and accounts with a Current balance, cannot change Type or Tax rate. | UI Text Box |
|---|
| The Current Balance field cannot be edited. |
Make any changes to your accounts. If you edit the Account Number, make sure that the new number is within the range used for the Account Type used by this account. For more information see Accounts List. | UI Text Box |
|---|
Need to change your opening balance date? Click your current Opening Balances date to bring up the Change opening balance date window. Select your new opening balance date, and click Save when finished. Note that if you change the opening balance date, make sure you check that the opening balances for your accounts are correct. |
- Click Save to save your changes.
|
| UI Expand |
|---|
| To delete an accountYou can delete accounts one at a time, or select multiple accounts for a bulk delete. When you delete accounts, they’re removed along with all their details. Instead of deleting accounts, we recommend that you make them inactive. For more information see To make an account inactive. | UI Text Box |
|---|
| Accounts that can't be deleted You can’t delete locked accounts—that is, system accounts with a locked icon (Image Added). You also can’t delete accounts that have been used in transactions, or accounts for which you’ve imported bank statements. Instead, you can make these accounts inactive. For more information, see To make an account inactive. |
To delete individual accounts- Access your Accounts list (click your business name and choose Accounts list).
- In the accounts list, find the account you want to delete and click the ellipses button (...) on the far right.
 Image Added Image Added - Click Delete.
A confirmation message appears. - Click Delete Account to delete the account.
To bulk delete multiple accounts| UI Text Box |
|---|
| Coming soon - Bulk delete still needs some time in the shop, but will be here in the next few days! |
- Access the Accounts list (click your business name and choose Accounts list).
In the accounts list, select the accounts you wish to delete by ticking the box to the left of the account number.
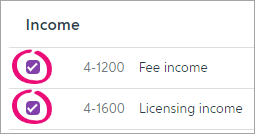 Image Added Image Added | UI Text Box |
|---|
| Bulk selecting headers If you select a header, every account and header underneath is automatically selected. |
- Click the Delete button.
A confirmation message appears - Click Delete account to delete the accounts.
|
| UI Expand |
|---|
| title | Moving and reordering your accounts |
|---|
| Moving and reordering your accountsYou can select one or several accounts from the Accounts list and move them under a header. This is great for when you've created a new header and want to start grouping accounts. | UI Text Box |
|---|
| Bulk selecting a header - If you need to move a header and every account under it, select the header in the accounts list. Every account and subheader will be automatically selected. |
- From the Accounts list, select the accounts you want to move by ticking the box to the left of the account number.
Image Added - Select the header you want to move the accounts under from the dropdown box.
- Click Move.
 Image Added Image Added
The accounts list is automatically updated with the changes.
|
| UI Expand |
|---|
| title | Making an account inactive |
|---|
| To make an account inactiveWhen you make accounts inactive, they’re removed from some selection lists so they can't be used in transactions. They also won't display in some reports, unless the report has the option to Show inactive accounts. Inactive accounts retain details you may need some day. This is in contrast to deleted accounts, which are removed along with all their details. For more information see To delete an account. You can make an inactive account active again at any time by editing the account and selecting the Active option. - In MYOB Essentials, click your business name and choose Accounts list.
- Click Edit. The Edit accounts page appears.
- In the accounts list, find the account you want to make inactive and deselect Active.
 Image Added Image Added - Click Save to save your changes.
|
|
| UI Tab |
|---|
| | UI Expand |
|---|
| - Access the Accounts list page (click your business name and select Accounts list).
- Click Add new.
Image Added - The Add new box appears.
- Click the Header tab.
Enter a Name and Parent header for the header you're adding. | UI Text Box |
|---|
| What's a parent header? A parent header is the header under which the new header will sit. For example, if you select Income as the parent header, the new header will sit 1 level below the Income header. |
- If you want to add more than one account, click into any of the empty fields below and repeat step 5.
A new blank line will automatically appear below with each new header entered. - Click Save to add the headers.
|
| UI Expand |
|---|
| title | Editing and exporting/importing headers |
|---|
| You can edit individual headers in your accounts list, or bulk export your headers as a CSV file and import them back into MYOB Essentials. Start by accessing your Accounts list (click your business name and choose Accounts list). - From the Accounts list, click the ellipses (Image Added) button next to the header you want to edit and select Edit.
 Image Added Image Added - The Edit header window appears.
- You can edit the Name and Parent header (the header under which this header will sit).
- Click Save when you're finished.
Exporting and importing headersIf you need to make multiple edits to your headers, such as bulk changes to header levels or names, you can export them as a CSV file and open in Excel. - From the Accounts list, click the Edit dropdown and select Export headers.csv.
 Image Added Image Added - The headers.csv file is downloaded.
- Open the headers.csv file in Excel or similar spreadsheet software.
- In Excel, you can change the heading designation (Y or N) and the heading level (1, 2, 3 or 4)
Do not change account numbers or account names in the spreadsheet. You can make bulk changes to accounts from within MYOB Essentials. - When you've finished editing the spreadsheet, save the CSV file to your computer.
- Back in your MYOB Essentials Accounts list, click the Edit dropdown and select Import headers.csv.
- Select your saved CSV filed from step 5.
- Your Accounts list is automatically updated.
If any accounts or headers could not be imported, you'll receive a message at the top of the Accounts list page.
 Image Added Image Added
|
| UI Expand |
|---|
| You can delete headers one at a time, or select multiple headers for a bulk delete. - Access the Accounts list page (click your business name and select Accounts list).
- Click the ellipses button (Image Added) next to the header you want to delete, and select Delete.
Image Added
The Delete header window appears. - Click Delete header to confirm.
Bulk delete multiple headers and accounts| UI Text Box |
|---|
| Coming soon - Bulk delete still needs some time in the shop, but will be here in the next few days! |
- From the Accounts list, select the headers you want to delete by ticking the box to the left of the header name.
 Image Added Image Added
Note that when you select a header, every account and header underneath it is automatically selected. Don't worry, you can choose to delete only the headers you've selected later on.
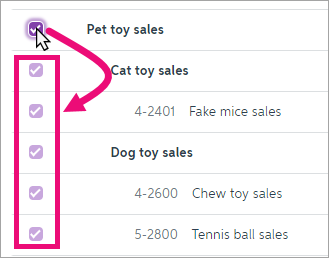 Image Added Image Added - After you've selected your headers and accounts, click the Delete button.
 Image Added Image Added
The What do you want to delete? window appears.
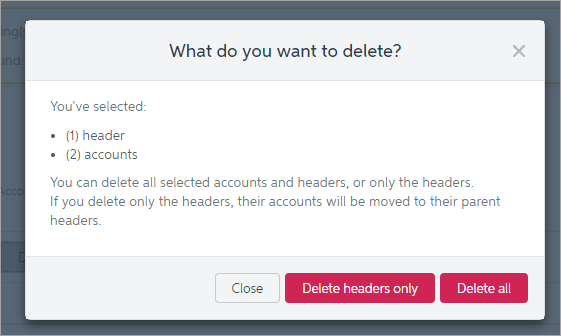 Image Added Image Added- You can choose to delete only the headers you've selected, or delete all headers and accounts you've selected.
If you delete only the headers, their accounts will be moved to their parent headers (the next highest header level). For example, accounts under a level 3 header will move under the next level 2 header. - After selecting what you want to delete, your accounts list is automatically updated.
|
| UI Expand |
|---|
| title | Moving and reordering headers |
|---|
| Moving and reordering headersYou can bulk select accounts from the Accounts list and move them under a header. This is great for when you've created a new header and want to start grouping accounts. | UI Text Box |
|---|
| Bulk selecting a header - If you need to move a header and every account under it, select the header in the accounts list. Every account and subheader will be automatically selected. |
- From the Accounts list, select the accounts you want to move by ticking the box to the left of the account number.
Image Added - Select the header you want to move the accounts under from the dropdown box.
- Click Move.
Image Added
The accounts list is automatically updated with the changes.
|
|
|
| HTML |
|---|
<div style="display: none;" data-swiftype-name="keywords" data-swiftype-type="enum">chart>add ofa accounts<new account</div>
</span> |
| HTML Wrap |
|---|
| width | 15% |
|---|
| class | col span_1_of_5 |
|---|
| | |
| HTML Wrap |
|---|
| float | left |
|---|
| class | col span_1_of_5 |
|---|
| | Panelbox |
|---|
| name | magenta |
|---|
| title | Related topics |
|---|
| |
| Panelbox |
|---|
| name | yellow |
|---|
| title | From the community |
|---|
| | RSS Feed |
|---|
| titleBar | false |
|---|
| max | 5 |
|---|
| showTitlesOnly | true |
|---|
| url | http://community.myob.com/myob/rss/search?q=accounts+list&filter=labels%2Clocation%2CsolvedThreads&location=category%3AMYOBEssentials&search_type=thread&solved=true |
|---|
|
|
|
|


 Yes
Yes
 No
No
 Thanks for your feedback.