
- Created by RonT, last modified by DijanaN on Apr 16, 2020
You are viewing an old version of this page. View the current version.
Compare with Current View Page History
« Previous Version 89 Next »
https://help.myob.com/wiki/x/VIMLAw
How satisfied are you with our online help?*
Just these help pages, not phone support or the product itself
Why did you give this rating?
Anything else you want to tell us about the help?
Australia only
ATO support for businesses during COVID-19
For the latest information about ATO measures and the support available for your business, visit ato.gov.au/coronavirus
The Australian Government has announced a wage subsidy scheme (dubbed JobKeeper) to help businesses impacted by COVID-19.
The JobKeeper scheme will reimburse eligible employers up to $1500 per fortnight for each eligible employee. The scheme will run for six months, backdated to 30 March 2020. From the first week in May, JobKeeper payments will go to eligible employers who have registered for the scheme.
Registering for JobKeeper payments
Check if your business and employees are eligible for JobKeeper payments by visiting business.gov.au.
If eligible, you can register your interest in applying for the scheme via the ATO website. Also, as part of the application process, make sure the ATO has your current banking details so they can pay your JobKeeper reimbursements.
Managing JobKeeper payment in MYOB Essentials
First, let's establish the JobKeeper payment amounts you'll need to pay (before tax) based on an employee's pay frequency:
| Pay frequency | JobKeeper payment amount | Calculation |
|---|---|---|
| Weekly | $750 | 1500 / 2 |
| Fortnightly | $1500 | 1500 X 1 |
| Twice a month | $1625 | 1500 X 26 / 24 |
| Monthly | $3250 | 1500 X 26 /12 |
Also, how you manage these payments in MYOB Essentials will depend on an employee's regular income.
| If an employee is | You'll need to |
|---|---|
| being paid less than the JobKeeper payment | Pay them the full JobKeeper payment. You can choose whether or not to pay superannuation on the topup amount. Leave entitlements will accrue on salary earned, but not on the JobKeeper topup. |
| being paid more than the JobKeeper payment | Pay them in the same way you currently do. |
| stood down (still employed but not working) | Pay them the full JobKeeper payment. You can choose whether or not to pay superannuation on this payment. Leave will not accrue on this payment. |
To make it easy for you, your employees, and the ATO to know how you've paid the JobKeeper payments, you'll set up new JobKeeper pay items. This also means the payments will clearly be shown on your employees' pay slips.
You might also need to create another pay item if you need to stop an employee's JobKeeper payments prior to the end of the scheme. See the FAQs below for details.
If our solution below doesn't meet your needs, you might need to discuss your options with an accounting advisor.
- Click your business name and choose Accounts list.
- Click Add new. The Add new box appears, in the Accounts tab.

Enter a unique Account Number.
Don’t use your real account number for bank and credit card accounts
The number you enter here is only used for tracking the account in MYOB Essentials. You don’t need to use your real bank or credit card account number.
- Enter the Account Name as JOBKEEPER SUBSIDY NO GST.
- Choose Income from the Account Type list.
- Choose NTR from the Tax Rate list.
- Click Save to add the accounts.
Here's our example:
You'll need to set up a pay item for:
- JobKeeper topup payments - this is for employees earning less than the JobKeeper payment amount who must be paid a topup to bring their taxable gross to $1,500 per fortnight.
- JobKeeper start - this is for all employees to let the ATO know when you've started paying an employee JobKeeper payments
- JobKeeper finish - this is only required if you'll stop paying an employee before the JobKeeper scheme finishes. See the FAQs below for details.
Make sure you name these pay items exactly as described. The names have been defined by the ATO to ensure they're accepted for Single Touch Payroll reporting.
Set up the JobKeeper topup pay item
- Go to the Payroll menu and choose Employees.
- Click the employee's name.
- Click the Pay items - earnings & deductions tab.
- Under Earnings, add a new earning called JOBKEEPER-TOPUP.
For the Rate, choose Multiplier of normal rate.
Enter a value of 1 in the Multiply by field.
- As the JobKeeper amount will be considered part of the employee's PAYG income, choose Taxable in the Tax field.
- Decide whether you need to Pay super on this earning.
As per the government's information, you must pay super on an employee's regular pay amount, but you can choose whether to pay super on top-up amounts.
Take a look at these examples for fortnightly paid employees:
Regular fortnightly income Fortnightly income with JobKeeper You must pay super on You can choose to pay super on $1000 $1500 $1000 $500 $1500 $1500 $1500 N/A $3000 $3000 $3000 N/A - Ensure that the option, Accrue annual and sick leave on this earning, is deselected.
- Choose Allowance - Other for the ATO reporting category.
- Click Save. The new earning is now listed for the employee.
Here's our example pay item:
- Click Save. The new earning is now listed for the employee.
- Click Save to save your changes to the employee.
- Click the name of another employee that will receive JobKeeper.
- Click the Pay items - earnings & deductions tab.
- Under Earnings, choose the JOBKEEPER-TOPUP pay item.
- Click Save.
- Repeat steps 14 to 15 for every employee that will be receiving JobKeeper.
Set up a JobKeeper START pay item
- Go to the Payroll menu and choose Employees.
- Click the employee's name.
- Click the Pay items - earnings & deductions tab.
Under Earnings, add a new earning called JOBKEEPER-START-FNxx, where xx refers to the fortnightly period you start making JobKeeper payments (see the following table for help). The pay item name must match this (all capitals, with a hyphen and no spaces) to ensure it's accepted by the ATO for Single Touch Payroll reporting.
FN If your pay date falls within The pay item Name must be this 01 30/03/2020 - 12/04/2020 JOBKEEPER-START-FN01 02 13/04/2020 - 26/04/2020 JOBKEEPER-START-FN02 03 27/04/2020 - 10/05/2020 JOBKEEPER-START-FN03 04 11/05/2020 - 24/05/2020 JOBKEEPER-START-FN04 05 25/05/2020 - 07/06/2020 JOBKEEPER-START-FN05 06 08/06/2020 - 21/06/2020 JOBKEEPER-START-FN06 07 22/06/2020 - 05/07/2020 JOBKEEPER-START-FN07 08 06/07/2020 - 19/07/2020 JOBKEEPER-START-FN08 09 20/07/2020 - 02/08/2020 JOBKEEPER-START-FN09 10 03/08/2020 - 16/08/2020 JOBKEEPER-START-FN10 11 17/08/2020 - 30/08/2020 JOBKEEPER-START-FN11 12 31/08/2020 - 13/09/2020 JOBKEEPER-START-FN12 13 14/09/2020 - 27/09/2020 JOBKEEPER-START-FN13 For the Rate, choose Fixed amount.
Enter a value of $0.01 in the Amount field.
- Choose Taxable in the Tax field.
- Leave the options, Pay super on this earning and Accrue annual and sick leave on this earning deselected.
- Choose Allowance - Other for the ATO reporting category.
Here's our example pay item:
- Click Save. The new earning is now listed for the employee.
- Click Save to save your changes to the employee.
- Click the name of another employee that will receive JobKeeper.
- Click the Pay items - earnings & deductions tab.
- Under Earnings, choose the JOBKEEPER-START-FNxx pay item.
- Click Save.
- Repeat steps 12 to 15 for every employee that will be receiving JobKeeper.
3. Do your first pay under JobKeeper
The first pay you complete under the JobKeeper scheme will look quite similar to any other pay day, but with these changes:
- You'll enter $0.01 against the JOBKEEPER-START-FNxx pay item for each employee you're paying.
- You'll increase the PAYG by 1 cent to balance the pay.
- If you're paying an employee who's earned less than the JobKeeper payment, or the employee has been stood down, you'll enter a value against the JOBKEEPER-TOPUP pay item.
Let's take you through it:
From the Payroll menu, choose Enter pay. The Pay centre page appears.
Under Confirm dates:
In the How often field, choose the pay frequency. For example, if it's a weekly pay, choose Weekly.
In the From and To fields, chose the first and last day of the pay period.
Choose the Pay on date. This is typically the day you're processing the pay run.
Under Select employees to pay:
Select the employees you're paying.
Click in the Email
 column to select which employees you want to email payslips to. You'll need to have entered their email addresses on the Employee details tab of their employee record to be able to email their payslip.
A tick
 shows in the Bank File column if the employee is being paid electronically.
- Under Pay run, click Start pay run. The Pay run page appears where you can review the pay details.
On the Pay run page, enter the number of paid hours against the JobKeeper pay item and reduce their Normal hours by the same amount.:
| If an employee is | Do this |
|---|---|
| being paid less than the JobKeeper payment |
|
| being paid more than the JobKeeper payment | Enter their hours as you normally would against Normal. |
| stood down | Enter the full JobKeeper payment against the JOBKEEPER-TOPUP pay item. |
Here's some examples:
Example 1: Employee paid less than $750 a week
Here's an example of a casual employee who works 20 hours per week and whose pay is less than the JobKeeper amount ($750). For their 20 hours they earn $570.00 a week. Under JobKeeper, they'll now earn $750 a week so we've put their extra $180.00 against the JOBKEEPER-TOPUP pay item. To do this, we need to work out how many hours $180.00 represents by dividing it by the employee's pay rate (180.00 / 28.50 = 6.3158).
Because this is their first JobKeeper payment, the JOBKEEPER-START pay item is also included in their pay with a value of $0.01 against it. To balance the pay, we also increase the PAYG by 1 cent ($244.00 + $0.01 = $244.01)

Example 2: Employee paid more than $1500 per fortnight
Here's an employee whose weekly pay is more than the fortnightly JobKeeper amount ($1500). They normally earn $1742.31 a fortnight. Under JobKeeper, they'll still be paid the same.
So we'll enter their pay as we normally would and record their hours against Normal.
But because it's the first pay they're receiving under the JobKeeper scheme, the JOBKEEPER-START pay item is also included in their pay with a value of $0.01 against it (after doing this first pay for them, we'll need to unlink the JOBKEEPER-START pay item from the employee). To balance the pay, we also increase the PAYG by 1 cent ($818.00 + $0.01 = $818.01)

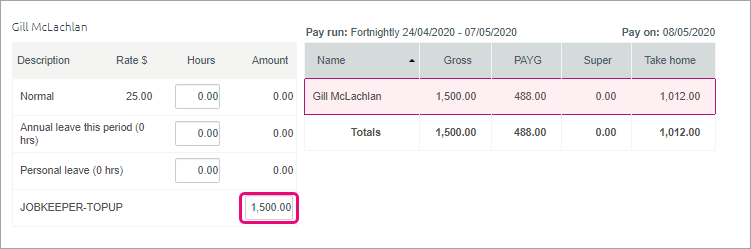
Example 3: Employee who is stood down
Here's an employee who has been stood down. Regardless of what they were earning while working, they'll now receive the full JobKeeper payment.
So in their fortnightly pay we'll enter $1500 against the JOBKEEPER-TOPUP pay item. To do this, we need to work out how many hours $1500 represents by dividing it by the employee's pay rate (1500 / 25 = 60).
We'll record zero hours against Normal and any other pay items.
And because it's the first pay they're receiving under the JobKeeper scheme, we'll enter $0.01 against the JOBKEEPER-START pay item. To balance the pay, also increase the PAYG by 1 cent ($488.00 + $0.01 = $488.01).
After entering the JobKeeper amount and adjusting the employee's Normal amount, complete the rest of the pay run as normal.
After an employee's first JobKeeper pay
If you've submitted the employee's first JobKeeper pay to the ATO via Single Touch Payroll reporting, you can unlink the JOBKEEPER-START pay item from them.
Like this:
- Go to the Payroll menu and choose Employees.
- Click the employee's name.
- Click the Pay items - earnings & deductions tab.
- Under Earnings, click the ellipsis button next to the JOBKEEPER-START pay item and choose Unlink from employee.
- Click Save to save your changes to the employee.
- Repeat from step 2 for all other employees that you've submitted their first JobKeeper pay for.
You will now be able to process subsequent pays in a similar way to the first pay, but without using the JOBKEEPER-START pay item.
4. Receive JobKeeper payments from the government
The JobKeeper payments from the government will be deposited into your nominated bank account. Here's how to record those payments in MYOB Essentials.
If you use bank feeds
The deposits from the government will appear in MYOB Essentials when your bank feed transactions appear.
- If you've already recorded a Receive Money transaction for the deposit (as described below), you can match the bank feed transaction to it.
- If you haven't already recorded a Receive Money transaction for the deposit, you can allocate the deposit to your wages expense account (the same account your wages are paid from). For details about how to do this, see Allocating bank transactions.
If you don't use bank feeds, you'll need to manually record a Receive Money transaction.
Here's how:
To manually record a Receive Money transaction
- Create a Receive Money transaction (Banking menu> Receive money). Need a refresher?
- In the Deposit into field, select the account the money is being deposited into.
- In the Notes field, enter a description for this transaction.
- If you've set the Australian Government up as a contact, choose it from the Payer list, or add the Australian Government as a contact by selecting Add customer from the Payer list and entering their details in the page that appears.
- In the Allocate to field, select the income account you created earlier.
- In the Amount column, enter the JobKeeper payment amount you've received.
Here's our example:
- Click Save.
JobKeeper FAQs
No problem. Set up for JobKeeper as described above. When setting up the JOBKEEPER-START-FNxx pay item, make sure the name includes the applicable code indicating when your started making JobKeeper payments. For example, if you've already paid employees during the period 30/03/2020 - 12/04/2020, you'd name the pay item JOBKEEPER-START-FN01.
Use this table as a guide.
| 01 | 30/03/2020 - 12/04/2020 | JOBKEEPER-START-FN01 |
| 02 | 13/04/2020 - 26/04/2020 | JOBKEEPER-START-FN02 |
| 03 | 27/04/2020 - 10/05/2020 | JOBKEEPER-START-FN03 |
| 04 | 11/05/2020 - 24/05/2020 | JOBKEEPER-START-FN04 |
| 05 | 25/05/2020 - 07/06/2020 | JOBKEEPER-START-FN05 |
| 06 | 08/06/2020 - 21/06/2020 | JOBKEEPER-START-FN06 |
| 07 | 22/06/2020 - 05/07/2020 | JOBKEEPER-START-FN07 |
| 08 | 06/07/2020 - 19/07/2020 | JOBKEEPER-START-FN08 |
| 09 | 20/07/2020 - 02/08/2020 | JOBKEEPER-START-FN09 |
| 10 | 03/08/2020 - 16/08/2020 | JOBKEEPER-START-FN10 |
| 11 | 17/08/2020 - 30/08/2020 | JOBKEEPER-START-FN11 |
| 12 | 31/08/2020 - 13/09/2020 | JOBKEEPER-START-FN12 |
| 13 | 14/09/2020 - 27/09/2020 | JOBKEEPER-START-FN13 |
You can then process your next pay as described in Do your first JobKeeper pay above.
Set up a JobKeeper Finish pay item
If you need to stop paying an employee JobKeeper payments before the scheme finishes, you'll need to create a new pay item and link it to the employee. This lets you to notify the ATO that the employee's payments are finished.
- Go to the Payroll menu and choose Employees.
- Click the employee's name.
- Click the Pay items - earnings & deductions tab.
Under Earnings, add a new earning called JOBKEEPER-START-FNxx, where xx refers to the fortnightly period you stopped making JobKeeper payments (see the following table for help). The pay item name must match this (all capitals, with a hyphen and no spaces) to ensure it's accepted by the ATO for Single Touch Payroll reporting.
FN If the employee's final pay date falls within The pay item Name must be this 01 30/03/2020 - 12/04/2020 JOBKEEPER-START-FN01 02 13/04/2020 - 26/04/2020 JOBKEEPER-START-FN02 03 27/04/2020 - 10/05/2020 JOBKEEPER-START-FN03 04 11/05/2020 - 24/05/2020 JOBKEEPER-START-FN04 05 25/05/2020 - 07/06/2020 JOBKEEPER-START-FN05 06 08/06/2020 - 21/06/2020 JOBKEEPER-START-FN06 07 22/06/2020 - 05/07/2020 JOBKEEPER-START-FN07 08 06/07/2020 - 19/07/2020 JOBKEEPER-START-FN08 09 20/07/2020 - 02/08/2020 JOBKEEPER-START-FN09 10 03/08/2020 - 16/08/2020 JOBKEEPER-START-FN10 11 17/08/2020 - 30/08/2020 JOBKEEPER-START-FN11 12 31/08/2020 - 13/09/2020 JOBKEEPER-START-FN12 13 14/09/2020 - 27/09/2020 JOBKEEPER-START-FN13 For the Rate, choose Fixed amount.
Enter a value of $0.01 in the Amount field.
- Choose Taxable in the Tax field.
- Leave the options, Pay super on this earning and Accrue annual and sick leave on this earning deselected.
- Choose Allowance - Other for the ATO reporting category.
- Here's our example pay item:

- Click Save. The new earning is now listed for the employee.
- Click Save to save your changes to the employee.
When you do a final pay for the employee, enter $0.01 against the JOBKEEPER-FINISH pay item. To balance the pay, also increase the PAYG by 1 cent.

This will inform the ATO (when you send the pay via Single Touch Payroll reporting) that the employee will no longer receive JobKeeper payments.