
You are viewing an old version of this page. View the current version.
Compare with Current View Page History
« Previous Version 4 Next »
https://help.myob.com/wiki/x/vI06Ag
How satisfied are you with our online help?*
Just these help pages, not phone support or the product itself
Why did you give this rating?
Anything else you want to tell us about the help?
You can use the Mail Merge Wizard to send bulk emails to clients.
Why email?
- It's expensive to communicate with your clients via mail with postage costs on the rise.
- More economical and less time consuming to email when your clients have email themselves.
- You are able to send an email with or without attachments.
- You have a record of the email stored in Practice Manager which you can access at any time. These can be accessed from the Client page > Documents tab.
- Emails can be sent to either the primary email address or an Invoice email address if set up.
Microsoft Outlook must be running before starting a mail merge or emailing bills.
Make sure you don't exit out of Outlook while sending emails. If Outlook is closed during the mailing process, refer to Troubleshooting emailing issues.
Email setup
If you haven't used the emailing facility before, you can configure your email details at any time. For information on these steps, refer to Setting up your email.
Email process
There are 2 stages to using the Mail Merge wizard:
- Selecting your clients and the Mail Merge Wizard
- Working the Mail Merge Wizard
Stage 1
- Use the Search functionality provided by the Find Clients or Find Contacts views to create a list of recipients associated with your mail merge. You can use Mail Merge lists, Append to search functionality or use reports which is the option MYOB recommend for bulk emailing. Refer to Using reports with extra field and extra list data filters in a mail merge.
Click Mail merge wizard on the Tasks bar. The Mail Merge Wizard — Select the mail merge method window opens.
Stage 2
- From the Mail Merge wizard screen, select Email.
Click the drop down to select the Send emails to email type.

Australian AE sites may see multiple email types whereas AO will only have Email and Invoice Email.
New Zealand AO sites will also have Tax Email as a selection.
Click Next.
The email addresses of the selected clients and contacts will be verified. If any clients or contacts don't have an email address or the email address is not valid, an error window will be displayed. The error window will list the number of clients that don't have a valid email address. An email cannot be created for these clients.
You can either:Click Continue to continue to the next stage. The listed clients or contacts will not be sent an email.
Click Cancel to exit the Mail Merge Wizard so that you can correct or enter a valid email address, before restarting the mail merge procedure again.
When you create your first mail merge for emails, you will create a new email template. This email template can be re-used. New email templates can be created using the Mail Merge Wizard as required.
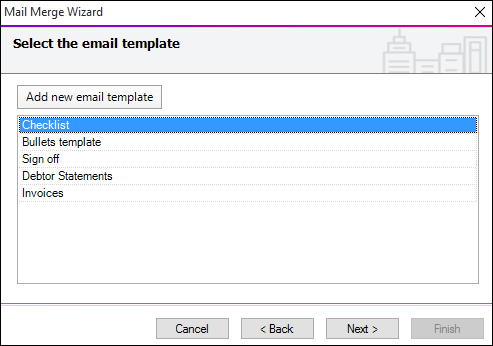
- Select the email template from the list or:
To create a new email template:
Click Add New Email Template. The Maintain Email Templates window opens. See Creating a new email template for more information.
To edit or delete an email template:
Highlight the required email template.
Right-click and select either Edit template or Delete template. See Editing and deleting email templates for more information.
- Click Next.
In this stage of creating a mail merge, you confirm the email details.
- The text in the Email subject field defaults to the content of the selected email template. The Email subject field is mandatory. and you can amend this text.
- If you are attaching a file to the email, there are two attachment options:

- If you select the Create and attach a Word document to this email checkbox, you select the Microsoft Word template to attach to the email. See Creating a mail merge for a Microsoft Word document.
- If you select the Attach a file to the email checkbox, click the ellipsis to find and select a file in the Open window. Click Open to select the file attachment.
- If you don't select a checkbox, an email will be generated based on the email template you selected.
- If you select the Create and attach a Word document to this email checkbox, you select the Microsoft Word template to attach to the email. See Creating a mail merge for a Microsoft Word document.
- In the Email address to be sent from option:
- The Company column lists the companies assigned to the contacts you have selected.
The Email account column shows the email used for sending emails. A separate email can be assigned for each company in the list.
To change the email, click the dropdown and select a new email. Emails in this list are retrieved from your Microsoft Outlook profile. We’ll remember the most recent email you selected.If you wish to use a different Outlook profile:
Click Back.
Close and reopen Microsoft Outlook.
Select a different Outlook profile containing the email account you wish to send from.
In the Mail Merge wizard, click Next, then click the Email account dropdown to see the new list of email accounts to email from.
- To configure the shared mailbox settings, click Configure a shared or delegate mailbox. The table in this window contains a list of manually-configured shared mailboxes. To create a new shared mailbox:
- Enter a name in Shared mailbox/On behalf of (for example, “accounts@myob.com”).
- In the Send using field, select an email from the dropdown list to assign an email to the shared mailbox (for example, “username@yourpractice.com”).
Press [Enter] to save the entry. The entry will now appear in the Email account dropdown.
After creating the new shared mailbox entry, you will need to select the account in the Email account to be sent from section.
To delete a shared mailbox entry, highlight the row and press [Delete].
Make sure that the email account in the Send using column is authorised in Outlook. Click the How do I do this? link for steps on verifying your email.

- Click Next.
The Mail Merge Wizard — Select the Word template for the letters or labels window will only open if you ticked the checkbox Create and attach a Word document to this email.
- Highlight the required template or
To create a new template:
Click Add New Template. At this point Word will open and prompt you to insert your merge fields. See Creating new document templates for more information.
- Click Next.
The Mail Merge Wizard — Select the address to be used window will only open if you ticked the checkbox Create and attach a Word document to this email.
In this stage of creating a mail merge, you select the address types to be used and their order.
The system defaults to your primary address type which is usually Postal. This can be changed, if required, by selecting another available address which will become the first address in the list. This means that the system will use this address first. If this address does not exist for the client, then the system default address will be used, e.g. Postal.
You cannot remove the system default address.
You can add several address types to the Address list and the first address found for each client will be used.
- Select the address type required for the email in the Available panel.
- Click
 to move the address type to the Selected panel. The default, Postal, is used for any contact that may not have another type of address selected as their mailing address. If a number of Available address types are Selected they can be ordered in the list using the up and down arrows.
 - Click Next.
In this stage of creating a mail merge, you select the associated contact type to be used and the sequence. You can select to send the Word document or email to a person at the company by using the contact precedence.
For example, to send a letter or email to a person at the company that has an association type of ‘has Mailing Contact’ or ‘has Director’, the system will address the letter or email to each contact that has this role (i.e., multiple letters or emails will be sent).

The system defaults to using the Main contact, who is the client selected from the Find Clients list. If you are not using mailing contact under Associations, leave the value as default and click Next to continue.
You can add several association types to the Contact list and the first association type found for each client will be used.
If no contacts are found with any of the selected association types, then the letter or email will be sent to the Main contact.
If you have selected an association at this Contact precedence stage, then the following merge fields are to be taken from the associated contact and not the main selected client:
- <<AddresseeLine1>>
- <<Salutation>>
- <<AddresseeMailingName>>
- <<AssociatedAddress>>
- Select the contact precedence required as the addressee from the Available panel.
Click
to move the contact type to the Selected panel. The contact types available for selection are those defined as Relationship Types in the system, for example ‘Has director…’ or ‘Has wife…’
If a number of Available contact precedence types are Selected they can be ordered in the list using the up and down arrows.The default Main is used for any contact that may not have a specific contact precedence selected.
The typical value used here is “has Mailing Contact”, where the system will address the letter to a person at the company.- Click Next.
In this final stage of the mail merge, the system defaults are applied.
Document options are set to Multiple documents and this can't be changed.
Under Other information, the Description is carried through from the Email Subject field.

When you send an email?
- Any documents generated or attached by this process are saved with the client’s files. These can be viewed from the Client > Document tab for each client.
- Emails (and documents) will be sent to the selected email address if it is present; otherwise, they will be emailed to the client’s primary email address.
 Yes
Yes
 No
No
 Thanks for your feedback.