
You are viewing an old version of this page. View the current version.
Compare with Current View Page History
« Previous Version 44 Next »
https://help.myob.com/wiki/x/W6A6Ag
How satisfied are you with our online help?*
Just these help pages, not phone support or the product itself
Why did you give this rating?
Anything else you want to tell us about the help?
You create an employee via the Create Employee Wizard. You can add the employee’s basic information and add the remaining details later. If the practice is using my.logins, you must either create or add a login or cancel the Create Employee Wizard.
- There are mandatory fields in the Step 1 of the wizard.
- When adding an employee, you can change information in previous steps by clicking Back.
- You can click Finish at any time to save information about the employee and exit the wizard.
Ensure you add the correct charge rates for any new employee. Check this before letting them enter their timesheets.
There are 6 steps in the wizard in MYOB Accountants Office and 8 steps in MYOB Accountants Enterprise:
You must complete all the mandatory fields indicated by a red triangle  . The warning icon displays
 ![]() against the field if you haven't entered a value.
against the field if you haven't entered a value.
Open the Create Employee Wizard. See Opening the Create Employee Wizard. The Create EmployeeWizard opens at Step 1—Employee Personal Details.
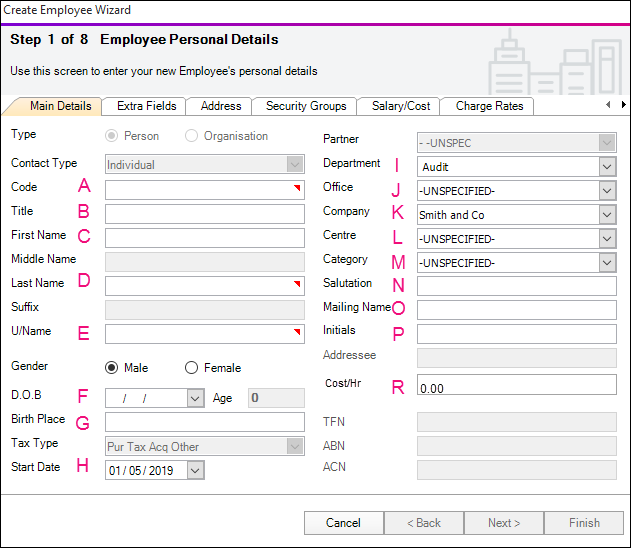
Fill in the relevant fields below:
Label Field Description A Code A mandatory field. The code must be unique; you can't use a code that's used by employee, client, or (AE) supplier. Allows a maximum of 8 alphanumeric characters.
The following characters aren't allowable in the employee Code: ~ ? * | - + + ,
B Title Mr, Ms, Mrs, Miss, Dr, etc C First Name Given Name D Last Name A mandatory field. Enter the surname / family name. E U/Name With MYOB Logins activated, the U/Name field isn't a mandatory field. The employee’s user name generates using the details of their name i.e. first name last name
When MYOB logins aren't activated, this a mandatory field and used to access the database.
AE only - Access Save With Contacts and MAS Integration using your U/name.
F Gender Select Male or Female. G DOB Enter the D.O.B. in the format dd/mm/yyyy or select from the drop-down calendar. The employee’s Age is automatically calculated based on the date of birth. H Birth Place Enter place of birth if required. I Start Date The employment start date. Enter the date in the format dd/mm/yyyy or select from the drop-down calendar. J Department Select the department the employee works for. K Office Select the office the employee works in. L Company Select the company the employee works for (AE). The company defaults for AO. M Centre (AE) Select the cost centre the employee belongs to, if applicable. N Category (AE) Select the category the employee belongs to, for example, Partner, Manager, Accountant. O Salutation The name that the person prefers to be called. For example, Chris or Mrs Lee (which displays in correspondence as Dear Chris or Dear Mrs Lee). P Mailing Name The name used for mail; an alternative to the full name or salutation. The employee’s full name defaults when you tab through the field. Q Initials Enter the employee’s initials, if required.The employee’s initial of their first name defaults when you tab through the field. R Cost/Hr (AO) Enter the cost per hour for the employee if required. Employee costs display on Client WIP reports by default. You can turn this off by changing task permissions. See Changing or updating employee cost rates. - Click Next.
In this area you can enter extra information the practice wants to collect per employee. Extras are set up by your system administrator and can be set as mandatory fields.
To view the configuration, select Maintenance > Maintenance Map > User defined > Extra Fields and / or Maintenance > Maintenance Map > User defined > Extra Lists.
Some examples of extras are:
- qualifications
- specialist field
- employee group.
You must complete all the mandatory fields indicated by a red triangle . The warning icon displays ![]() against the field if you haven't entered or selected a value.
against the field if you haven't entered or selected a value.
To enter the extra details:
Where relevant, enter or select a value for the Extra Fields and Extra Lists.
 indicates an extra field. Type the value in the Value field.
 indicates an extra list. Select a value from the drop-down that displays when you click the Value field.
Click Next. This information transfers to the Employee page > Extras tab from where you can amend it later on.
Enter the address and contact information for the employee in the appropriate fields.
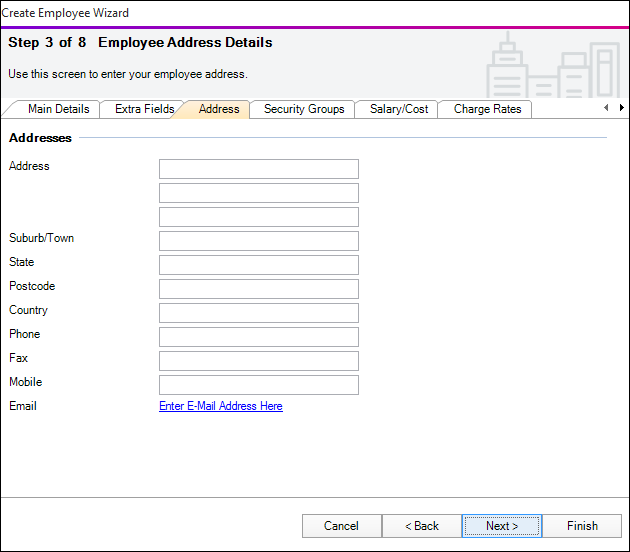
Right-click the Enter Email Address Here hyperlink and overtype the existing text with the employee’s email address.
If you left-click the hyperlink, a new email message opens.
Click Next. This information transfers to the Employee page > Personal tab of the new employee.
- Either:
Accept the default security group: Basic1 (AE) or Everyone (AO)
or
Select a different security group for the employee:

Click the default row under the Group heading, for example.
Click the ellipse button. The Find Security Group window opens.
Click Search. All Security Groups and their descriptions are listed.
Select the Security Group you want for the employee.
Click OK. The Security Group is displayed and the Find Security Group window closes.
Click Next. This information transfers to the Employee page > Security Groups tab where it can be edited at a later stage.
Employee Salary/Cost is used to record salary, benefits and leave details for an employee. This information is a basis for managing resources for the practice.
The salary ranges, benefits and leave are created in the system by your system administrator using Maintenance > Employee > Employee Benefit Type.
Unavailable fields
A number of fields are unavailable (greyed out) in this step of the wizard:
Salary/Benefit section:
Employee Total (Current)—the total cost of the employee calculated from the figures entered in the Salary/Benefit area.
Hrs/Week—the employee’s weekly work hours as defined by their employee category.
Hrs/Year—the employee’s yearly work hours as defined by their employee category.
Leave section:
Productive—the number of leave days that were productive.
Unproductive (Current)—the number of leave days that were unproductive.
This area can be used to calculate an employee's Salary details and calculate a cost per hour. Otherwise you can enter a cost/hour.
Enter the employee’s Salary/Benefit details:
Enter the employee’s Start Date. Enter the date in format dd/mm/yyyy or select it from the drop-down calendar.
Enter the employee’s End Date (if applicable). Enter the date in format dd/mm/yyyy or select it from the drop-down calendar.
Select the Benefit Type from the drop-down.
Enter any Details to be recorded with the benefit. This field is limited to a maximum of 50 alphanumeric characters.
Enter the Annual Value amount. This figure is used when calculating the employee’s cost rate.
Click the Include checkbox. This includes the salary amount in the employee’s cost rate calculation.
If necessary, overtype the Cost/Hr amount. This is the cost per hour for the employee, calculated from the figures entered in the Salary/Benefit table and the assigned number of working hours.
Enter the Leave details for the employee:
Enter the employee’s leave Start Date. Enter the date in format dd/mm/yyyy or select it from the drop-down calendar.
Enter the employee’s leave End Date. Enter the date in format dd/mm/yyyy or select it from the drop-down calendar.
Enter the number of Days leave.
Select the type of leave from the drop-down.
Click the Productive checkbox, if required.
Click Next. You will need to revisit the Employee page > Salary/Cost tab once the time table details are input. The system can then calculate the cost per hour once the yearly hours are displayed.
You enter the employee’s hours of work in Step 5—Time Table. You can specify the individual hours of work for each day the employee works including their lunch breaks.
Enter the total time the employee must work each day of the week. The Total weekly work hours is automatically calculated based on the daily entries made. Enter the daily total time in the format 00.00, e.g., for an seven and a half hour work day enter 07.50.
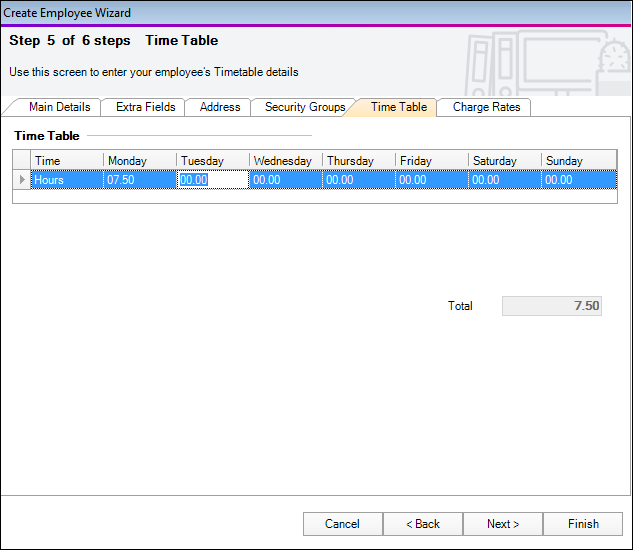
Click Next.
The employee Charge Rate is the amount charged for the employee’s work.

Enter the Start Date of the employee charge rate. Enter the date in the format dd/mm/yyyy or select it from the drop-down calendar.
Enter the End Date (if applicable) of the employee charge rate. Enter the date in the format dd/mm/yyyy or select it from the drop-down calendar.
Select the Charge Rate Type from the drop-down list.
Enter the correct Hourly Rate for the employee and press Enter.
Repeat Steps 1 to 4 if multiple charge rates are required.
Click Next (AE) or Finish (AO). This information transfers to the Employee page > Charge Rates tab where it can be edited at a later stage
You can enter the employee’s hours of work in one of two ways:
- Either:
(A) Enter the number of hours the employee will be working for each day of the week. Enter the daily total time in the format 00.00, e.g., for an seven and a half hour work day enter 07.50 or
(B) Click Category to apply the Standard Hours of work set up for the employee category you assigned in Step 1.
Review the Enforce Time Table setting.
For a full time employee, change the enforce option to Daily if they're required to enter a minimum of their standard hours each day.
For a part time employee who works non standard hours and days, leave the enforce set to None.
- Click Next.
Accountants Enterprise with Practice Manager only
Step 8—Authorisation of the wizard sets up the permissions for:
the employee to authorise bills and timesheets of others.
who can authorise the employee’s bills and timesheets.
who the employee can authorise on behalf of.
who can authorise on the employee’s behalf.
who can give secondary authorisation to an employee’s timesheets and bills.
The fields in this window are identical to those on the Employee page > Authorisation tab. If you know which permissions you want to give to the employee you can complete this step now in the wizard. Alternatively, you can click Finish and create the permissions later using the Employee page > Authorisation tab.
Click Finish to complete the set up or click Back to review the details before clicking Finish. The Employee page for the new employee opens.
In AE, if you need to change the timesheet to a daily, periodic or calendar view for the employee, see Changing timesheet data entry modes
 Yes
Yes
 No
No
 Thanks for your feedback.