| HTML |
|---|
<span data-swiftype-index="true"> |
| HTML Wrap |
|---|
| Australia only Online invoice payments now offers businesses the option to pass on surcharging fees associated with online payments to their customers. That means that the 1.8% surcharge for card payments (Amex, VISA, Mastercard, Apple Pay or Google PayTM) can now be added to a customer invoice. BPAY is excluded in this phase, so you will continue to be charged for payments received via BPAY. How does it work?If you're already using online payments, you can turn on customer surcharging. This will apply to all customers who make payments using a credit or debit card. When customer surcharging is turned on, the 1.8% surcharge fee can be passed on to your customers. The 1.8% surcharge fee is GST inclusive, regardless of whether the invoice includes GST. Next, you just need to create and send invoices like you normally would. | UI Expand |
|---|
| | title | Turn surcharging on or off for all invoices |
|---|
| To turn surcharging on or off for all invoicesClick your business name and choose Sales settings. Click the Payments tab.In the Invoice payment options > Online section, click Edit preferences:
 Image Removed Image Removed
Select the option Enable the option to pass on credit card surcharges and choose an income account to record late charges and surcharges.
 Image Removed Image Removed
Click Save. Now, you just need to create and send invoices like you normally would. See Creating invoices and Emailing, printing or downloading invoices if you need a refresher. | UI Text Box |
|---|
| Do you create recurring invoices? The option to pass on customer surcharging for all invoices isn't available yet for invoices created from recurring transactions. Instead you'll have to enable this before you send each invoice, by opening it and selecting the Apply Surcharge option. See 'To turn surcharging on or off for a single invoice', below. |
To turn surcharging off for all invoices, repeat these steps and select the option Don't surcharge credit card payments. | UI Expand |
|---|
| title | Turn surcharging on or off for a single invoice |
|---|
| Once you've turned on customer surcharging (see the steps above), you can choose to turn surcharging on or off for individual invoices. - Create the invoice as you normally would.
Select or deselect the Apply surcharge option.
 Image Removed Image Removed | UI Text Box |
|---|
| If you change this setting on an invoice you've already sent, you'll need to save your changes and re-send the invoice. |
- Complete the invoice as normal and send it to your customer.
|
| UI Expand |
|---|
| title | How the surcharging looks to your customers |
|---|
| The customer will receive the invoice as they normally would. When they click on Pay Now, they'll be asked to select their payment method. 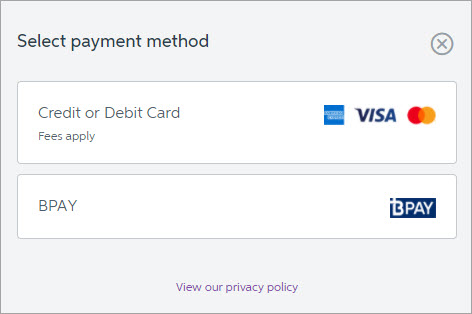 Image Removed Image Removed
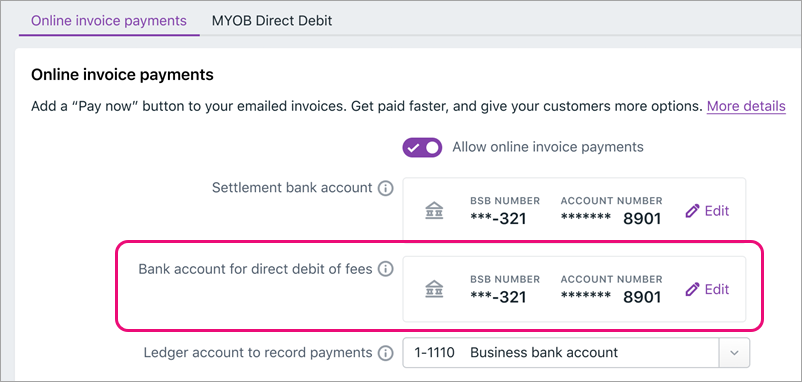
If you use online payments, you might need to edit the bank account your customers' payments go into, or the account your fees and charges are debited from. To learn more about the payment details that appear on your invoices, quotes and statements, see Set up your payment details. You can edit your bank details in the merchant portal, accessible from MYOB. | UI Text Box |
|---|
| If a customer chooses to pay via BPAY, they will not incur a surcharge fee. However, you will continue to be charged any fees related to payments received via BPAY. | When they select Credit or Debit Card, they'll be asked to enter their card details. The amount owing, the surcharge fee, and total amount due (invoice and surcharge fee) will be listed as shown below.  Image Removed Image Removed
When they click Pay, the payment will be processed.
| UI Expand |
|---|
| title | Handling the payment |
|---|
| Handling the paymentWhen a customer makes a payment, the details will automatically be entered into your MYOB business, and the invoice will be closed off. We'll also send you an email with a detailed break down of the payments. Note that the payments you receive will be recorded as unmatched and the surcharge fees will be recorded under the ledger account you chose when you turned on surcharging (see the steps above). The surcharge amount will have the same reference number as the received payment, but with an additional 'S' at the end. 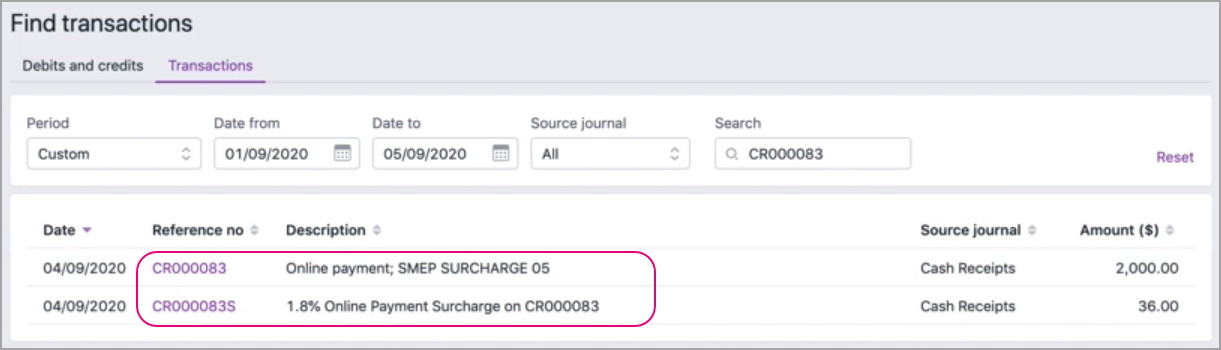 Image Removed Image Removed
For example, say you receive three online payments on Monday. The payment details of each transaction will be listed as unmatched. MYOB will deposit the total of the three payments overnight into your bank account as one lump sum. So on Tuesday, you would match the deposited transaction that will appear on your bank feed and bank statements. For more information see Matching bank transactions. |
Google Pay is a trademark of Google LLC. | HTML |
|---|
<h2><i class="fa fa-comments"></i> FAQs</h2><br> |
| UI Expand |
|---|
| title | What are the fees and charges related to online payments? |
|---|
| - Any of your invoices paid using a credit card (AMEX, Visa, Mastercard, Apple Pay or Google PayTM); via our online payment service, will surcharge the payer a 1.8% fee (incl. GST)
- All fees related to invoices paid using BPAY; via our online payment service, will be charged to your business and not the payer
- As the surcharge amount will be settled along with the invoice amount into your bank account, you'll continue to be charged at 1.8% of the total settled amount that is deposited into your account
- The $0.25 per transaction fee will only be charged to your business and not the payer.
|
| UI Expand |
|---|
| title | Where do I find the surcharge amounts? |
|---|
| Where do I find the surcharge amounts?You'll see individual surcharge amounts in your transactions list: - Go to Banking and choose Find transactions.
- Click the Transactions tab. A list of transactions appear.
- The surcharge amount will have the same Reference no as the received payment, but with an additional 'S' at the end.
Image Removed
|
| UI Expand |
|---|
| title | How do I change the bank account my fees and charges are debited from? |
|---|
| How do I change the bank account my fees and charges are debited from?You’ll need to verify any new bank accounts you add the same way you did when you first set up online payments. |
| CSS Stylesheet |
|---|
/* Style the feedback div. TODO: Make this responsive */
#feedback {
	font-family: Arial,Helvetica,sans-serif,Verdana;
	width:500px;
	margin-top:0px;
	padding-top:0px;
	padding-bottom:100px;
}

/* Style the Yes and No options and images */
.yes {
	font-weight:bold;
	float:left;
	padding-top:10px;
	vertical-align:middle;
}

.yes img, .no img {
	vertical-align:middle;
	padding-left:10px;
	padding-right:10px;
	padding-bottom:10px;
	padding-top:10px;
	height: 40px;
}

.no {
	font-weight:bold;
	float:right;
	vertical-align:middle;
	margin-right:250px;
	padding-top:10px;
}

/* Style the div containing the checkboxes and comments field */
.moreinfo {
	display:none;
    margin-top:100px;
    line-height:10px;
}

p.moreinfo {
	padding-top:10px;
}

/* Style the confirmation message when a user submits the form */
#submitted {
	display:none;
	border: 1px solid #7FBA00;
	background-color: #ECF5D9;
	position:relative;
	margin-top:100px;
	height:70px;
	width:104%;
}

#submitted img {
	vertical-align:middle;
	padding:20px;
	height:35px;
}

/* Comments heading */
#commentsHeading {
	display:none;
	padding-bottom:10px;
	margin-top:10px;
}

/* Style the comment box */
textarea#comments {
width:100%;
height:100px;
vertical-align:top;
border: #5E2080 2px solid;
font-family: Arial,Helvetica,sans-serif,Verdana;
font-size: 11pt;
display:none;
}

/* Style the positive comment box */
#positiveComments {
width:100%;
height:100px;
vertical-align:top;
border: #5E2080 2px solid;
font-family: Arial,Helvetica,sans-serif,Verdana;
font-size: 11pt;
}

#positiveCommentsHeading {
margin-top:100px;
padding-bottom:10px;
}

/* Remove the resizing option from the comments text area */
textarea#comments {
resize: none;
padding:10px;
}

textarea#positiveComments {
resize: none;
padding:10px;
}

#supportText {
font-size:11pt;
margin-right:-50px;
padding-bottom:20px;
color: #888;
display:none;
}
#positiveCommentText {
font-size:11pt;
margin-right:-50px;
padding-bottom:20px;
color: #888;
}


#inlineSupportInfo {
display:none;
margin-left:28px;
padding-bottom:20px;
line-height:20px;
color:#888;
margin-top:-5px;
}

#inlineSupportInfo a {
color:#5E2080;
}

#inlineMoreHelpInfo {
display:none;
margin-left:28px;
padding-bottom:20px;
line-height:20px;
color:#888;
margin-top:-5px;
}

#inlineMoreHelpInfo a {
color:#5E2080;
}

/* Style the checkbox list */
#feedback input[type=checkbox] {
display:none;
}

#feedback input[type=checkbox] + label:before {
content: "";
display: inline-block;
width: 18px;
height: 18px;
vertical-align:middle;
margin-right: 8px;
background-color: #fff;
border: #5E2080 2px solid;
border-radius: 100px;
margin-top:0px;
margin-bottom:0px;
}

#feedback input[type=checkbox]:checked + label:before {
content:"\2714";
color:white;
background-color: #5E2080;
text-align:center;
line-height:18px;
}

/* Style the checkbox labels */
label {
display:block;
vertical-align:middle;
}

/* Style the Submit button and its various states (including disabled).  */
/* TODO: Set up a subclass of button to use here instead */
button {
background: #5E2080;
border-top: 1px solid #5E2080;
border-right: 1px solid #5E2080;
border-bottom: 1px solid #5E2080;
border-left: 1px solid #5E2080;
border-radius:30px;
padding: 10px 32px;
vertical-align:middle;
color:#fff;
float:right;
font-family: Arial,Helvetica,sans-serif,Verdana;
font-weight:bold;
font-size: 11pt;
margin-right:-25px;
}

button:hover {
background: #4D1A6B;
border-top: 2px solid #4D1A6B;
border-right: 2px solid #4D1A6B;
border-bottom: 2px solid #4D1A6B;
border-left: 2px solid #4D1A6B;
cursor: pointer;
}

button:active {
background: #4D1A6B;
border-top: 2px solid #4D1A6B;
border-right: 2px solid #4D1A6B;
border-bottom: 2px solid #4D1A6B;
border-left: 2px solid #4D1A6B;
cursor: pointer;
}

input#searchTerm{
line-height:15px;
font-size: 11pt;
height:15px;
width:200px;
margin-left:-5px;
margin-top:10px;
padding:10px;
}

#searchButton {
margin-left: 10px;
cursor: pointer;
font-size: 14pt;
}

#positiveFeedback {
display:none;
}

button[disabled],
button[disabled]:hover,
button[disabled]:active {
background: #ddd;
border-top: 1px solid #ddd;
border-right: 1px solid #ddd;
border-bottom: 1px solid #ddd;
border-left: 1px solid #ddd;
color: #8f8f8f;
box-shadow: none;
-moz-box-shadow: none;
-webkit-box-shadow: none;
}
p#positiveCommentText, p#supportText {
    text-transform: none;
} |
| HTML Wrap |
|---|
| width | 15% |
|---|
| class | col span_1_of_5 |
|---|
| | |
| HTML Wrap |
|---|
| float | left |
|---|
| class | col span_1_of_5 |
|---|
| | Panelbox |
|---|
| name | magentagreen |
|---|
| title | Related topics |
|---|
| |
|
|


 Yes
Yes
 No
No
 Thanks for your feedback.