- Created by KylieN, last modified by AdrianC on Oct 27, 2021
https://help.myob.com/wiki/x/4IKO
How satisfied are you with our online help?*
Just these help pages, not phone support or the product itself
Why did you give this rating?
Anything else you want to tell us about the help?
If you regularly make the same types of payments, you can set up rules to automatically allocate these to your MYOB Essentials accounts, saving you from manual data entry. For example, this can be helpful for regular utility bill payments or purchases you make a lot, like petrol.
You can set up a rule using a unique description and amount in the bank transactions you import into MYOB Essentials. When the same type of transaction always uses the same text and amount, you can use it to automatically allocate the transaction to the correct MYOB Essentials account.
There are two ways you can create a rule:
- from a bank transaction if you want to create a rule based on an existing transaction, or
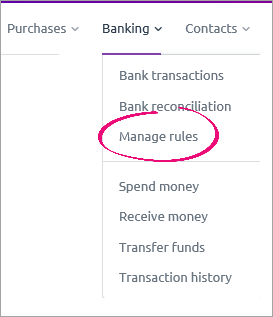
- from the Banking menu > Manage rules.
Need to change or delete an allocation rule? See Managing rules.
Before creating a rule, it's a good idea to view your accounts list to see if you have an appropriate account to allocate the rule to. If you need to create or edit an account, see Adding, editing and deleting accounts.
To create an allocation rule from a bank transaction
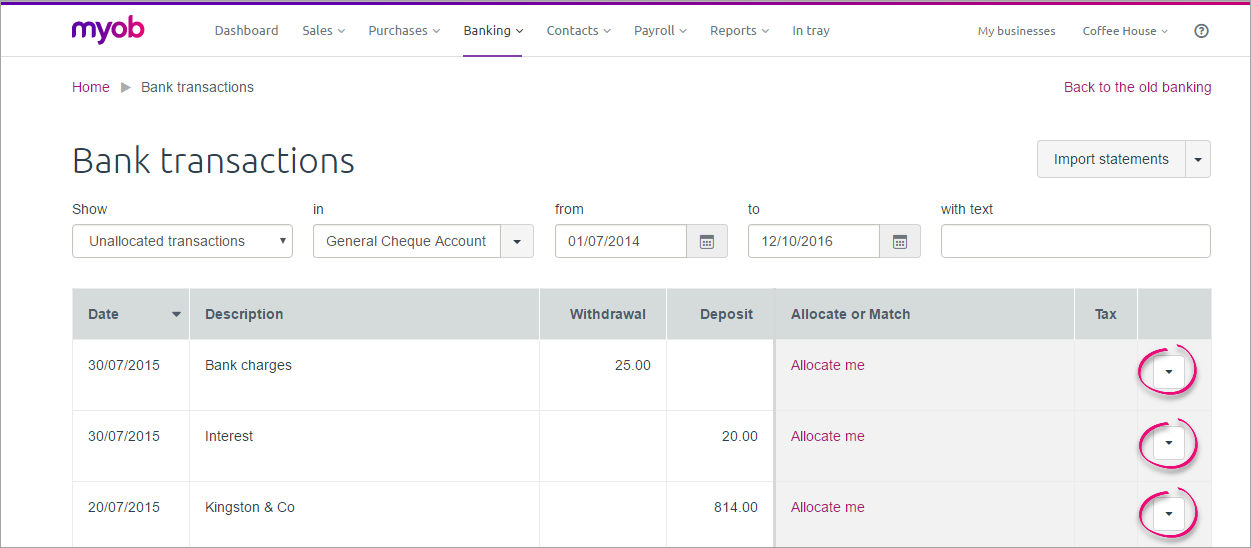
- Go to the Banking menu and choose Bank transactions. The Bank transactions page appears, showing your bank transactions from your bank feed or imported bank statements.
- Find the bank transaction you'd like to base your allocation rule on and click the down arrow in the right column to expand the transaction.

- Click the Create rule button.
- Enter a Name for the rule.
- In the Conditions section, choose either:
- Description - if the rule is to be applied based on its description. For example, edit the description so that it will match all transactions you want this rule to apply to. This field is not case-sensitive. For example, if the field says "POS 0392342-BUNNINGS NUNAWADING VI", you might change it to simply say "BUNNINGS".
- Amount - if the rule is to be applied based on a specific amount. You can then enter the amount.
- If required, click Add condition to add additional conditions for this rule.
- In the Allocate to section, select percentage (%) or dollar amount ($).
Allocating by percentage
To allocate by %, type the percentage amount in the Percentage box, select the account in the Account drop down, and select the tax code from the final drop down.
Add more than one percentage allocation by repeating the above steps in the boxes stacked below the row you're on. Filling out those boxes will make additional allocation boxes appear. Note that the total percentage amount must equal 100%.
Allocating by dollar amount
To allocate by $, type the amount in the Amount box, select the account from the Account drop down, and select the tax code from the final drop down.
To allocate the full amount to one account, leave the Amount field prefilled with Full amount and only select an account and tax code.
To allocate split amounts, fill out the first row to make additional allocation rows appear. Additional rows will have the Amount field prefilled with Remaining amount. For your last allocation destination, leave the Amount field prefilled and only select an account and tax code. Your screen will look something like this:

- (Australia only) If the transactions which match this rule are reportable contractor payments, select the mark as reportable option and choose a supplier from the drop down list.
If you'd like to assign this allocation to a supplier, select Assign to supplier and choose a supplier from the dropdown list.
- When you've filled out the allocation rule to your liking, click Save. Your new allocation rule will apply to all past and future transactions, and the rule will be saved under your Manage rules.
To create rules from the Allocation rules page
You don't need to base your allocation rules on the transactions that have already appeared in your bank feed or bank statement. If you already know the transactions you'll be allocating, just go to the Allocation rules page (Banking > Manage rules) and set up your rules there.

- Go to the Banking menu and choose Manage rules. The Allocation rules page appears.
- Click Create Rule. The Create rule page appears.

- Enter a Name for the rule to make it easy to identify later.
In the 'Conditions' section - Select if the rule will be based on a Description or Amount.
- If Description - enter the text (word or phrase) which, if it's contained in the transaction description, the rule will be applied.
- If amount - Enter the Equals amount.
- (Optional) Click Or or Add condition to refine your rule.
In the 'Allocate to' section - In the Allocate By field, select % or $ to define if the rule will allocate matching transactions by a percentage or dollar amount.
- To allocate by %, type the percentage amount in the Percentage box, choose the account in the Account drop down, and select the tax code from the final drop down. Add more than one percentage allocation by repeating the above steps in the boxes stacked below the row you're on. Filling out those boxes will make additional allocation boxes appear. Note that the total percentage amount must equal 100%.
- To allocate by $, type the amount in the Amount box, choose the account from the Account drop down, and select the tax code from the final drop down. To allocate the full amount to one account, leave the Amount field prefilled with Full amount and only select an account and tax code. Your screen will look something like this:
- To allocate split amounts, fill out the first row to make additional allocation rows appear. Additional rows will have the Amount field prefilled with Remaining amount.
- For your last allocation destination, leave the Amount field prefilled and only select an account and tax code. Your screen will look something like this:

- (Australia only) If the transactions which match this rule are reportable contractor payments, select the Mark as reportable option, and select a supplier from the drop down list.
- If you'd like to assign this allocation to a supplier, click Assign to supplier and select a supplier from the dropdown list.
- When you've filled out the allocation rule to your liking, click Save. Your new allocation rule will apply to all past and future transactions and the rule will be saved.
For more information on editing or deleting your allocation rules, see Managing rules.

 Yes
Yes
 No
No
 Thanks for your feedback.