
- Created by admin, last modified by ErikV on May 11, 2016
You are viewing an old version of this page. View the current version.
Compare with Current View Page History
« Previous Version 13 Next »
https://help.myob.com/wiki/x/bQiy
How satisfied are you with our online help?*
Just these help pages, not phone support or the product itself
Why did you give this rating?
Anything else you want to tell us about the help?
Create, edit or delete your allocation rules from Manage rules - found under the Banking dropdown.

You can choose whether to allow MYOB Essentials to automatically match your transactions, and you can set up rules to automatically allocate the transactions that appear on your bank feed.
Transactions that are auto-matched or automatically allocated based on your rules will appear in the Bank transactions page with a magic wand icon next to them.

If a match or allocation is wrong, you can unmatch or unallocate the transaction. See Allocating bank transactions and Matching bank transactions.
Auto-matching
By default, MYOB Essentials will auto-match a transaction if there's one exact match available. You might want to turn this off if you've got a lot of transactions for the same amount, or if you find transactions are often incorrectly auto-matched.
If you don't want transactions to be auto-matched, you can deselect the Auto-match bank transactions to MYOB Essentials transactions option from the Manage rules page.
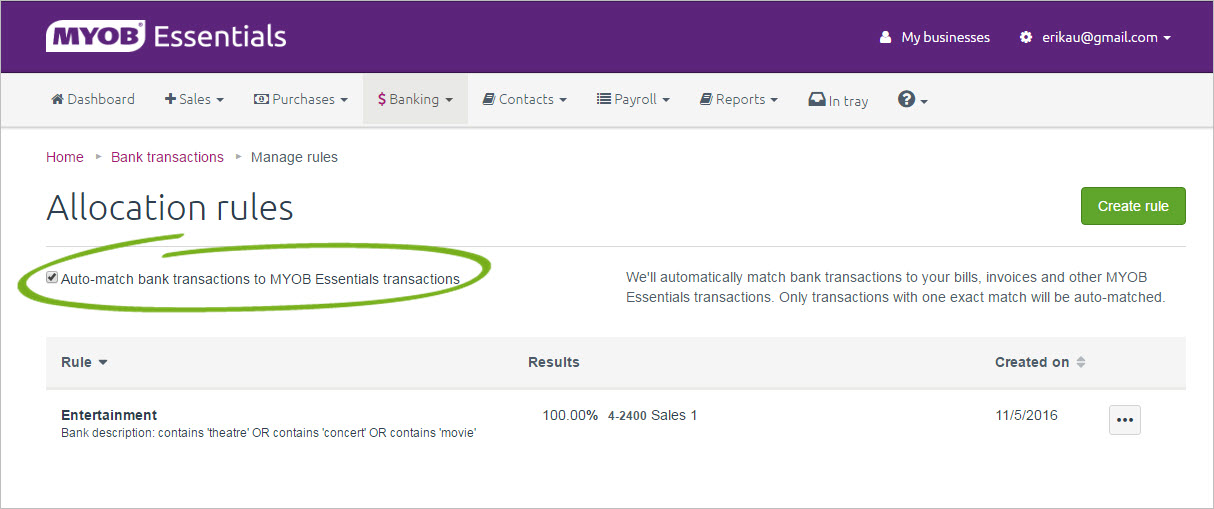
If auto-matching is turned off, transactions with one match will show on the Bank transactions page as having 1 match available and you'll need to manually confirm the match yourself. See Matching bank transactions.
Allocation rules
If you regularly receive certain transactions, you can set up an allocation rule. MYOB Essentials will use these rules to allocate the amounts of all imported bank transactions that meet the criteria to the nominated MYOB Essentials account.
You can set up a rule using any unique description or amount (or multiple descriptions or amounts) in the bank transactions you import into MYOB Essentials. When the same type of transaction always uses the same text or amount, you can use it to automatically allocate the transaction to the correct MYOB Essentials account.
Banks provide only brief descriptions for transactions, but they usually contain enough information to identify the relevant MYOB Essentials account. Allocation rules won’t cover all transactions, but they save significant time once you’ve set them up. They will apply every time you import new bank transactions, but you can edit or delete them at any time.
Make sure the description text is suitable
To make sure the description text of a bank transaction is suitable to be used as an allocation rule, check that:
- the same text appears regularly in transactions,
- the text is unique, and
- if the text is long, it can be shortened easily and still refer to all items belonging to a certain account.
Go to the Banking menu and choose Bank transactions. The Bank transactions page appears, showing your bank transactions from your bank feed or imported bank statements.
If you're using the new banking:
- Find the bank transaction you'd like to base your allocation rule on and click the down arrow in the right column to expand the transaction.
- Click the Create rule button.
- Edit the description in the Name field so that it will match all transactions you want this rule to apply to. This field is not case-sensitive.
For example, if the field says "POS 0392342-BUNNINGS NUNAWADING VI", you might change it to simply say "BUNNINGS". - Choose your conditions from the drop down lists
- Description, select Contains, Begins with, or Ends with from the drop down menu, and type the description text.
- For an Amount, Equals is automatically selected. Type the numerical amount.
- To create more than one condition, click Add conditionand repeat step 4.
Repeat steps 4 and 5 until you're satisfied with the rule's conditions - In the Allocate to section, start by choosing whether you want to allocate by percentage (%) or dollar amount ($)
- For allocating by percentage (%), type the percentage amount in the Percentage box, select the account in the Account drop down, and select the tax code from the final drop down.
Add more than one percentage allocation by repeating the above steps in the boxes stacked below the row you're on. Filling out those boxes will make additional allocation boxes appear. Note that the total percentage amount must equal 100%. - To allocate by dollar amount ($), type the amount in the Amount box, select the account from the Account drop down, and select the tax code from the final drop down.
Filling out the allocation boxes will make additional allocation boxes appear below. Repeat the above steps to create additional allocation destinations.
- For allocating by percentage (%), type the percentage amount in the Percentage box, select the account in the Account drop down, and select the tax code from the final drop down.
- If you'd like to assign the allocation to a supplier, check the Assign to supplier box and select a supplier from the drop down list.
- When you've filled out the allocation rule to your liking, click Save. Your new allocation rule will apply to all past and future transactions, and the rule will be saved under your Manage rules.
If you're using the old banking:
Find the bank transaction you'd like to base your allocation rule on and click the transaction description. The Deposit details or Withdrawal details window appears.
Click Create rule. The Create Allocation Rule window appears. If you can't see this window, try scrolling down the page.
- Edit the description in the If your bank transaction description contains field so that it will match all transactions you want this rule to apply to. This field is not case-sensitive.
For example, if the field says "POS 0392342-BUNNINGS NUNAWADING VI", you might change it to simply say "BUNNINGS". - In the and the amount is field, choose whether you want the rule to apply to all transactions matching this description, or only those with the same amount as the transaction you're basing the rule on. This can be useful if, for example, your regular phone and internet bills are from the same company, but for different amounts.
- In the allocate the transaction by field, choose whether you want to split the allocation by percentage or by dollar amount.
If you're not splitting the transaction between more than one account, choose percentage. - In the Percentage or Amount field, enter the percentage or amount you want to allocate to the first account. If you're allocating the whole amount to one account, leave this value as 100% or Full amount.
- In the Account field, choose which account you want to allocate this amount to. The Tax rate field is filled in automatically, but you can change it if you want.
- If you're splitting the transaction between more than one account, enter the percentage or amount in the next line and choose the account and tax code.
- Repeat step h until the full amount has been accounted for.
Click Save. The rule is created and applied to any unallocated or unmatched transactions.
You don't need to base your allocation rules on the transactions that have already appeared in your bank feed or bank statement. If you already know the transactions you'll be allocating, just go to the Manage allocation rules page and set up your rules there.
- Go to the Banking menu and choose Manage allocation rules.
Click Create allocation rule. The Create Allocation Rule window appears. If you can't see this window, try scrolling further down the page.
Complete the fields at the top of the Create Allocation Rule window.
In the first field, enter the text that you want to use to allocate transactions.
Note that if you’re creating an allocation rule while you’re allocating a transaction to a MYOB Essentials account, this field will contain the transaction’s Description text. If necessary, edit the text.Case-sensitivity
The text you enter here will not be treated as case-sensitive.
- From the first drop-down list, select whether you want to allocate transactions with amounts equal to the amount you’ll choose in step c, or allocate transactions of any amount.
- If you chose equal to in step b, enter an amount in the field that becomes active. Only transactions with amounts equal to this amount will be allocated.
- From the second drop-down list, select whether you want to allocate transaction amounts by dollar amount, or percentage.
- In the Account column of the list, select the MYOB Essentials account that you want to allocate transaction amounts to.
- If you want to split transaction amounts between two or more MYOB Essentials accounts:
- Click Split Amount or Split Percentage (note that this button name changes according to the option you chose in step d of step 3).
A new line appears in the list. - Select a second MYOB Essentials account and amount or percentage.
- Repeat for any other accounts you want to split transaction amounts between.
- Enter an Amount or Percentage against the first account, with the balance against the other accounts (note that this column name changes according to the option you chose in step d of step 3).
- Click Split Amount or Split Percentage (note that this button name changes according to the option you chose in step d of step 3).
- Click Save to save the allocation rule.
- Go to the Banking menu and choose Manage allocation rules. The Allocation Rules page appears, displaying details of all existing allocation rules in the list.
- Click the allocation rule you want to edit. The Edit allocation rule window appears, displaying details of the allocation rule.
- Make any changes.
- Click Save to save your changes.
- Go to the Banking menu and choose Manage allocation rules. The Allocation Rules page appears, displaying details of all existing allocation rules in the list.
- Select the allocation rule you want to delete and click Delete. A confirmation message appears.
- Click Yes to delete the allocation rule.
 Yes
Yes
 No
No
 Thanks for your feedback.