
How satisfied are you with our online help?*
Just these help pages, not phone support or the product itself
Why did you give this rating?
Anything else you want to tell us about the help?
You can customise the appearance of your invoices and quotes by choosing a pre-designed template and selecting the colours you want to use. The theme you choose for your invoices and quotes will automatically be used for all invoices you print and send to your customers until you decide to change it.
You can also enter the details of how your customers can pay you. This information will be included in the How to pay section of your invoices.
And if you email invoices and quotes to your customers, you can change the default content of the email you send with quotes or invoices.
From this page, you can:
- Choose a layout type
- Change the look of your invoices and quotes
- Choose your default payment terms
- Set up your How to pay details
- Set up your default invoice and quote emails
Choose a layout type
Depending on whether you include items or quantities on your invoices and quotes, you can choose the layout type that shows only the columns you actually use.
On the Layout type tab of the Invoice and quote settings page, you can choose which type of layout best suits your business:
- Items and services - allows you to enter quantities on each line of your invoices and quotes. You can also speed up data entry by including the items you've already set up in MYOB Essentials. You can leave these fields blank on any or all lines of your invoices and quotes, but the columns will still be visible.
- Services - allows you to enter a description on each line, and does not include columns for items or quantities. This gives you a simple, clean look for date-based or professional services, or if you want to write a different description for each of your sales.
When you select a layout, a sample appears, showing which columns will be available for you to use on your invoices and quotes, along with some more information to help you decide if the layout is right for you.

Note that when you've chosen a layout, it will be used for all of your invoices and quotes until you change it on this page. You won't be able to change it while you're entering an invoice or quote.
Change the look of your invoices and quotes
From the Settings menu, choose Invoice and quote settings. The Invoice and quote settings page appears.
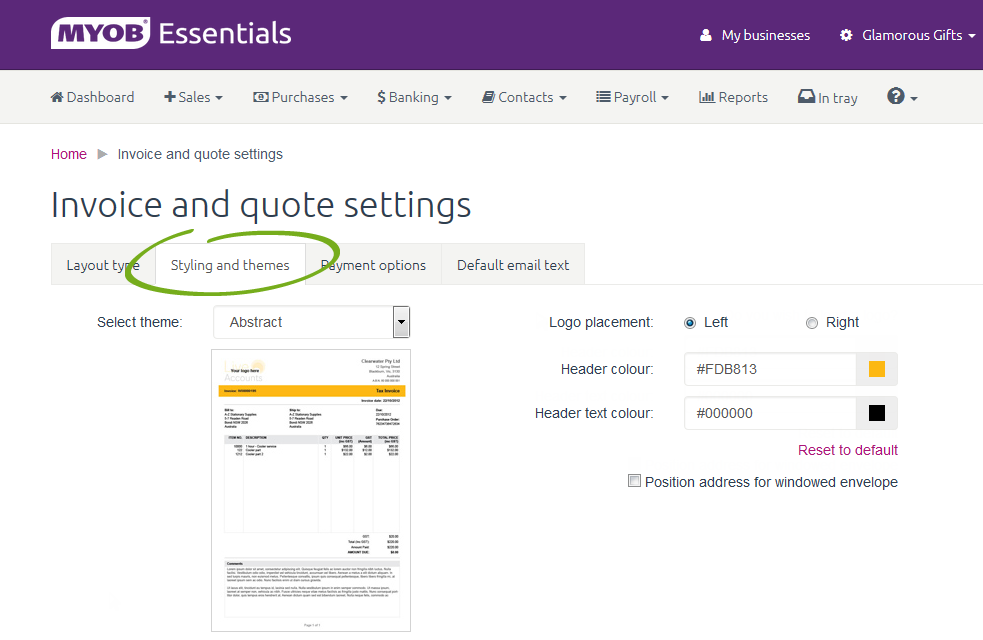
- In the Select theme list, choose the invoice template you want to use. You can view a preview of the invoice at any time by clicking Preview.
- Select where you want your logo to appear on the invoice by choosing the Left or Right option for Logo placement.
If you haven’t already uploaded a logo, you can do so by clicking the Do you wish to load a logo? link on the right hand side of the page. See Logo. - Choose a Header colour and Header text colour by clicking in the coloured boxes displaying the current colours and selecting new colours in the popup boxes.
Alternatively, if you know the hexadecimal colour code for these colours, enter them in the text fields. - If you want to position your customers’ addresses so that they will be visible when folded and placed in a windowed envelope, select the Position address for windowed envelope option.
- When you’re happy with how your invoices and quotes will appear, click Save. It’s a good idea to preview your theme both on screen and when printed so you can be sure that it will display in the way you want.
Choose your default payment terms
In the Default payment terms section of the Payment options tab, choose the default payment terms that you want to appear on your invoices. You can change these terms for individual invoices while you're entering the invoice, but future invoices will always use the default terms you set up here.
You can choose from three ways of calculating payment terms:
- Due on - Choose each invoice's due date as you create the invoice.
- Days from end of this month - Invoices will be due the specified number of days from the end of the month they're issued in.
- Days from invoice date - Invoices will be due the specified number of days after the invoice's Date of issue.
Set up your How to pay details
In the How to pay details section of the Payment options tab, you choose which options you want to include in the How to Pay section of the invoices you give to your customers. You can add details for Direct deposit and By mail. For more information see To set your How to Pay Details below.
- From the Settings menu, choose Invoice and quote settings. The Invoice and quote settings page appears.
- Click the Payment options tab.

- In the How to pay details section, select the payment options you want to include on your invoices:
- Direct deposit
- Mail.
- If you select Direct deposit, enter the details of the bank account you want customers to deposit payments into.
- If you select Mail, you can choose whether you want customers to mail their payments to your business address or your postal address. The address you choose will be printed on your invoices.
You can view or change your business or postal address on the Business details page. See Business Details for more information. - Click Save to save your changes.
Set up your default invoice and quote emails
On the Default email text tab, you can customise the default email that's sent with your invoices and quotes when you email them to your customers.
- From the Settings menu, choose Invoice and quote settings. The Invoice and quote settings page appears.
- Click the Default email text tab.
- If you're customising the email text for invoices, click the arrow next to the Default invoice email heading. If you're customising the email text for quotes, click the arrow next to the Default quote email heading.
The chosen section expands, showing the default email and a list of variables. Edit the text of the email. You can personalise the email using variables like the customer's name, your business details, or information about the invoice or quote that you're sending.
To insert a variable, position the cursor in the email at the spot where you want to insert the variable, then click the variable in the list on the right.Don't edit variables
You shouldn't edit the variables in the message body. If you edit a variable, it won't work properly, and your emails might contain strange symbols, or you might not be able to save your template.
You can remove a variable by deleting the variable text, including double brackets, from the email.- If you make a mistake and want to revert to the previously saved version of the email, click Clear changes.
- When you're done, click Save.
 Yes
Yes
 No
No
 Thanks for your feedback.