
You are viewing an old version of this page. View the current version.
Compare with Current View Page History
« Previous Version 53 Next »
https://help.myob.com/wiki/x/nIBRB
How satisfied are you with our online help?*
Just these help pages, not phone support or the product itself
Why did you give this rating?
Anything else you want to tell us about the help?
Only available to early adopters when accessing an AccountRight file in a web browser
An inventory item is an item that you buy, sell and stock which is measured in quantities, such as a hammer or box of nails
We're rolling out the ability for MYOB to manage your inventory stock levels, including buying and selling inventory items.
You can create items before entering transactions, or you can create items on-the-fly when entering a purchase order or an invoice.
Creating an inventory item
Add the details of an inventory item to MYOB. This includes the item's name, description, buying and selling prices and choose the accounts to track purchases, sales and stock levels.
To create an inventory item
- From the Inventory menu, choose Create an item to open the Create item page.
- Complete the fields in the Item details section:
- Name—enter a short item name.
- Description—enter a detailed item description, for use on invoices and bills. Note: If you leave this field blank, the Name will be used as the description.
- Select whether to Use item description on sales and purchases. If you leave this option deselected, only the item's Name will show in sales and purchases.
- Item ID—enter a unique identifier for the item.
- If you sell this item, complete the fields in the Selling details section:
- Select the option I sell this item. The fields in this section become active.
- Selling price ($)—enter the price of the item, excluding tax or GST.
- Selling prices is—select either Tax inclusive or Tax exclusive.
- Unit of measure—enter a unit of measure for the item, such as boxes, cans, hours, kg, etc.
- Account for tracking sales—choose the account to which you want sales of this item allocated.
- Tax code—select the relevant tax code to be applied when selling this item. If unsure, check with your accounting advisor or the ATO.
- If you buy this item, complete the fields in the Buying details section:
- Select the option I buy this item. The fields in this section become active.
- Buying price ($)—enter the cost of the item, excluding tax or GST.
- Unit of measure—enter a unit of measure for the item, such as boxes, cans, hours, kg, etc.
- Account for tracking purchase—choose the account to which you want purchases of this item allocated.
- Tax code—select the relevant tax code to be applied when buying this item. If unsure, check with your accounting advisor or the ATO.
- If you want to track the quantities of the item when you buy or sell it, complete the fields in the Inventory details section:
- Select the option, I inventory this item.
- Account for tracking inventory—choose the account to record the on-hand value of this item.
- When you're done, click Save.
You can also view, edit, delete and deactivate items.
Need to do a stocktake or adjust your inventory?
These features aren't yet available in a web browser, but you can still adjust inventory quantities or values or do a stocktake in your AccountRight desktop app.
Ordering an inventory item
Create a purchase order for inventory items you need from a supplier. This details what you require, the quantities, prices, and any applicable shipping address. You can then send the purchase order to the supplier to prepare your order.
To order an inventory item from a supplier
Go to the Purchases menu and choose Create purchase order.
Choose the Supplier you're ordering from.
- (Australia only) If the order will result in a reportable payment, select the option Report to ATO via TPAR. Learn more about Reportable contractor payments.
- Confirm the Shipping address where you want the order delivered.
If necessary, change the Purchase order number. This number is automatically generated, based on the last number used.
If you change the number, you’ll change the automatic numbering. For example, if you change the number to 000081 , the next time you create a purchase order, the new number will be 000082 .
- If you have a Supplier invoice number or Promised date from the supplier, enter these.
- Select whether the amounts in the order are Tax inclusive or Tax exclusive.
- Click the Field layout icon and select the Services and items option.

Enter details of the items you're ordering.
Field Description Item ID Choose an item from your item list. Description A description of the item appears automatically. You can change this if you want. Account The expense account for tracking purchases of this item appears automatically. You can change this if you want. No of units Enter the quantity to be delivered. Unit price The price per unit of the item appears automatically. You can change this if you want. Discount % [Optional] If you've been given a discount, type it as a percentage. Amount ($) The total price of the items is calculated automatically. If you change the total, the Discount % field is updated to show the discount applicable. Job [Optional] Select a job number here to assign a line item to a specific job. Tax code The default tax (Australia) or GST (New Zealand) code for an item appears here. If you want to change it, enter the required tax/GST code. Entering a new item?
Click the dropdown arrow in the Item column and choose + Create Item. Enter the item details and click Save. Learn more about Creating items.

If you're paying a deposit on this order, enter it in the Amount paid field near the bottom.
Deposits on orders
If you want to apply a payment to a purchase order, you'll need to specify a linked account for tracking supplier deposits (Accounting menu > Manage linked accounts > Purchases tab > I track deposits paid to suppliers).
Learn more about linked accounts and supplier deposits.
Here's our example order (with a $100 deposit applied):
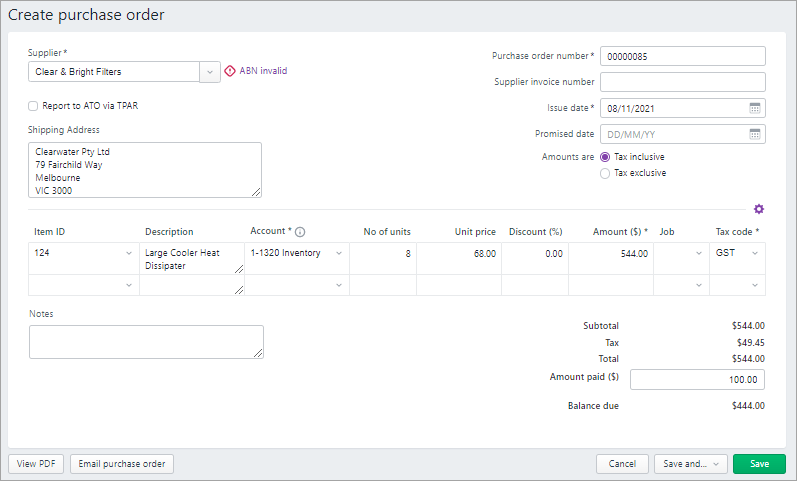
When you're done, use the buttons across the bottom of the page to choose an action.
If you want to... do this... Print or save a PDF copy Click View PDF and choose the template to generate the PDF (currently only invoice templates can be used) then click Export. The order appears as a PDF in a new tab where you can print or save it. Email the order Click Email purchase order, enter or check the details of the email and click Send purchase order. You can change the default purchase order email template by clicking your business name > Purchases settings. Learn more about Purchases settings Cancel without saving Click Cancel. Save the order and create a new one Click Save and... then choose Save and create new. The order is saved and a new, blank order appears. Save the order and create a duplicate Click Save and... then choose Save and duplicate. The order is saved and a new order with the same details and new order number is created. Save the order Click Save.
Selling an inventory item
Create an invoice for the inventory items you sell. This includes the item, the quantities, prices, discounts and any messages for the customer. Then choose how to send the invoice to them.
It's a good idea to set your default sales layout to Sales and items if you're going to be selling items. You can change it back to a Services layout when entering an invoice if you want.
To invoice a customer for an inventory item
From the Sales menu or the Invoices page, click Create invoice. The Invoice page appears.
Choose the Customer you're selling to. The customer’s address details appear in the field below. If you've entered a shipping address when you created the customer, this will appear on PDF copies of the invoice.
If you want to:
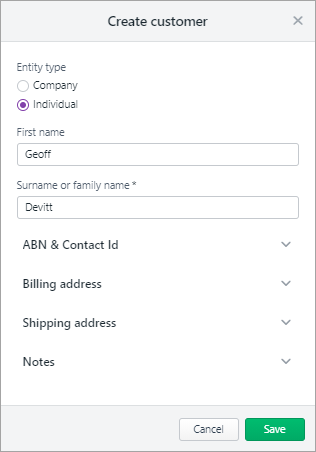
Add a new customer:
Click the Customer dropdown arrow and choose Create customer. Enter as much (or as little) info as you like and click Save. You can always go back later and fill in additional details.

Add missing details to an existing customer:
Type the customer's name in the Customer field and hit Enter. Click the dropdown next for the information you want to add, such as the ABN or billing or shipping address, add the details and click Save.
- (Australia only) The status of the ABN you've entered in the customer's record will checked, and the status shown. Click the status to see more details.
- You're notified if the customer has any open quotes:

If you want to convert one of these quotes to an invoice:- Click Open quotes.
- Select an invoice and click Convert. The invoice is completed with the details of the quote. You can change these details if you want.
If necessary, change the Invoice number. This number is automatically generated, based on the last number you used.
Changing the numbering
If you change the invoice number, you’ll change the automatic numbering. For example, if you change the number to 000081, the next time you create an invoice, the new invoice number will be 000082.
- If you have one, enter the Customer PO Number.
- Check the date in the Issue date field.
- Click the date in the Due date field to set the terms for this invoice. How do I set my default payment terms?
- (Australia only - if set up for online payments):
- Select the option Allow online payments to allow the customer to pay you straight from their invoice. If you haven't signed up yet, click Start getting paid online to get started.
- Select the option Apply Surcharge to pass the 1.8% online payment transaction fee (for credit or debit card payment) onto the customer. If you haven't turned on this preference, learn about Customer surcharging for online payments.
- Select an option from the Amounts are list.
- If you want the prices to include tax or GST, choose Tax inclusive. Note that this is the default tax preference.
- If you want the prices to exclude tax or GST, choose Tax exclusive.
Click the Field layout icon and select the Services and items option.
In the Item ID column, enter or choose the item you're selling.
Entering a new item?
Click the dropdown arrow in the Item column and choose + Create Item. Enter the item details and click Save. Learn more about Creating items.
The item Description, Unit price and Tax code appear, based on the details you entered when you created the item.
Enter the number of Units of this item you're selling. The calculated Amount is displayed.
There's a built-in calculator in the No of units, Unit Price, Discount and Amount fields. Just enter a calculation in the field and tab out of it:

Repeat step 10 for each item you're selling. Need to add or remove blank lines or line items?
The totals are calculated at the bottom of the invoice:
Subtotal—the total for the items added to the invoice
Tax—the amount of tax applied to the invoice
Total amount—the total amount of the invoice including the tax or GST amount
Amount paid—the total of any invoice payments made
Balance due—the invoice total minus the amount paid.
- (Optional) Choose a Job if the line item relates to a specific job. Tell me more about jobs.
If you want to add a note about the invoice, select a Message to customer and enter any additional notes in the box below it. These notes will appear on the customer's invoice.
For example, you could use this area to add additional details about payment.
Check that all the information in the invoice is correct.
Use the buttons across the bottom of the page to choose an action.
If you want to... do this... Print, download a PDF copy or send an invoice link Click View PDF. The invoice appears as a PDF in a new tab where you can download it or print it. Learn more about downloading an invoice PDF. Email the invoice Click Email invoice. Enter or confirm the email details and click Send invoice. Learn more about emailing invoices. Save it as a recurring invoice Click Save as recurring. Enter the recurring transaction Schedule name and choose the Frequency, such as Daily, Weekly or Monthly. Learn more about recurring transactions. Prefill the invoice from a recurring transaction Click Prefill from recurring. Select a recurring transaction and click Prefill. The invoice is updated with information from the recurring transaction. Learn more about recurring transactions. Cancel without saving Click Cancel. Save the invoice and create a duplicate Click Save and duplicate. An invoice with the same details and new invoice number is created. Learn more about Duplicating an invoice. Save the invoice and create a new one Click Save and create new. The invoice is saved and a new, blank invoice appears. Save the invoice Click Save.
For more information about invoices, see Creating invoices.
What's coming next
More inventory features will be released in 2022, giving you the ability to:
- adjust the quantity and value of inventory items
- do a stocktake
- report on items, such as your most profitable items
- set stock alerts to see the items you need to order more of
- update item prices in bulk.
Feedback and support
We'd love to hear your feedback, as it will play a big part in delivering a seamless experience for you and other businesses.
If you have any feedback, questions or need support at any stage of the Early Adopter Program, email us at inventoryfeedback@MYOB.com
