You can create invoices from the Sales menu or the Invoices page by clicking Create invoice. If you're often on the go, try using the MYOB Invoice app to create your invoices.
You can enter an invoice for items you sell, or services you provide. There's a preference which determines your default layout, but you can change the field layout when entering the invoice.
Watch this video to see how to see how to create a customer contact, create an invoice and record a payment:
Entering an inventory item sale?
It's a good idea to check that you have sufficient stock on hand to fulfil the sale by running the Reorder report and ordering in any items you need. In a future release, you'll be able backorder items to fulfil a sale.
Ready to create an invoice? Let's do it:
To create an invoice
From the Create menu > Invoice or from the Sales menu > Invoices page > click Create invoice.
Choose the Customer you're selling to. The customer’s address details appear in the field below. If you've entered a shipping address when you created the customer, this will appear on PDF copies of the invoice.
If you want to:
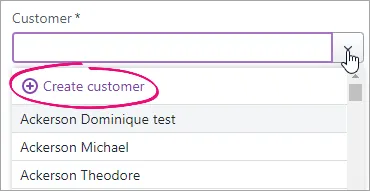
Add a new customer:
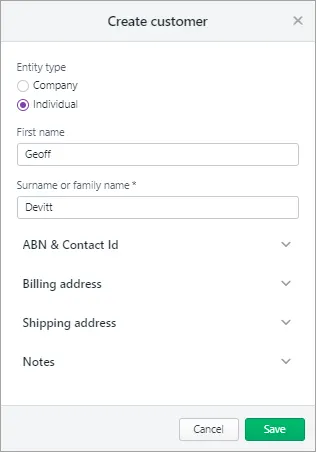
Click the Customer dropdown arrow and choose Create customer. Enter as much (or as little) info as you like and click Save. You can always go back later and fill in additional details.
Add missing details to an existing customer:
Type the customer's name in the Customer field and hit Enter. Click the dropdown next for the information you want to add, such as the ABN or billing or shipping address, add the details and click Save.
(Australia only) The status of the ABN you've entered in the customer's record will checked, and the status shown. Click the status to see more details.
You're notified if the customer has any open quotes:
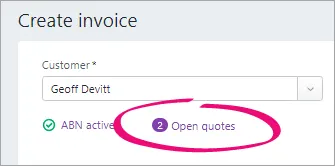
If you want to convert one of these quotes to an invoice:
Click Open quotes.
Select an invoice and click Convert. The invoice is completed with the details of the quote. You can change these details if you want.
If necessary, change the Invoice number. This number is automatically generated, based on the last number you used.
Changing the numbering
If you change the invoice number, you’ll change the automatic numbering. For example, if you change the number to 000081, the next time you create an invoice, the new invoice number will be 000082.
If you have one — or you're entering an e-invoice — enter the Customer PO Number.
Customer PO Number
If you're entering an e-invoice, you can enter additional reference numbers in the Customer PO Number field. See the FAQ below for details.
Check the date in the Issue date field.
Click the date in the Due date field to set the terms for this invoice. If you want to make these the default payment terms for this customer, click Remember terms for this customer. You can also set default payment terms in your sales settings. These are applied to any new customers you create.
If you're set up for online payments:
Select the option Allow online payments to allow the customer to pay you straight from their invoice. If you haven't signed up yet, click Start getting paid online to get started.
Select the option Apply Surcharge to pass the 1.8% online payment transaction fee (for credit or debit card payment) onto the customer. If you haven't turned on this preference, learn about Customer surcharging for online payments.
If you're registered for GST, select an option at the Amounts are field.
If you want the prices to include tax or GST, choose Tax inclusive. Note that this is the default tax preference.
If you want the prices to exclude tax or GST, choose Tax exclusive.
Click Field layout and select the applicable option based on what you're selling.

If you're selling items:
In the Item ID column, click the dropdown to choose an item or search for an item by entering all or part of the Item ID or Supplier item ID. As you type, matching items are shown.
Entering a new item?
Click the dropdown arrow in the Item ID column and choose + Create Item. Enter the item details and click Save. Learn more about Creating items.
When you choose an item:
the item's Description, Category for tracking sales, Unit selling price and Tax code appear automatically, based on what you entered when you created the item (you can edit these details if you want)
the total price of the items is calculated automatically in the Amount field.
Enter the number of Units of this item you're selling. The calculated Amount is displayed.
Use the built-in calculator
There's a built-in calculator in the No of units, Unit Price, Discount and Amount fields. Just enter a calculation in the field and tab out of it:
Repeat for each item you're selling. Need to add or remove blank lines or line items?
If you're selling services:
In the Description column, enter a description of the service you're providing.
Choose the Category the income from this service will be allocated to. If you're not sure, check with your accounting advisor.
Enter the Amount of this service.
If required, change the Tax code. If you're not sure, check with your accounting advisor.
Repeat for each service you're selling. Need to add or remove blank lines or line items?
Enter any charges for Freight, and if required, change the default Tax/GST code. If you can't enter Freight, you'll be prompted to specify a linked category for freight. (What is a linked category?) The totals are calculated at the bottom of the invoice:
Subtotal—the total for the items added to the invoice
Tax—the amount of tax applied to the invoice
Total amount—the total amount of the invoice including the tax or GST amount
Amount paid—the total of any invoice payments made
Balance due—the invoice total minus the amount paid.
(Optional)
Choose a Job if the line item relates to a specific job. Tell me more about jobs.
If you want to add a note about the invoice, choose a Notes to customer and enter any additional text in the box below it (or edit an existing note). These notes will appear on the customer's invoice. For example, you could use this area to add additional details about payment. You can choose one of the notes that come with MYOB Business, edit an existing one or add your own reusable notes — see Notes to customer.
Save a default note
If you frequently use a note, select Save as default. This note will then appear automatically whenever you create an invoice (you can still choose a different note if you want).
Check that all the information in the invoice is correct.
Use the buttons across the bottom of the page to choose an action.


If you want to... | do this... |
|---|---|
Print, download a PDF copy or send an invoice link | Click View PDF. The invoice appears as a PDF in a new tab where you can download it or print it. Learn more about downloading an invoice PDF. |
Email the invoice | Click Email invoice. Enter or confirm the email details and click Send invoice. Learn more about emailing invoices. |
Save it as a recurring invoice | Click Save as recurring. Enter the recurring transaction Schedule name and choose the Frequency, such as Daily, Weekly or Monthly. Learn more about recurring transactions. |
Prefill the invoice from a recurring transaction | Click Prefill from recurring. Select a recurring transaction and click Prefill. The invoice is updated with information from the recurring transaction. Learn more about recurring transactions. |
Cancel without saving | Click Cancel. |
Save the invoice and create a duplicate | Click Save and duplicate. An invoice with the same details and new invoice number is created. Learn more about Duplicating an invoice. |
Save the invoice and create a new one | Click Save and create new. The invoice is saved and a new, blank invoice appears. |
Save the invoice | Click Save. |
Add an attachment | Drag files or browse and add files into the Attachments area. These files can only be PDF, TIFF, JPEG or PNG and below 10MB. |
Ready to take a payment? See Customer payments.
FAQs
How can I record cash sales?
If you want to keep track of cash sales, set up a contact called "Cash Sales" and choose this contact when making a cash sale.
My business isn't registered for GST - why is GST appearing in my invoice?
In older versions of MYOB Essentials, the tax code that appears in an invoice is based on your GST settings.
In this version of MYOB, the invoice tax code is based on the tax code assigned to the item or account:
In item sales, the default tax code is based on the tax code assigned to the item. If your business is not registered for GST, you should edit the item to set its default tax code to N-T.
In service sales, the default tax code is based on the tax code assigned to the account. If your business is not registered for GST, you should edit the account to set its default tax code to N-T.
How do I deal with a customer who is also a supplier?
You set up two contacts: a customer contact and a supplier contact. You can then record payments and receipts as normal.
TIP: Another way to manage your payments is to offset your outstanding customer and supplier invoices using a contra account.
Can I use an item with a negative value for customer discounts?
No. You'll get an error if you try to use an item with a negative selling or buying price in an invoice.
In older versions of MYOB Essentials, you could create an item with a negative price and use it to create discounts in invoices.
To record a customer discount on an invoice in this version of MYOB, you can use the Discount (%) column (when you use the Services and items invoice layout) or add a separate line with a negative figure in the Amount ($) column.
See Customer discounts.
How do I enter additional reference numbers for e-invoicing?
You can use the Customer PO number field to enter additional reference numbers for e-invoicing. When entering these numbers, use the relevant prefix:
Reference number | Prefix |
|---|---|
Tender Reference Number | TN: |
Project Reference Number | PN: |
Contract Reference Number | CN: |
Buyer Reference Number | BR: |
If you have a customer PO number, enter that first then enclose any additional reference numbers in square brackets [ ] and separate each reference number by semicolons.
Here's an example showing the Customer PO number, followed by a Tender Reference, Project Reference and Buyer Reference:

Why am I seeing the error "You must specify a category"?
If you use categories in AccountRight, there's a preference you can turn on which requires a category to be selected for every transaction.
Until we implement category functionality in the web browser version of AccountRight, if you're seeing this message in the browser you'll need to record the transaction in your desktop AccountRight software.
(AccountRight browser users) Why has the default Freight tax code changed?
If you access an AccountRight company file in a browser, you might notice that the default Tax/GST code for the Freight field is different when you enter a sale in the browser.
This is because the default Tax/GST code in the browser is set in the linked income account for freight (Accounting menu > Manage linked accounts > Sales > Income account for freight), whereas in the desktop app it's set in the customer's card (Card Information window > Selling Details > Freight Tax Code).
You can easily change the Tax/GST code in the transaction or set a new default Tax/GST code in the browser by editing the freight linked income account.
(AccountRight Premier browser users) Why do I get a message that there’s not enough stock on hand when there is sufficient stock?
If you try to save an item invoice and receive the message, There's not enough stock on hand for item undefined. Check if you have enough stock of the items on this invoice., even though you do have enough stock on hand, this is because you use the multiple inventory locations feature in AccountRight desktop and you store the item at more than one location.
Multiple locations isn’t yet available in AccountRight browser. When you enter an item sale AccountRight browser, it's only able to check the stock on hand at the primary location and can't count the items at other locations.
Solution: enter the sale in AccountRight desktop instead.