New Zealand only When you come aboard for the first time, you'll receive the message: We've got data for (X) clients. Do you want to create their tax notices? When you click Create now, all provisional tax notices and terminal tax notices will be created for your tax clients, for the current period, once their IR data is downloadedMYOB Practice automatically creates tax notices for your clients 3 months before they’re due. The automatic tax notice creation process runs each Sunday. You can also choose to create an individual client's tax notices for the entire tax year. The manual tax notice creation happens immediately when you initiate the process. | UI Text Box |
|---|
| We only create For tax notices for tax clients.If you can't find a tax notice for your client, check that they're to be created for a client, they must be set up as a Tax client in their Compliance settings. |
You'll see this message again at the beginning of every tax year, dependent on your clients' balance month, so you can create tax notices for multiple clients, in one go.| UI Expand |
|---|
| title | To manually create a tax notice |
|---|
| | | size | medium |
|---|
| note | If you've changed the GST taxable period, Balance date or Extension in your client's Compliance settings after their tax notice has been created, please contact support to have these values updated in the tax notice. |
Working with tax notices after upgradingIf you've upgraded from AE/AO Tax to MYOB Practice Tax, your tax notice preparation could be streamlined. If your client's 2019 or 2020 tax return has already been filed or assessed in AE/AO, then their tax notices are prefilled with the filed or assessed tax return values in MYOB Practice. This means that no additional work is required by you. If this client's 2019 or 2020 tax return has not been filed or assessed in desktop, then you have the flexibility of manually entering the tax return values | | MYOB Practice automatically creates tax notices 3 months before they’re due. |
Go to Compliance > Tax notices. In the message at the top of the page, click Create all tax notices.  Image Added Image Added The tax notices are created for the current period.
|
| UI Expand |
|---|
| title | To prepare a tax notice |
|---|
| To prepare a tax noticeGo to Compliance > Tax notices and find your client's tax notices in the list. Click the tax notice you want to edit. The tax notice opens. Make the required adjustments in the tax notice page. See Provisional tax notices - NZ or Terminal tax notices - NZ for information about completing the fields. Once you've made all required adjustments, click Next at the top of the page and select either: Send for review, if you want to send the tax notice to be reviewed by another member in your practice, or Mark as Ready for client, if you're ready to send the tax notice to your client. 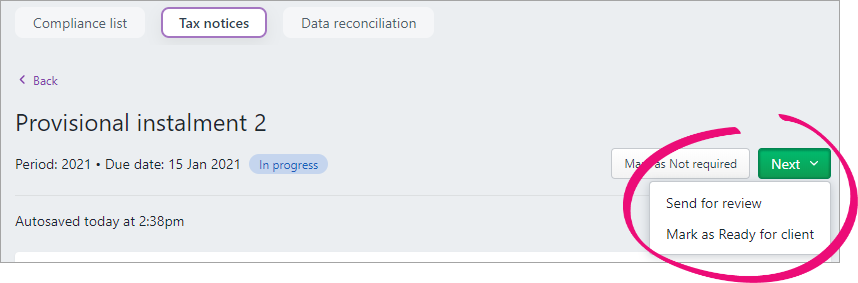
|
| UI Expand |
|---|
| title | To update the status of tax notices |
|---|
| To update the status of tax notices in bulkUpdating the status in bulkYou can update the status of multiple tax notices in bulk from the Tax notices list view (the view you see before clicking in to an individual tax notice). You can update the status to Not started, In progress, In review, Ready for client, Sent, Paid or Not required. So if you have a lot of tax notices that you don't need to prepare or send, you can update their status to Not required in one go without having to open the tax notice first. | UI Text Box |
|---|
| Some tax notice statuses can't be changed to certain other status options in the Mark as drop-down. For example, you can't change a Paid status back to Not required. A confirmation window will tell you if any tax notices you've selected cannot be updated to the new status you've selected. |
| UI Text Box |
|---|
| The Basis value displays the status of the tax return that's used as the basis for the tax notice. That status will be Not Started, Draft, Approved, Filed or Assessed. Draft could be In progress, In review or Ready for client. Approved could be Pending client signature, Ready to file or Rejected. |
To update the status in bulk:
From the Tax notices list All clients view, either select individual tax notices or select them all in one go: To individually select individual the tax notices you want to change in bulk, select the checkbox next to each tax notice for which you want to change the status.  Image Removed Image RemovedTo select all the tax notices, select the Client name checkboxat the top of the list. If you've got more than 40 outstanding tax notices, you'll need to scroll down to load more tax notices. MYOB Practice only loads 40 at a time to avoid long load times. Once all the tax notices are loaded, select the Client name checkbox again. To confirm that all tax notices are selected, compare the Outstanding status number to the number of items selected displayed at the top of the list.
 Image Removed Image Removed Image Added Image Added
When you select the checkboxes, the Mark as options appear above the list of tax notices.
 Image Removed Image Removed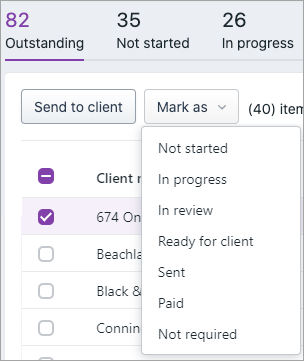 Image Added Image Added Select a new status from the drop-down and confirm you want to change the status in the confirmation window. | UI Text Box |
|---|
| The confirmation window tells you if any tax notices you've selected can't be updated to the new status you've selected. |
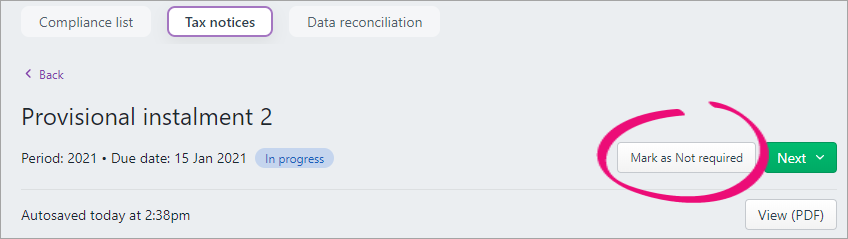
Updating the status individuallyYou can only update the status of an individual tax notice that you've clicked and opened from the Tax notices list view.
So if a tax notice isn't required for a client and you don't want to get a reminder to send the tax notice, click the tax notice and click the Mark as Not required button on the top of the page.
Or you could click Next at the top of the page and select a status.
|
|


 Yes
Yes
 No
No
 Thanks for your feedback.