Get started with portalsCreate portals for each of your clients to make collaboration easy. Portals enable you to share documents securely and keep your clients up-to-date. | HTML |
|---|
<p> </p><div class="wistia_responsive_padding" style="padding:56.25% 0 0 0;position:relative;"><div class="wistia_responsive_wrapper" style="height:100%;left:0;position:absolute;top:0;width:100%;"><iframe src="//fast.wistia.net/embed/iframe/6p7mrctij8?videoFoam=true" title="Wistia video player" allowtransparency="true" frameborder="0" scrolling="no" class="wistia_embed" name="wistia_embed" allowfullscreen mozallowfullscreen webkitallowfullscreen oallowfullscreen msallowfullscreen ></iframe></div></div>
<script src="//fast.wistia.net/assets/external/E-v1.js" async></script><p> </p> |
If you haven't created a portal before, you might need to set up your default portal options first. Then you can start creating client portals. | UI Text Box |
|---|
| Want to see how clients can log into their portal and approve documents? Watch this video |
Clients vs usersWhen you create a portal for a client, you need to choose who can access the portal. All who need access must be set up as a portal user. You'll do this when you create the portal. For example, say you have a client named JJ Cleaners, which is a partnership owned by Jane and Jim Clear. You can set up a portal for JJ Cleaners (the client), so you can collaborate with the owners online. However, before Jane and Jim can access the portal, you need to create user records for them. If someone else needs access to the client portal or a portal document, you'll need to create user records for them too. If Jane also has an interest in a separate partnership, you can assign the user record you already created for her to the other partnership's portal. In summary, a user can be assigned to more than one portal, but you can only have one portal for each client. Access controlWhen you create a portal, you control who can access it and what access privileges they get - either full access, or as contributors: Full access users can see all documents and associated tasks available in the portal.Contributors are users with restricted access to certain documents or tasks.
For example, you can add your bookkeeper as a contributor to a portal, only giving them access to the documents they need to work on. Or a bank may require access to specific documents in the portal for a given period.Work together with your clientsThe portal in MYOB Practice is a secure online space to collaborate and interact with your clients. - Share documents with your client so they can comment on and approve the documents. (Digital signatures). These can be tax returns or activity statements that might need their approval.
- Assign tasks to your client with instructions and they'll receive an email immediately for further action.
- Add and restrict users who can have full access or just contributors.
Each client has their own portal in MYOB Practice and you can personalise the web address for each of your clients. Start setting up PortalsExamplesThe following examples will give you some ideas on how you can set up portals for different types of clients. | UI Expand |
|---|
| title | Example 1 - Individual |
|---|
| Jane Clear is an individual for whom you prepare an annual tax return and provide some financial planning advice. In MYOB Practice, you would create a portal with Jane as the sole user. 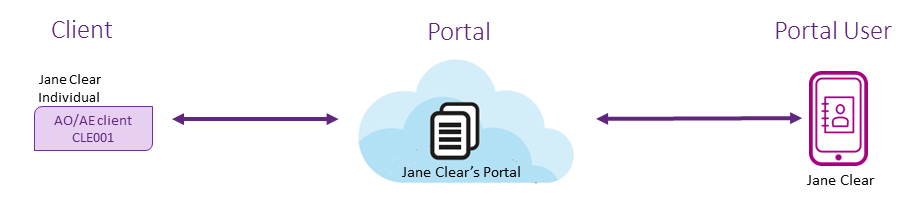
|
| UI Expand |
|---|
| title | Example 2 - Partnership |
|---|
| Ben and Cecila Abbot, a married couple, operate a business as a partnership. Each are familiar with the financial situation of the partnership and each other's financial details. As their accountant, you would set up a client portal for their partnership, Abbot Portal, with both Ben and Cecila as portal users. 
|
| UI Expand |
|---|
| title | Example 3 - Family group |
|---|
| The Darwell Family Group consists of 4 members - Lisa (Mum), Paul (Dad) and 2 children, Sam and Naomi. - All in the family group are part of the Darwell Company.
- Sam generates an independent income and has other assets apart from the company.
- Naomi is still a minor and has no independent income.
When you're thinking about setting up portals for the Darwell Family, you could set up: - a client portal with all the members of the family group for the company
- a separate portal for mum and dad, for their tax and accounting needs
- a portal for Sam so that his tax and accounting requirements are kept separate from the rest of the family group.
Therefore, for the Darwell Family Group, 3 client portals could be created. 
|
| UI Expand |
|---|
| title | Example 4 - Contributors |
|---|
| Jane is refinancing her business loan and her bank has requested that she provide them with a number of documents in order to secure the loan. As her accountant, you're able to add the bank as a contributor to Jane's portal so that they can access the documents that they need. The bank won't have access to the whole portal, only to the documents that you share with them. This will save you time and resources in photocopying the documents and mailing them to the bank; and the bank can access the documents immediately speeding up the loan process. 
|
Helping your clients with portalTo help your clients understand and use the portal see Help for your clients or Watch this video. | 
 Yes
Yes
 No
No
 Thanks for your feedback.