
You are viewing an old version of this page. View the current version.
Compare with Current View Page History
« Previous Version 9 Next »
https://help.myob.com/wiki/x/84TeAw
How satisfied are you with our online help?*
Just these help pages, not phone support or the product itself
Why did you give this rating?
Anything else you want to tell us about the help?
- MYOB Practice Tax (NZ) introduces a new way to prepare tax notices.
- This topic explains how to complete your tax notice work.
- You can also view the Data reconciliation workflow and Compliance workflow.
- We're adding new features all the time. To keep up with the changes, check our what's new and coming soon pages.
Preparing tax notices
Click the image to take a closer look.

Before starting, check the details of new clients, including their address, compliance settings, tax notice delivery settings and whether notices have been created.
Review the delivery preferences of any clients you're not sure of. The delivery preferences are in the compliance settings of each client.
If you need to create new tax notices, click Create now at the top of the Tax notices page, from either the All clients practice-level view, or from an individual client record.

You will be prompted by this link to create new tax notices on the first day of a client's new financial year. For example, on 1st April.
If the compliance settings need to change and if this affects the notice dates, contact us to reset the remaining tax notice dates.
Check that all IR assessments have been reconciled.
If you have an IR assessment that you don't agree with, leave it unreconciled. MYOB Practice won't use this IR assessment in the tax notice calculation.
For more information on transactions for tax notices, see Data reconciliation workflow.
Review tax returns to identify any that should be progressed for filing, so that the return RIT is used in the calculation instead of last year's assessment.
For more information, see Compliance workflow and Data reconciliation workflow.
In the All clients view of the Tax notices page, use the filters at the top of the list to filter for the tax notice date you are looking at.
Where there are multiple kinds of notices in the same month, you may need to use the Notice Type filter.
If you're working in a large practice, you may want to filter by your own clients as a partner or manager to find your specific tax notice list.
Once you've started work on tax notices, you can further filter by the notice status, but initially all notices will be in the Outstanding category.
Now that you can see the notices that need to be checked, you can look at the calculation on each notice and decide what to do with it.
Where the same action can be applied to multiple notices, you can select the relevant notices and use the Mark as option to move those multiple notices to the correct status.
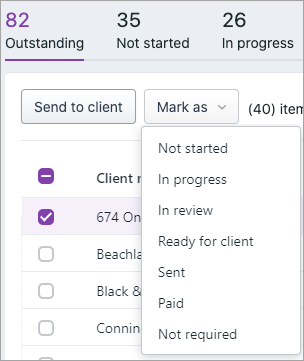
If any notices don't need to be sent to clients, you can mark these as Not required. These are usually notices with nothing due to pay.
Notices for Ratio and AIM clients would also normally be moved to the Not required status. To create a list of your Ratio and AIM notices, use Tax Manager on the desktop.
Notices created for partnerships and LTC companies are automatically moved to the Not required status when they're created.
If a notice is marked as Not required accidentally, you can always change them back to any other status.
Notices with correct calculations can be sent without changes. After checking the payment amount and the RIT that it's based on, these notices can be selected and moved to the next stage of the process without further action.
The notice amount may be incorrect because it's based on last year's assessment and you've chosen to enter an Estimate for this year or you want to use the draft figures from the current year's unfiled return.
You can open the notice and select the basis of the calculation as either Estimate or Standard.
- If you select Estimate, you can manually enter the estimated income and tax credits to be used in the tax notice calculation. This estimate will be carried forward to all future tax notices for the tax year.
- If you select Standard, the tax notice will use the latest return or assessment to calculate the notice amount.
If the latest figures are from last year, then that year will be automatically selected and an uplift will be applied.
If there's no filed return or assessment for the current year, you can manually change the year. The calculation fields will be unlocked, so can manually enter the draft return figures.
You may want to use tax pooling to cover the amount due in this tax notice.
You can open the tax notice and select Yes at Tax Pooling.
With tax pooling is selected, there's no longer an amount due on the tax notice, there's no expected payment in the data reconciliation and the amount will be removed from the total tax due for the year.
Sometimes you may want to include an expected transaction in the tax notice calculation. Or you may want to ask the client to pay more to cover circumstances the IR is not yet aware of.
In these kinds of situations, you can adjust the notice amount and add voluntary adjustments.
You can add a voluntary adjustment for each of the INC, SLS, FAM, GST & FBT tax types.
INC adjustments can be for a positive or negative amount.
Once you're happy with the notice amount and calculation, you can select those notices and mark them either as In review if a partner or manager needs to look at them first, or as Ready for client if they are ready to send to your clients.
You can do this either one by one in the individual notices or in bulk from the All clients view of the Tax notices page.
Once a notice is In review, a partner or manager can view a filtered list of their notices to review them.
The notices can then either be approved or sent for rework.
If the notice is approved, it's locked and a PDF of the notice is saved in the client's Documents tab.
If the RIT calculation changes after the return has been locked, you'll see an alert beside the notice to let you know that the amount may potentially be different.
If the notice is sent for rework, it's unlocked and is moved back to the In progress status.
Once a notice has been moved to the Ready for client status, you'll need to open each notice to send it.
When the notice status is changed to Sent, either manually or by sending the email or Portal task, an MYOB payment is created. This payment will show as outstanding until it's reconciled against the matching IR transaction.
If, before sending the notice, you decide that the calculation needs to be redone (perhaps because of an alert that the calculation basis has changed), you can send the notice for rework. This will delete the copy of the tax notice, which was saved when the notice was approved or marked as Ready for client.
If the delivery preference has been set to Email, clicking Send to client will allow you to review the email before sending it. You can edit the title and content of the email before sending it, and you can add documents.
The email will be sent to your client from mail@apps.myob.com, but the reply address on the email will be the one set as your Practice alias address in your practice settings. If the client clicks Reply, the reply will be sent to that reply address.
If the delivery preference has been set to Portal, clicking Send to client will create a Portal task. Similar to the email method, you can edit the title and content of the task as well as adding documents as required.
Because it's a Portal task, you can also edit which person associated with the client will receive the task, who the sender of the document will be and who will be notified when the client approves the document. There's also a due date so that you can keep track of whether the client's response is timely and send reminders if you haven't received a response.
If the delivery preference has been set to Send manually, the Send to client button will be locked and you'll need to click View PDF to download the PDF of the tax notice. You can either print or save the PDF for distribution to the client.
Once the notice has been saved, you can select Mark as and choose Sent to move the notice to the Sent status.
As the due date of the tax payment approaches, notices will move from Sent to Paid automatically. This happens as the IR payment is reconciled against the payment created, by marking the tax notice as Sent.
If the notice doesn't move from Sent to Paid, this means it hasn't been paid. You can follow up with those clients to make sure they pay on time to avoid IR penalties. Or you can use tax pooling with that client, in which case you would move the notice back to In progress, which deletes the copy of the notice and the payment transaction. This lets you edit the notice to include the tax pooling, before you resend it or mark it as Not required.

 Yes
Yes
 No
No
 Thanks for your feedback.