| HTML |
|---|
<span data-swiftype-index="true"> |
| HTML Wrap |
|---|
| Not available in AccountRight Basics If your company file is online, when suppliers email you their invoices, you can store them securely online and link them to your AccountRight bills using the In Tray. Once they’re in, AccountRight will use advanced Optical Character Recognition (OCR) technology to identify key information in each document, speeding up transaction entry by filling in what it can for you.  Image Removed Image Removed
And if you’re a bookkeeper or accountant, the source documents you need to review for each bill transaction are now just a click away. You no longer need to chase up clients to get copies of their supplier invoices for verification, and it’s easier to check that all their tax allocations are correct (making BAS and GST returns easier to prepare). Watch this video to learn how it works: | HTML |
|---|
<p> </p><iframe width="560" height="315"
src="https://www.youtube.com/embed/mHTCD4cbyvc?rel=0" frameborder="0"
allowfullscreen></iframe> |
| UI Expand |
|---|
| | title | Adding documents to your In Tray |
|---|
| Adding documents to your In TrayYou can add documents up to 10MB in size and in these file formats can be added to your In Tray: .PDF, .JPG, .JPEG, .TIFF, .TIF, and .PNG. Here's how: - You need to be working online to start adding documents to AccountRight.
- Go to the Purchases command centre and click In Tray.
- Add documents to your In tray:
There are four ways you can add documents to your In tray: | How to add documents to your In tray | Steps |
|---|
| Drag and drop | - Select a file from your computer
- Drag and drop it into the In tray window
- Your file is now saved to your In Tray.
| | Click and browse | - Click Add Documents
- Choose your file
- Click Open
- Your file is now saved to your In tray.
| Email bills | Each MYOB account has a unique email address assigned to it, which means you can send yourself documents that will arrive straight to your In tray. If you have multiple businesses, you'll have a different email address for each. Here's how to find your unique email address: Open your In trayClick on Email AddressSelect Copy email address Add your unique email address to your contacts in your email service providerForward bills from suppliers to your unique email addressYour files will appear in your In tray.
OR Send your unique email address with suppliers so they can send your bills straight to your In tray. You can send files up to 10MB in size in .PDF, .JPG, .JPEG, .TIFF, .TIF, and .PNG formats to your In tray (just make sure your emails don't exceed 20MB in size). | Partner with suppliers | Whenever you shop with certain brands, like Reece and Officeworks, you can get your invoices from them sent directly to your In tray. Learn more about automating your supplier invoices. | | UI Expand |
|---|
| title | Creating bills using In Tray documents |
|---|
| Creating bills using In Tray documentsIf you haven’t had a chance to enter a bill transaction for a supplier invoice you’ve received, let AccountRight do the work for you. - Ensure your file is online, and checked in (look for the green status bar at the bottom of your AccountRight window).
- Go to the Purchases window and click In Tray.
- If you haven’t already, add the document to the In Tray:
- If you drag the document to the In Tray, or click Add Documents, you’ll see the upload status, and a blue icon to indicate we’re working on getting it ready for you.
- If you email the document, it will appear in the In Tray after a minute or two.
- Select a document that’s ready to use (there’s no blue icon on the thumbnail), and click Create New Bill.
- A purchase window appears with a thumbnail of the document in the right corner of the window.
 Image Removed Image Removed
AccountRight will use the information that it is able to extract from the document to prepare a bill for you.
For example, if the supplier has been identified (based on ABN in Australia, or GST Registration ID in New Zealand), it will be selected for you. Other details, like the bill date, the total amount and supplier’s invoice number, can all be filled in for you if we’ve been able to extract that information from the document. If the supplier’s ABN (Australia) / GST Registration ID (New Zealand) is identified, it will be added to the supplier’s card for you if it’s not already there. For ABNs, we’ll also check to see if it’s a valid number. Check, and if necessary correct, the details that have been filled in for you. They’re highlighted in blue. | UI Text Box |
|---|
| | Click the Enlarge button to see the document details. This might help you fill in any missing details. |
- Record the purchase.
|
| UI Expand |
|---|
| title | Linking In Tray documents to existing bills |
|---|
| Linking In Tray documents to existing billsThe In Tray shows you which documents haven’t been linked to a transaction yet. The documents are sorted by the date they were added. If you’ve already recorded a bill that relates to a supplier invoice, or converted an order into a bill, you can link them together. - Ensure your file is online, and checked in (look for the green status bar at the bottom of your AccountRight window).
- Go to the Purchases window and click In Tray.
- If you haven’t already, add the document to the In Tray:
- If you drag the document to the In Tray, or click Add Documents, you’ll see the upload status, and a blue icon to indicate we’re working on getting it ready for you.
- If you email the document, it will appear in the In Tray after a minute or two.
Select a document that’s ready to use (there’s no blue icon on the thumbnail), and click Link to Existing Bill. If this button isn't active, click the Refresh  Image Removed button at the top of the window. Image Removed button at the top of the window.
The Link to existing bill window appears.
 Image Removed Image Removed
If information was able to be extracted from the document, it will appear in the Invoice details section of the window. Click the magnifying glass icon next to the thumbnail to see a full version of the document. Select the supplier that the bill relates to in the Search Criteria section. | UI Text Box |
|---|
| If you've already paid the bill, click Include Closed and Returns to see closed bills. |
Select the bill that you want to link the document to, and then click Link. | UI Text Box |
|---|
| | You can't link a document to a bill within a locked period. You'll need to either turn off the locked period preference (Setup > Preferences > Security tab), or change the locked period to an earlier date. |
- The document is now linked to the bill, and the thumbnail disappears from the In Tray window.
You can see which bills have a linked document in the Purchases Register (accessible from the Purchases command centre). Look for the document icon. 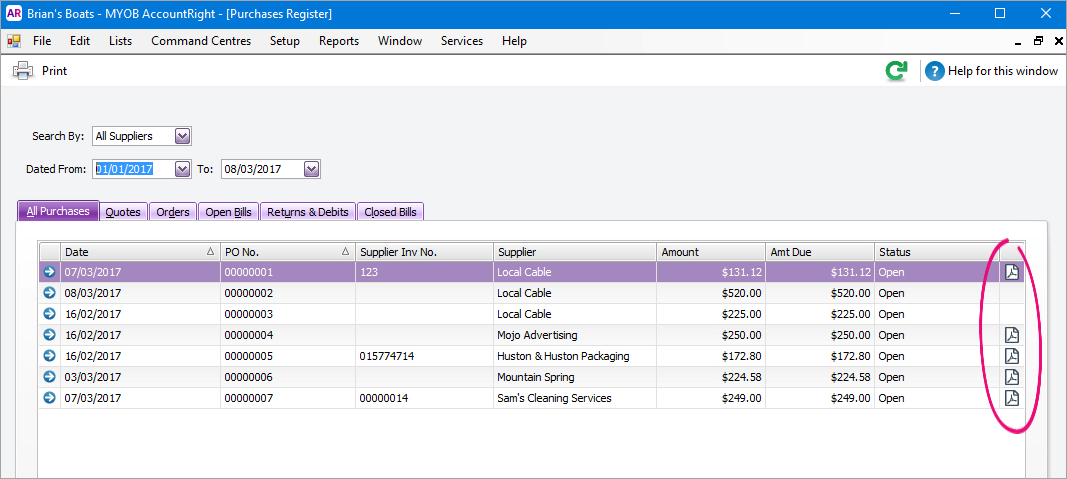 Image Removed Image Removed
|
| UI Expand |
|---|
| title | Unlinking In Tray documents from bills |
|---|
| Unlinking In Tray documents from billsIf you've linked a document to the wrong bill, just click the unlink icon ( Image Removed) in the bill you’re viewing and save the bill. The document will return to the In Tray so you can link it again. Image Removed) in the bill you’re viewing and save the bill. The document will return to the In Tray so you can link it again. |
| UI Expand |
|---|
| title | Viewing, downloading and printing In Tray documents |
|---|
| Viewing, downloading and printing documentsWhile you’re working online, you can view the full details of documents you’ve added to AccountRight. In Tray documents are sorted by the date they were added. Just click the Enlarge button (the magnifying glass) in the In Tray or in a purchase that has a linked document. The Enlarged window appears.  Image Removed Image Removed
Use the Zoom In ( Image Removed) and Zoom Out ( Image Removed) and Zoom Out ( Image Removed) icons to change the magnification of the document, or select a zoom percentage from the dropdown list. Image Removed) icons to change the magnification of the document, or select a zoom percentage from the dropdown list. To download a document (one at a time), click the Save icon in the Enlarged window, and give the file you’re about to download a name (it will be a PDF file, even if you uploaded it as an image file). Once downloaded, you can view or print them using any PDF viewer or attach them to emailsTo set up a bank feed for an ANZ account: Your AccountRight company file doesn't need to be online to set up bank feeds, but you'll need an internet connection. There are two parts to setting up a bank feed: 1. Apply Start the application process in AccountRight, then finish via ANZ's internet banking site. In New Zealand, you have the option to submit an application form. | 2. Link Once your bank feed application is approved, choose the AccountRight account the bank feed applies to. | 1. Apply for a bank feedApplying online via ANZ's internet banking is the quickest way to get up and running. If you're in New Zealand, you have the option to complete an application form. Both methods are covered here: | UI Expand |
|---|
| title | To apply via ANZ internet banking (recommended) |
|---|
| To apply via ANZ internet bankingIf you're in New Zealand and you can't apply via ANZ's internet banking, you'll need to complete an application form as described in the next task. To apply for a bank feed via ANZ internet banking - Start AccountRight.
Go to the Banking command centre and click Bank Feeds. | UI Expand |
|---|
| title | If it's your first bank feed |
|---|
| - The Manage Bank Accounts window appears. Click Get Started with Bank Feeds.
 Image Added Image Added - An internet browser window opens and the MYOB Sign In window appears.
- If prompted, sign in with your MYOB login details (email address must be lowercase).
- Proceed to step 4 below.
|
| UI Expand |
|---|
| title | If it's an additional bank feed |
|---|
| - The Bank Feeds window appears. Click Manage Bank Accounts.
 Image Added Image Added - When the Manage Bank Accounts window appears, click Add or remove a bank account. An internet browser window opens and the MYOB Sign In window appears.
- If prompted, sign in with your MYOB account details (email address must be lowercase).
If you have multiple MYOB products or company files, select the applicable product and company file.
|
Choose your company file from the Set up bank feeds for this company file list. Click Add more bank accounts or Add more credit cards.
 Image Added Image Added | UI Text Box |
|---|
| 'Add more' buttons missing? Oops - you're probably not the online owner (this is usually the person who set up your AccountRight subscription). If you are the online owner (or should be), contact us and we'll help sort it out. |
Select ANZ from the list of financial institutions. Choose the option to continue the bank feed application online and then select the I confirm... checkbox. Click Submit. You'll be provided an 8-digit code and directed to log in to ANZ internet banking. - Log in to ANZ internet banking.
Access the applicable page: | For | Do this |
|---|
| ANZ (AU) | - Go to Settings > Manage Bank Feeds.
- If it's your first time setting up a bank feed, click Get started. Otherwise, click Activate a new bank feed.
| | ANZ (NZ) | Go to Your Settings > Connect to an accounting provider. | - Follow the onscreen prompts.
- When prompted, enter your 8-digit code.
- Submit your application.
Applications are usually processed by ANZ within 24 hours, but it can take a few days—we'll let you know when it's ready. To check the application status, see Manage bank feeds. If you haven't heard from us after 5 business days, contact product support (click chat or scroll down for other options on the Contact Us page). Once it's ready, you'll need to link the bank feed to the corresponding account in AccountRight. See task 2 below for instructions. |
| UI Expand |
|---|
| title | To apply with an application form (New Zealand only) |
|---|
| If you're in New Zealand and you can't apply for a bank feed via ANZ internet banking as described above, you can submit an application form. - Start AccountRight.
Go to the Banking command centre and click Bank Feeds. | UI Expand |
|---|
| title | If it's your first bank feed |
|---|
| - The Manage Bank Accounts window appears. Click Get Started with Bank Feeds.
 Image Added Image Added - An internet browser window opens and the MYOB Sign In window appears.
- If prompted, sign in with your MYOB account details (email address must be lowercase).
- Proceed to step 4 below.
|
| UI Expand |
|---|
| title | If it's an additional bank feed |
|---|
| - The Bank Feeds window appears. Click Manage Bank Accounts.
 Image Added Image Added - When the Manage Bank Accounts window appears, click Add or remove a bank account. An internet browser window opens and the MYOB Sign In page appears.
- If prompted, sign in with your MYOB account email address and password (email address must be lowercase).
- If you have multiple MYOB products or company files, select the applicable product and company file.
|
Choose your company file from the Set up bank feeds for this company file list. Click Add more bank accounts or Add more credit cards.
Image Added | UI Text Box |
|---|
| 'Add more' buttons missing? Oops - you're probably not the online owner (this is usually the person who set up your AccountRight subscription). If you are the online owner (or should be), contact us and we'll help sort it out. |
Select ANZ from the list of financial institutions. - Choose the option to have your application for emailed to you.
- Enter your bank account details.
Select the I confirm... checkbox then click Submit. You'll be prompted to print the bank feed application form. - Click Print Form. The authority form and cover sheet appear. A copy of the authority form is also sent to you by email.
- Print the form.
- Read the cover sheet for instructions on how to complete and submit the form.
- Click Done in the Print the bank authority form page.
The My Products page appears. This shows details about your AccountRight subscription and online services.
The Bank Feeds section is updated with the details of the bank feed you have just applied for.
 Image Added Image Added - Complete and submit the application form. Submission details are provided on the form.
Your application will be processed within 10 business days—we'll let you know when it's ready. To check the application status, see Manage bank feeds. If you haven't heard from us after this time, (click chat or scroll down for other options on the Contact Us page). Once it's ready, you need to link the bank feed to the corresponding account in AccountRight. See the instructions below. |
2. Link the bank feed to an account in AccountRightWe’ll notify you by email when your bank feed is ready to use. You can then link the bank feed to the corresponding account in AccountRight. | UI Expand |
|---|
| title | To link an account to the bank feed |
|---|
| To link an account to the bank feed- In your company file, go to the Banking command centre and click Bank Feeds. The Bank Feeds window appears.
- Click Manage Bank Accounts. The Manage Bank Accounts window appears.
This window shows the status of your bank feeds applications so you can follow their progress. - Click Check/update status.
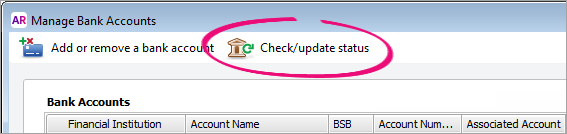 Image Added Image Added
The bank feeds Log in window appears. - Sign in with your MYOB account email address and password (email address must be lowercase).
The Manage Bank Accounts window reappears. This window shows all the bank feeds you have set up and their status. | UI Text Box |
|---|
| "Name not provided by bank" If you applied for your bank feed via ANZ's online banking, the Account Name on the Manage bank feeds page will display "Name not provided by bank'. Don't worry—this doesn't affect your bank feed. |
In the Associated Account column, select an account from the list. This will be the account that the bank feed will be compared to. You can only select accounts set up as a bank account or credit card. Learn more about account types.
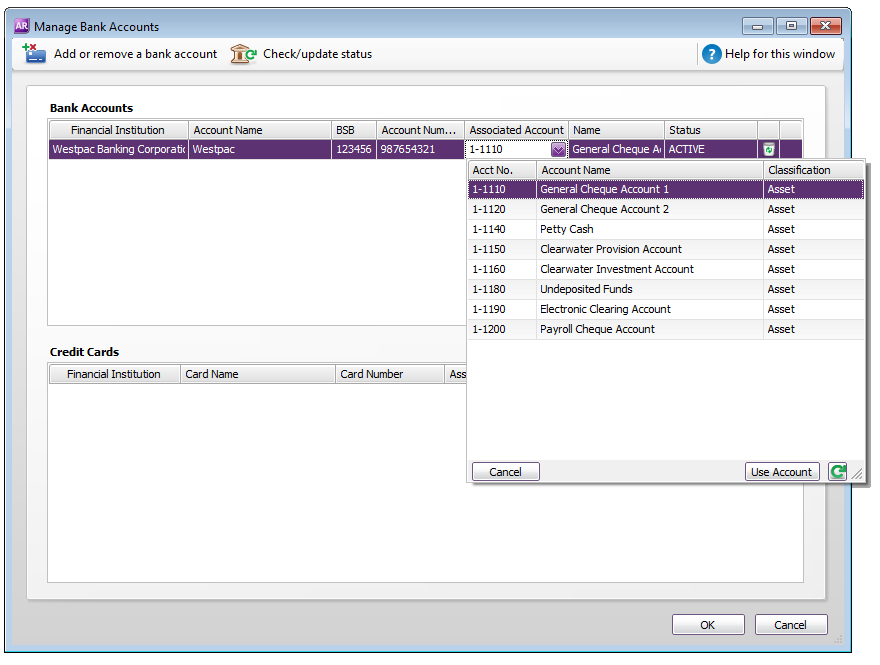 Image Added Image Added - Click Use Account. The account is now linked to the bank feed.
- Click OK to finish.
|
What happens next?When your bank feed is ready and it's linked to an AccountRight account, you’ll be able to download and approve transactions into your company file. Check the delivery frequency for your ANZ account: Australia | New Zealand. Note that the first bank feed you receive will have transactions dated from when your bank feed was approved. Any transactions that occurred while you were waiting for the bank feed to be set up won’t be included. If you want to import and reconcile transactions dated before your feed approval date, you can import a bank statement. | HTML |
|---|
<h2><i class="fa fa-comments"></i> In Tray FAQs</h2><br>h2> |
| UI Expand |
|---|
| UI Expand |
|---|
| title | Why can't I click the Create New Bill or Link to Existing Bill buttons? |
|---|
| After uploading a bill to your In Tray, click the Refresh Image Removed button at the top of the window to activate these buttons| title | Why doesn't prefilling of fields work for some documents I add? |
|---|
| Why doesn't prefilling of fields work for some documents I add?Ensure that the text print on your documents is clear and sharp. If you’re adding scanned documents, try increasing the scan resolution or the darkness if it’s too light. We’re continuing to tweak the OCR feature so that it can recognise more characters and fonts, so you can expect it to get better over time. | UI Text Box |
|---|
| Make sure the In Tray document is ready for use (there isn't a blue icon on it) before linking it to an existing bill or creating a new bill. |
|
| UI Expand |
|---|
| title | How can I stop someone from accessing the In Tray? |
|---|
| How can I stop someone from accessing the In Tray? You can control access to the In Tray for each user from the User Access window (Setup menu). Click the Manage Roles tab and in the list of Purchases tasks, deselect the In Tray option. |
| UI Expand |
|---|
| title | Can I link more than one supplier invoice to a bill |
|---|
| Can I link more than one supplier invoice to a billYou can only link one supplier invoice to a bill. If you have more than one document you want to link to a bill, you can either: - scan all the associated documents together to create a single PDF, or
- use a 3rd party program to combine PDF documents (there are several free programs that will do this - search Google for "combine PDF free".
|
| How do I reprint the bank feed application form? |
| You can reprint the application form for a bank feed that you've applied for. If you need to apply for a new bank feed, repeat the steps above for applying for a bank feed. - Start AccountRight.
- Go to the Setup menu > Manage Bank Accounts. The Manage Bank Accounts window appears.
- Click Add or remove a bank account. An internet browser window opens and the MYOB Sign In page appears.
- Sign in with your MYOB account email address and password.
- If you have multiple MYOB products or company files, select the applicable product and company file.
- Select an account and click Print authority form. The bank feed authority form and cover sheet appear.
- Print the form.
Have you been requested to resubmit a bank feed application? Repeat the steps above to apply for a bank feed. |
| HTML Wrap |
|---|
| width | 15% |
|---|
| class | col span_1_of_5 |
|---|
| | |
| HTML Wrap |
|---|
| float | left |
|---|
| class | col span_1_of_5 |
|---|
| | Panelbox |
|---|
| name | green |
|---|
| title | Related topics |
|---|
| |
| Panelbox |
|---|
| name | yellow |
|---|
| title | From the community |
|---|
| | RSS Feed |
|---|
| titleBar | false |
|---|
| max | 5 |
|---|
| showTitlesOnly | true |
|---|
| url | http://community.myob.com/myob/rss/search?q=in+tray&filter=location%2Clabels&location=category%3AAccountRight&search_type=thread |
|---|
|
|
|
|

 Yes
Yes
 No
No
 Thanks for your feedback.