Only available for online company files in AccountRight Plus and Premier 2020.2 onwards, Australia only Set MYOB Team up for your company fileIf you've joined the Early Adopters Program for the MYOB Team app, here's all you need to know to get set up. You can only set up MYOB Team for online company files and you must have the role of Administrator of the company file. Before you sign into MYOB Team, you need to open AccountRight and:is a fast, simple and powerful self-service app for managing teams, rosters, multiple locations and timesheets. Employers can distribute and approve rosters, manage timesheets, oversee multiple locations, and have an overview of who is working most efficiently, from any device. Employees can clock on and off through the MYOB Team app, check their hours and payslips, and see upcoming shifts. Once an employee clocks on and off with the app, the data is sent straight to your online AccountRight company file, ready for the next pay run. No more third-party plug-ins or apps. And the best part is MYOB Team is included as part of your MYOB subscription. Depending on your business needs, your employees can use MYOB Team: - on their mobile phones to clock on and off, submit timesheets and view rosters, or
- on an on-premises iPad tablet kiosk to clock on and off.
And you can manage it all in the MYOB Team admin portal, accessible via any web browser. 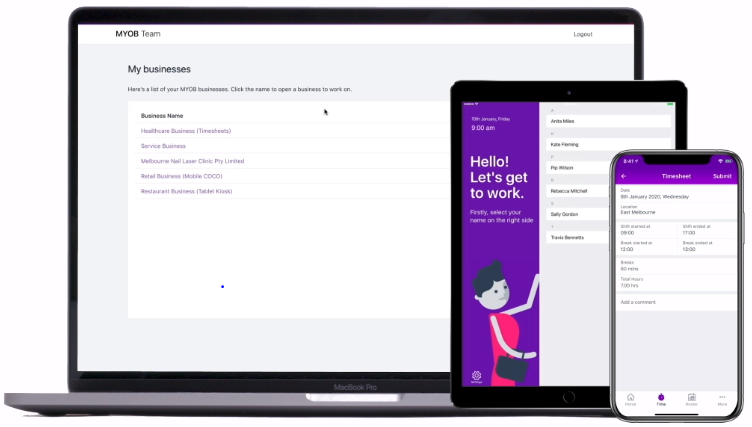 Image Added Image Added
| UI Text Box |
|---|
| Hey employees! If you've been invited to use MYOB Team on your phone, your help is here. |
Setting up MYOB TeamYou'll start the setup process by checking a few things in AccountRight, then complete the setup in the MYOB Team admin portal. | Checklist |
|---|
| Check that MYOB Team is right for you. - MYOB Team works with online AccountRight company files (make sure you're using the latest AccountRight version)
- Only AccountRight administrators can set up MYOB Team
- Only employees with an Hourly pay basis can use MYOB Team to submit their hours
- Employee hours submitted via MYOB Team will appear in AccountRight against the Base Hourly payroll category
|
| UI Expand |
|---|
| title | 1. Select the timesheet preferenceCheck your company file setup |
|---|
| 1. Select the timesheet preferenceGo to the Setup menu and choose Preferences. The Preferences window appears.In the System tab, select the I Use Timesheets for [...] and My Week Starts on [...] preference.If you:- only want to record payroll information, select Payroll from the I Use Timesheets for [...] list.
- also want to record activity slips as well as payroll information, select Time Billing and Payroll from the I Use Timesheets for [...] list.
Choose the first day of your timesheet period from the My Week Starts on [...] list. Note that if you just use timesheets for payroll and your pay period starts on a different day each period, for example, you pay monthly, you can select any day.
 Image RemovedClick Image RemovedClick Check your company file setupOpen your AccountRight company file and complete these tasks. | UI Text Box |
|---|
| If you're prompted to sign on to your AccountRight company file, select the option Link this User ID to your my.MYOB account. This is required to ensure your file can be accessed by MYOB Team.  Image Added Image Added
|
| UI Expand |
|---|
| title | Check your business contact details |
|---|
| Your business contact details must be up to date to ensure MYOB Team can be set up successfully. - Go to the Setup menu and choose Company Information. The Company Information window appears.
- Ensure you've entered valid details for the following:
- Address
- Phone Number
- Email Address
 Image Added Image Added - Click OK.
|
2. Check that you have a valid email address | 2. Check that you have a valid email address | | Check your default superannuation fund |
| Check your default superannuation fundAs an employer, you must have a default super fund set in AccountRight that your employees can choose to use (or they can choose their own fund). You'll specify an employee's super fund when you add the employee to AccountRight, or they can chose their own fund when they set up the MYOB Team mobile app. To learn more about selecting your default super fund, visit the ATO website. To set a default super fund: - Go to the Setup menu and choose
|
Company - General Payroll Information. The
|
Company - General Payroll Information window appears.
|
Ensure that a valid email address has been entered in the Email Address field. This will typically be the email address you sign into AccountRight with.
 Image Removed Image Removed- Choose your Default Superannuation Fund.
 Image Added Image Added
If your desired fund isn't listed, learn how to set up superannuation funds. - Click OK.
|
3. Check that your employees have valid email addresses | 3. Check that your employees have valid email addresses | | Check employee email addresses, pay, super and tax details |
| Check employee email addresses, pay, super and tax detailsEmployees who will use MYOB Team need a valid email address recorded in their employee card. If they'll be submitting timesheets, make sure their pay basis is set to hourly and their standard pay contains no hours. You should also check that their super fund and tax details are complete. Here's what to do: Go to the Card File command centre and click Cards List. The Cards List window appears. Click the Employee tab. - Click the zoom arrow next to the card of an employee that will use MYOB Team. The Card Information window appears.
In the Profile tab, ensure that a valid email address has been entered in the Email field. This will be the same email address the employee must use to sign in to the MYOB Team app.
 Image Added Image Added If the employee will be submitting timesheets using MYOB Team: - Click the Payroll Details tab.
- On the Wages tab, ensure the Pay Basis is set to Hourly. Salary based employee's can't submit timesheets using MYOB Team.
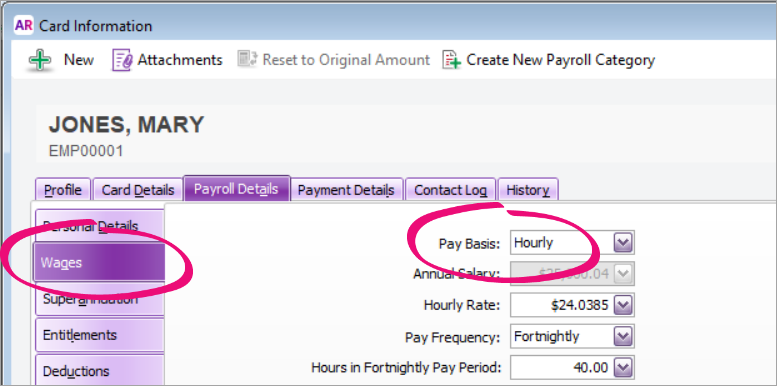 Image Added Image Added - On the Superannuation tab, ensure you've chosen your employee's superannuation fund and entered their employee membership number (employees can also chose their own fund when they set up the MYOB Team mobile app).
 Image Added Image Added - On the Taxes tab, ensure you've selected the correct tax table for your employees. If you're still waiting for their tax file number or don't yet know it, enter 111 111 111 in the Tax File Number field – you can always update this later. If the employee won't have a TFN, see Enter your employee payroll information for other options.
 Image Added Image Added - On the Standard Pay tab, ensure there are no hours recorded. Any hours here will be included in their pay on top of submitted timesheet hours.
 Image Added Image Added
- Click OK.
- Repeat from step 3 for all employees that will be using MYOB Team.
|
|
Sign in to MYOB TeamYou now need to sign in to MYOB Team and: - invite your employees
- enter the locations where your employees work
- choose who can approve timesheets
You must be an Administrator of the company file to complete the following steps. | UI Expand |
|---|
| title | To sign in to MYOB Team |
|---|
| To sign in to MYOB Team| UI Expand |
|---|
| title | Turn on the timesheet preference |
|---|
| Turn on the timesheet preferenceIf you're already using timesheets in AccountRight, you'll have this preference activated. If not, it's easy to set up. Learn more about Timesheets in AccountRight. The timesheet preference you choose in AccountRight will determine which time capture modes you can use in MYOB Team. - Go to the Setup menu and choose Preferences. The Preferences window appears.
- In the System tab, select the I Use Timesheets for [...] and My Week Starts on [...] preference.
- Choose what you use timesheets for from the I Use Timesheets for [...] list. This choice will also determine which time capture types you can choose when setting up your business locations (see task 3 below).
If you choose: - Choose the first day of your timesheet period from the My Week Starts on [...] list.
If your pay date varies, for example you pay monthly, it doesn't matter which day of the week you select.
Image Added - Click OK.
|
|
| UI Expand |
|---|
| title | 2. Add your employees |
|---|
| 2. Add your employeesYou can now open the MYOB Team admin portal to finish the setup. Let's start by adding your employees to the MYOB Team admin portal. You'll invite your employees to use MYOB Team in task 5 below. If you add an employee to AccountRight after setting up MYOB Team, you'll need to repeat the steps below to also add the employee into the MYOB Team admin portal. Add your employees- Go to the Payroll command centre and click MYOB Team.
- If prompted, sign in to your MYOB account (email address and password). The MYOB Team admin portal opens on the My businesses page appears, showing all of your online company files.
 Image Removed Image Removed
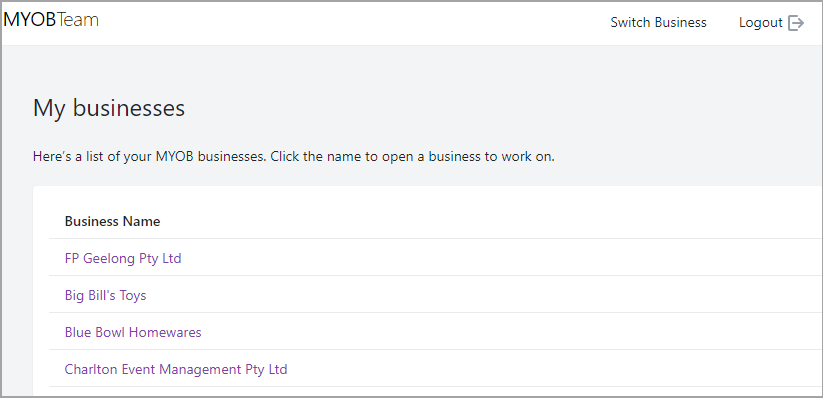 Image Added Image Added Click the company file that you want to set up MYOB Team for. - If a message appears requesting MYOB Team to access your company file, click Allow access. You can now start to add adding your employees to MYOB Team.
| | UI Expand |
|---|
| - Click the People Employees tab.
- Click Add employee. A list of the employees in the company file appears. If you need to add any new employees to your company file, see Add an employee.
Select the employees you want to invite add to use MYOB Team. - Click Add and send email invite. The employees will be sent an email with a link for the MYOB Team mobile app.
| | UI Expand |
|---|
| Add locations- Click the Locations tab.
- Click Add location. The Add
| UI Text Box |
|---|
| If an employee you'd like to add can't be selected (their name is greyed out), you need to go to the Employee Card in AccountRight and enter a valid email address for the employee. See the setup tasks above for more details. |
- Click Add employees.
You can now set up your business locations - see the next task for details. |
| UI Expand |
|---|
| title | 3. Set up business locations |
|---|
| 3. Set up business locationsLocations are your business's physical workplaces, departments or teams of employees. You'll choose a time capture type for each location, based on your business needs and how you want your employees to submit their hours. Verifying attendance at a locationIf your employees clock on and off using the MYOB Team mobile app or a tablet kiosk, you can use either geolocation or photo capture to reduce time theft and increase transparency around employee attendance. You can verify submitted geolocations and photos when approving timesheets. | Feature | Use with | Description |
|---|
| Geolocation | Mobile phone app | See whether employees clock on and off within 200 metres of the business location. Employees will need to have mobile phone location services turned on when clocking on and off. | Photo capture | Tablet kiosk | Captures a photo of an employee each time they clock on or off using the tablet kiosk. |
To set up a location: - In the MYOB Team admin portal, click the Locations tab.
- Click Create location. The Create location page appears.
- Enter the location name and address.
- Select a Time capture type. There are 4 options for time capture mode available. MYOB Team only supports one mode per business however, so you'll need to choose one for all of your employees:
Real time clock on, clock off using an iPad Tablet – for business - The options you're given are based on the timesheet preference you set in AccountRight (see task 1a above).
Real time clock on, clock off using employee’s mobile phone to capture and prove attendance with high accuracy
–
phone
–
alsoSelect your timezone. - Click Add location.
| UI Text Box |
|---|
| The time capture type can't be changed after you've saved the location. Instead, you'll need to delete the location then create a new location with the different time capture type selected. |
- Choose your timezone.
(Optional) Enable geolocation or photo capture for this location. Photo capture is available for tablet kiosks, and geolocation is available for mobile phones. - Select the option Enable geolocation or Enable photo capture.
- Click View my legal obligations and read the displayed information.
- Select the option to acknowledge you understand your legal obligations.
Here's our example location:
 Image Added Image Added - Click Save.
You can now add approving managers to each location - see the next tasks for details. |
| UI Expand |
|---|
| title | 4. Add approving managers |
|---|
| 4. Add approving managersAn approving manager is someone who can approve and edit timesheets. This might be an employee, like a manager or team leader, or perhaps the business owner, a bookkeeper or payroll officer. You'll need to assign an approving manager | Add an approving managerOn the Locations page, click to each of the business locations you set up in the previous task. This will be the person you want to approve timesheets for the employees in that location. When you add an approving manager, they'll be sent an invitation to use MYOB Team. | UI Text Box |
|---|
| You may need to set up the approving manager as an employeeIf you'd like to add an approving manager who is not currently an employee, like the business owner, a bookkeeper, or payroll officer, you'll need to set them up as an employee in AccountRight. Just create a new employee card for them and enter their name and email address on the Profile tab, and set their Employment Basis to Other on the Payroll Details tab. You should also set their Pay Basis to Hourly and Hourly Rate to 0.00 (Payment Details > Wages tab). If you don't want to include this person in pay runs, select Inactive Card on the Profile tab. You can then add them as an employee in the MYOB Team admin portal as described in task 2 above, then select them as an approving manager. |
To add an approving manager to a location: - In the MYOB Team admin portal, click the Locations tab.
- Click a location.
- From the Add Select an approving manager list, choose an employee.
- Click Add and invite. The employee is listed as an Approving Managerapproving manager and will be sent an invitation to download the MYOB Team mobile app.
- If you want to:
Approving Manager - approving manager for the current location, repeat from step 2
- add
Approving Managers - approving managers to other locations, repeat from step 1.
You can now add and invite employees to a location - see the next task for details. |
| UI Expand |
|---|
| title | 5. Add and invite employees to a location |
|---|
| 5. Add and invite employees to a locationYou can now assign employees to one or more locations. This also sends an invitation to those employees to use MYOB Team. - In the MYOB Team admin portal, click the Locations tab.
- Click a location.
- Click the approving manager.
- From the Select employee list, choose an employee to assign to the approving manager.
- Click Add.
- Repeat from step 4 for all employees you want to assign.
- Click Add and invite. The selected employees will be sent an email with a link to download the MYOB Team mobile app.
- If an employee works in multiple locations, repeat these steps to add them to each location.
Accepting the invitationOnce employees download the mobile app, they'll need to create an MYOB account prior to signing in (unless they already have one). They'll do this by clicking Create an account on the sign in screen, then follow the prompts. When creating their account, employees must use the same email address as the one saved in their employee card in AccountRight. 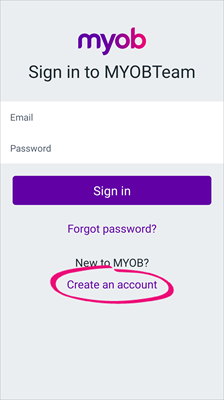 Image Added Image Added
Self-onboardingWhen an employee first signs into the MYOB Team mobile app, they'll be prompted to enter any personal, tax and superannuation details that are missing from their employee card in AccountRight. This eliminates paperwork, reduces your data entry, and simplifies your workflow. For all the details on using the MYOB Team mobile app, see this help topic (you might even want to send it to your employees for their reference). |
What's next?Buggered if I know. Once you're set up and you've invited your employees, find out about: |

 Yes
Yes
 No
No
 Thanks for your feedback.