Most businesses send statements to customers who have outstanding balances at the end of a month. Statements will be generated using the statement form you choose at the time of emailing or printing, and you can personalise your statement form to suit your business needs. Once you've set up AccountRight to send emails, you're good to go. This includes personalising your default email messages. | UI Text Box |
|---|
| Got multiple contact details for a business? You can enter multiple addresses, including email addresses, in the customer card – see Adding a customer. |
Here's how to print or email (or reprint or resend) statements one at a time or in a batch. | UI Expand |
|---|
| title | To print a customer statementstatements |
|---|
| To print a customer statementstatementsGo to the Sales command centre and click Print/Email Statements. The Review Statements Before Delivery window appears. | UI Text Box |
|---|
| Can't access the Sales command centre? You need a Sales role to access Sales functions. See Set up roles. |
- Click the To Be Printed tab.
- In the Statement Type field, select the type of statement you want to print.
- Invoice statements list all invoices aged as at a specified date.
- Activity statements list all sales invoices and payments within a specified date range. Activity statements include a running account balance.
- Specify the statement period.
- If you selected Invoice as the statement type, enter an ageing date to display invoices outstanding as at that date.
If you want to include only invoices recorded up to the statement date, select the Only include invoices up to Statement Date option. - If you selected Activity as the statement type, enter the statement date range in the From and To fields.
- Type the number of statements you want to print per customer in the Print field.
- If Click Advanced Fiters if you want to: statement information or change the type of form the statement will be printed on, click Advanced Filters and make your selections. For more information, see Advanced batch filters.
- customer list
- select a different statement form
- include customers with zero balances, or
- add finance charges to the amounts due.
Learn more about Advanced batch filters.
- (Optional) Click the Balance column heading to sort the displayed list by customer balance owing. This helps if you want to print statements only for those customers who owe up to a certain value.
- Click in the select column (
 ) next to the customers you're printing statements for. ) next to the customers you're printing statements for. - Click Print. If you need to reprint a statement, repeat the above steps.
| UI Text Box |
|---|
| | Having trouble printing? See Printing Learn more about printing from AccountRight.
| UI Expand |
|---|
| title | To email a customer statementstatements |
|---|
| To email a customer statementstatements- Go to the Sales command centre and click Print/Email Statements. The Review Statements Before Delivery window appears.
- Click the To Be Emailed tab.
- In the Statement Type field, select the type of statement you want to email.
- Invoice statements list all invoices aged as at a specified date.
- Activity statements list all sales invoices, payments and orders with a customer deposit for a specified date range. Activity statements include a running account balance.
- Specify the statement period.
- If you selected Invoice as the statement type, enter an ageing date to display invoices outstanding as at that date.
If you want to include only invoices recorded up to the statement date, select the Only include invoices up to Statement Date option. - If you selected Activity as the statement type, enter the statement date range in the From and To fields.
- If Click Advanced Fiters if you want to: or
- select a different statement form
, click Advanced Filters and make your selections. For more information, see - include customers with zero balances, or
- add finance charges to the amounts due.
Learn more about Advanced batch filters.
- (Optional) Click the Balance column heading to sort the displayed list by customer balance owing. This helps if you want to email statements only to those customers who owe up to a certain value.
- Click in the select column (
 ) next to the customers to whom you want to email statements. ) next to the customers to whom you want to email statements. - If you want to change a customer’s email address, select the customer’s name and then select another address from the Email Address list or type a different address in the Email Address field at the top of the window.
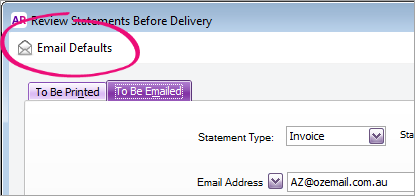
A message appears asking if you'd like to update the employee's card. Click Yes if you want to update it or No if this is a temporary change. - Type the subject and message of the email or accept the default subject and message. If you want to change the default messagethese defaults, click Email Defaults and make the your changes as appropriate.
- Click Send Email. If you need to resend a statement, repeat the above steps.
|
| HTML |
|---|
<h2><i class="fa fa-comments"></i> FAQs</h2><br> |
| UI Expand |
|---|
| title | How do I change the default email subject and message? |
|---|
| How do I change the default email subject and message?You can change the default Subject and Message for your emails in the Email Defaults window. If you have the Review Statements Before Delivery window open, click Email Defaults (top left corner). You can also open this window by going to Setup > Preferences > Reports & Forms tab > Emails.  Image Removed Image Removed
To change the form which is used when emailing, see Set the default forms to use when emailing or printing.| To save statements to disk |
| To save statements to disk you'll need third-party software to "print" (save) the statements as PDF documents. Windows 10 has a built-in Print to PDF option which you can select when printing, or you can use a program like Adobe Acrobat or CutePDF to provide the ability to print (save) documents as PDFs. Once you have the ability to print to PDF, when printing statements in AccountRight and you're prompted to choose a printer, choose the PDF printer from the list of printers. This saves the statements as PDF documents. |
| UI Expand |
|---|
| title | How can I check my email delivery status? |
|---|
| How can I check my email delivery status?If you send emails directly from AccountRight you can track the email delivery status. If you send emails through Microsoft Outlook, there are features in Outlook which can help track email delivery and receipt. Refer to the help in Outlook for more details. |
| While there isn't a "print preview" function to see what your customer statements will contain, there are a few ways you can do it. If you want to see (or change) the fields on your customer statements, view the statement form (Setup menu > Customise Forms > Statements > Invoice or Activity then open the statement form you use). Learn more about personalising your forms. Here are 3 methods for viewing statement content: | Method | Details |
|---|
| Email a statement to yourself | Follow the steps above for emailing statements, select the customer and enter your email address in the To field. When the email arrives, view the attachment to see the statement. | | Print (save) a statement to a PDF document | To save statements to disk you'll need third-party software to "print" (save) the statements as PDF documents. Windows 10 has a built-in Print |
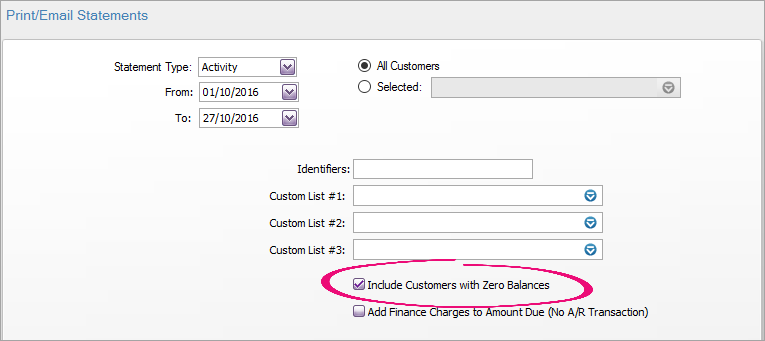
How do I include statements for customers with zero balances?To include statements for customers with zero balances, click Advanced Filters you can select when printing, or you can use a program like Adobe Acrobat or CutePDF to provide the ability to print (save) documents as PDFs. Once you have the ability to print to PDF, when printing statements in AccountRight and you're prompted to choose a printer, choose the PDF printer from the list of printers. This saves the statements as PDF documents. |
| | UI Expand |
|---|
| title | How do I include statements for customers with zero balances? |
|---|
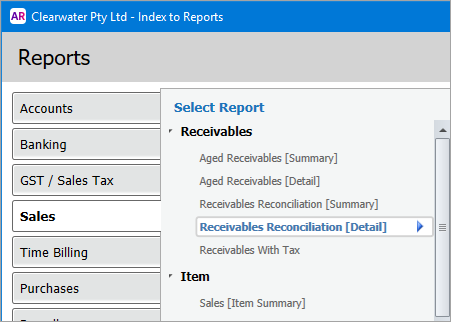
| | Run the Receivables Reconciliation [Detail] report | This report will show you what'll appear on your customers' statements. Go to the Reports menu > Index to Reports > Sales > Receivables Reconciliation [Detail].  Image Added Image Added
Change the As of date to the statement date and set the Ageing Method to Days Overdue Using Invoice Terms.  Image Added Image Added
|
|
| UI Text Box |
|---|
| Adjust the displayed columns on the Review Statements Before Delivery windowand select the option Include Customers with Zero Balances.  Image Removed Image Removed
- Change the column width by clicking and dragging the edge of a column heading left or right.
- Hide a column by right-clicking a column heading and choosing Hide This Column.
- Re-display hidden columns by right-clicking a column heading and clicking Reset Layout (if this doesn't work, try closing and reopening the window).
|
|