Need to clear your list of old transactions from your print or email queue? The same procedure applies to removing any transactions that you can print or email. This includes pay slips, customer statements, invoices and purchase orders. If you've only got a few transactions to remove, open each transaction and change the Delivery Status to Already Printed or Sent. 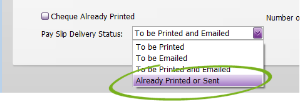
| UI Expand |
|---|
| title | To remove emails a batch of transactions from the To Be Emailed email queue |
|---|
| If you need to remove emails from the To Be Emailed tab, there's two ways to do it: - Disconnect your computer from the internet.
- Open the batch email window for the type of transaction you want to send. For example, the Print/Email Payslips, Print/Email Invoices or Print/Email Statements windows.
- Select the To Be Emailed tab.
 - Select all the emails you want to remove and click Send Email. Without an internet connection, it will move them to the outbox in Microsoft Outlook.
- Open Microsoft Outlook and delete the emails from the outbox.
- Reconnect to the internet.
|
| UI Expand |
|---|
| title | To remove a batch of transactions from the To Be Printed print queue |
|---|
| If you need to remove transactions from the To Be Printed tab, there's two ways to do it: - Turn off your printer.
- Open the batch email window for the type of transaction you want to send. For example, the Print/Email Payslips, Print/Email Invoices or Print/Email Statements windows.
- Select the To Be Printed tab.
 - Select all the emails you want to remove and click Print.
- Select the printer you turned off click Print.
- Open the print queue (double-click the printer icon
 in your computer's system tray, near the clock). in your computer's system tray, near the clock). - Select the items in the print queue which are the transactions from AccountRight. You can select multiple items by clicking the first item then holding down the SHIFT key then selecting the last item.
- Right-click the selected items and choose Cancel.
- Click Yes to the confirmation message.
- Turn your printer back on.
|
| 
 Yes
Yes
 No
No
 Thanks for your feedback.