| HTML |
|---|
<span data-swiftype-index="true"> |
| html-wrap |
|---|
| AccountRight Plus, Premier and Enterprise, Australia only AccountRight 19.14 is the 2017 compliance update and is now available. This update contains payroll tax tables which apply from 1 July 2017. How you update depends on your current AccountRight version. To find out, go to the Help menu in your company file and choose About AccountRight. <add pic showing v19.13> Choose your current AccountRight version to find out how to update. | UI Expand |
|---|
| title | I'm using AccountRight v19.13 |
|---|
| You'll be up and running in no time. Just install the update, then when you're ready to process pays from 1 July, load the new tax tables. 1. Install AccountRight v19.14You'll need to install this update on all computers currently using AccountRight v19.13. The easiest way to get the update is through AccountRight. In your company file, go to the Help menu and choose Updates then Check for Updates. The Software Manager window appears and lists available updates.
| UI Text Box |
|---|
| AccountRight v19.14 not showing? You can also download it by logging in to my.myob.com.au (subscription required). Go to the My Products menu and choose Downloads then click to download the AccountRight v19.14 installer. Double-click the downloaded file to start the installation. |
Click the October 2016 compliance update <what's the new name?> and click Install. The software will be downloaded.
| UI Text Box |
|---|
| Installing on multiple computers If you've got a slow internet connection and you don't want to repeat the download on each computer, select the AccountRight v19.14 update in the Software Manager window and click Download Only. You can then copy the downloaded file to a USB stick and use it on multiple computers. |
- When the download is complete, follow the prompts to complete the installation.
- When prompted to Register for Update Alerts, enter your 12 digit serial number and click Register for Updates. This ensures you'll be alerted of future AccountRight updates.
<does this happen when updating from 19.13? If so, add new pic of Register for Update Alerts window>
After installing you'll notice a new shortcut on your desktop <new or updated icon?>. Use this icon from now on: <new pic of v19.14 desktop shortcut required>  Image Removed Image Removed
2. Load the tax tablesYou need to load the tax tables in AccountRight v19.14 before you process your first pay in July 2017. - Open your company file.
- Go to the Setup menu and choose Load Payroll Tax Tables. The Load Tax Tables window appears.
- Click Load Tax Tables.
To confirm you're using the latest tax tables, go to the Setup menu and choose General Payroll Information. The Tax Table Revision Date should be 1/07/2017.
<new pic required>  Image Removed Image Removed
|
| UI Expand |
|---|
| | title | I'm using AccountRight v19.12 (or earlier) |
|---|
| Upgrading to AccountRight v19.14 is a little different to previous AccountRight updates: - It's a full product download, not just an update.
- AccountRight will be installed in a new program folder, such as C:\PlusClassic.
- Your existing AccountRight v19 software, program folder and desktop shortcut will not be removed.
- You will need to complete a few post-installation tasks.
| UI Text Box |
|---|
| Create a backup Before doing anything, we suggest backing up your data. In your company file, go to the File menu and choose Back Up, then choose the option to Back up all data. Save your backup file in a safe location. |
Some of these tasks need to be repeated on all computers which use AccountRight, but others only need to be done once. | UI Expand |
|---|
| title | 1. Install AccountRight v19.14 |
|---|
| You'll need to install this update on all computers currently using AccountRight v19. The easiest way to get the update is through AccountRight. In your company file, go to the Help menu and choose Updates then Check for Updates. The Software Manager window appears and lists available updates. | UI Text Box |
|---|
| AccountRight v19.14 not showing? You can also download it by logging in to my.myob.com.au (subscription required). Go to the My Products menu and choose Downloads then click to download the AccountRight v19.14 installer. Double-click the downloaded file to start the installation. |
Click the AccountRight v19.14 upgrade <update name> and click Install. The software will be downloaded. | UI Text Box |
|---|
| Installing on multiple computers If you've got a slow internet connection and you don't want to repeat the download on each computer, select the AccountRight v19.14 upgrade in the Software Manager window and click Download Only. You can then copy the downloaded file to a USB stick and use it on multiple computers. |
- When the download is complete, follow the prompts to complete the installation.
- When prompted to Register for Update Alerts, enter your 12 digit serial number and click Register for Updates. This ensures you'll be alerted of future AccountRight updates.
<new pic of Register for Update Alerts window required>
After installing you'll notice a new shortcut on your desktop. Use this icon from now on: <new pic of v19.14 desktop shortcut required> Image Removed |
| UI Expand |
|---|
| title | 2. Upgrade your templates |
|---|
| If you edited any of the templates in your previous AccountRight version, you'll need to upgrade them for use in AccountRight v19.14. This includes: - customised forms
- custom reports
- personalised letters
- graphics (such as your company logo or card images)
- BASlink setup information
AccountRight has a handy assistant which upgrades these templates for you. You'll need to use this assistant to upgrade the templates on each computer which uses AccountRight. - Click the Windows Start button and choose All apps (or All programs).
- Click to open the MYOB AccountRight Plus v19.14 folder (or Premier, Enterprise).
- Click MYOB AccountRight Plus v19.14 Templates Upgrade Assistant. The Assistant opens.
<new pic required>
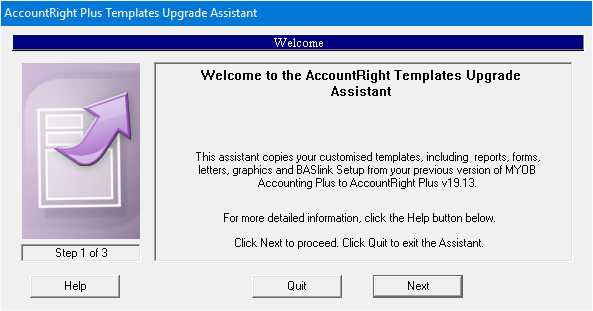 Image Removed Image Removed Click Next. The folder path to your previous AccountRight version is displayed in the Source field. The Destination field displays the path to your new AccountRight folder, such as C:\PlusClassic.
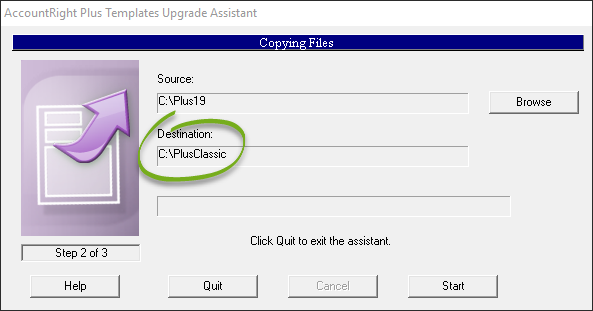 Image Removed Image Removed | UI Text Box |
|---|
| If your previous AccountRight version isn't found Click Browse and locate the folder where your previous AccountRight version is installed. Click the .exe file (for example Myob.exe or Myobp.exe) then click Open. |
Click Start. Your templates will be upgraded. - Click Finish when complete.
 Image Removed Image Removed
| UI Text Box |
|---|
| The templates that were installed with AccountRight v19.14 will be backed up to folders beginning with the word “Old”. You can find these folders in your new AccountRight folder, such as C:\PlusClassic. |
|
| UI Expand |
|---|
| title | 3. Upgrade your company file |
|---|
| You'll need to upgrade your company file so it works with AccountRight v19.14. Perform these steps on the computer where the company file is stored. Start AccountRight v19.14.At the Welcome window click Open your company file. A file browser window appears.Locate your company file. By default your company file will be in the program folder from your previous AccountRight version. | If you're upgrading from... | Your company file will be here... |
|---|
| AccountRight Plus | C:/Plus19 | | AccountRight Premier | C:/Premier19 | | AccountRight Enterprise | C:/Enterprise19 | Click your company file then click Open.Sign on to your company file.Click Yes to the upgrade prompt.
<new pic required> 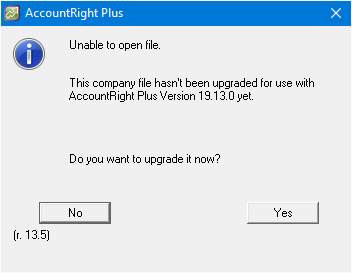 Image Removed Image Removed
Confirm the location and name for your upgraded company file. By default the upgraded company file will be saved in your new AccountRight program folder, such as C:\PlusClassic.
<new pic required>
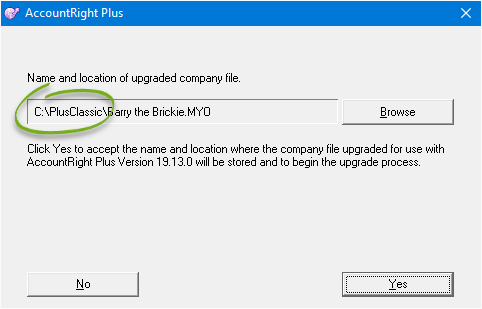 Image Removed Image Removed
| UI Text Box |
|---|
| Shared company files and add-ons If you're using AccountRight Premier and your company file is accessed by multiple computers, make sure the upgraded company file is saved in a shared location to ensure it's accessible by all users. See the FAQ What if my AccountRight Premier company file is shared in a network? below. Using a 3rd party add-on? Add-ons might be affected if your upgraded company file is saved in a different location to your pre-upgraded company file. See the FAQ Will this upgrade impact my 3rd party add-on? below |
Click Yes to upgrade the company file. Click OK when complete. | UI Expand |
|---|
| title | 4. Load the tax tables |
|---|
| You need to load the tax tables in AccountRight v19.14 before you process your first pay in July 2017. - Open your company file.
- Go to the Setup menu and choose Load Payroll Tax Tables. The Load Tax Tables window appears.
- Click Load Tax Tables.
To confirm you're using the latest tax tables, go to the Setup menu and choose General Payroll Information. The Tax Table Revision Date should be 1/07/2017.
<new pic required> Image Removed |
| HTML |
|---|
<h2><i class="fa fa-comments"></i> FAQs</h2><br> |
| UI Expand |
|---|
| title | I've upgraded to v19.14 - why am I being asked to upgrade again? |
|---|
| Only applicable if upgrading from AccountRight v19.12 or earlier If you're being prompted to upgrade your company file again, you're most likely trying to open your old (pre-upgraded) company file. Don't upgrade the file again. Instead, browse for your upgraded company file which is likely to be saved in your new AccountRight program folder, such as C:\PlusClassic. |
| UI Expand |
|---|
| title | Why is my AccountRight shortcut opening my previous version? |
|---|
| Only applicable if upgrading from AccountRight v19.12 or earlier Make sure you're using the new AccountRight v19.14 shortcut to open the software. To avoid confusion, you might want to delete your previous AccountRight version's icon. <new pic of v19.14 desktop shortcut required> Image Removed There's a couple of ways to ensure the shortcut is opening AccountRight v19.14 (and not your previous AccountRight version): check the Welcome window when you start AccountRight
<new pic required>
 Image Removed Image Removed
In your company file, go to the Help menu and choose About AccountRight.
<new pic required>
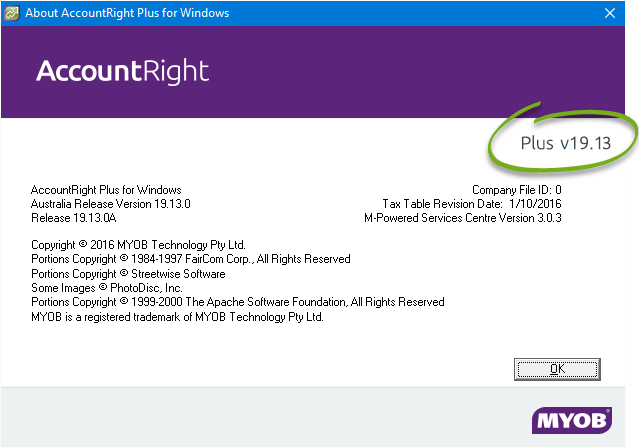 Image Removed Image RemovedLearn more about setting up AccountRight shortcuts | UI Expand |
|---|
| title | Can I open an upgraded company file in an earlier AccountRight v19 release? |
|---|
| No. Once a company file has been upgraded for use in v19.14, you won't be able to open it in an earlier AccountRight version.
<to be confirmed by Quinny/testing/PD> |
| UI Expand |
|---|
| title | Why can't I see my upgraded templates on other computers? |
|---|
| Your customised templates are stored on each computer which uses AccountRight. This means you'll need to upgrade your templates on each computer. See Upgrade your templates above. Still can't see your upgraded templates? See Unable to see a customised form. |
| UI Expand |
|---|
| title | Will this upgrade impact my 3rd party add-on? |
|---|
| 3rd party add-ons will continue to work with AccountRight v19.14. However, if your upgraded company file is stored in a different location to your pre-upgraded company file, you might need to configure the add-on to point to the new file location. This may require editing your Data Source Name (DSN) or configuring the 3rd party application. See this support note for information about editing the DSN, or contact your 3rd party provider. |
| UI Expand |
|---|
| title | What if my AccountRight Premier company file is shared in a network? |
|---|
| A company file which is accessed by multiple computers in a network needs to be stored in a shared folder. This ensures the company file is accessible by all users. If you're upgrading a shared company file, make sure you save the upgraded company file in a shared folder. Just click Browse when upgrading and choose where you want to save the upgraded company file. One option is to save the upgraded company file in the same shared location as your existing company file. But first, you'll first need to rename your existing company file (you can't save an upgraded company file in the same location, with the same name, as an existing company file). Just right-click the company file and choose Rename and add "PRE JUL 2017" to the file name, e.g. "PRE JUL 2017 MyCompanyFile.MYO". Then when you upgrade this file (see Upgrade your company file above), click Browse and choose your current shared folder and rename the upgraded company file to its original name, e.g. "MyCompanyFile.MYO". |
| UI Expand |
|---|
| title | After upgrading, can I uninstall my previous AccountRight version? |
|---|
| Only applicable if upgrading from AccountRight v19.12 or earlier Yes. After completing all of the tasks above, you can uninstall your previous AccountRight version. It's up to you. Uninstalling your previous AccountRight version won't impact AccountRight v19.13. Learn how to uninstall AccountRight |
html-comes with a set of invoice form templates which are used when printing or emailing PDF invoices. And it's easy to change these forms to add your own personal touch. By default, business details entered in the Company Information window (Setup menu > Company Information) will appear on your invoices. This includes your company name and contact details: 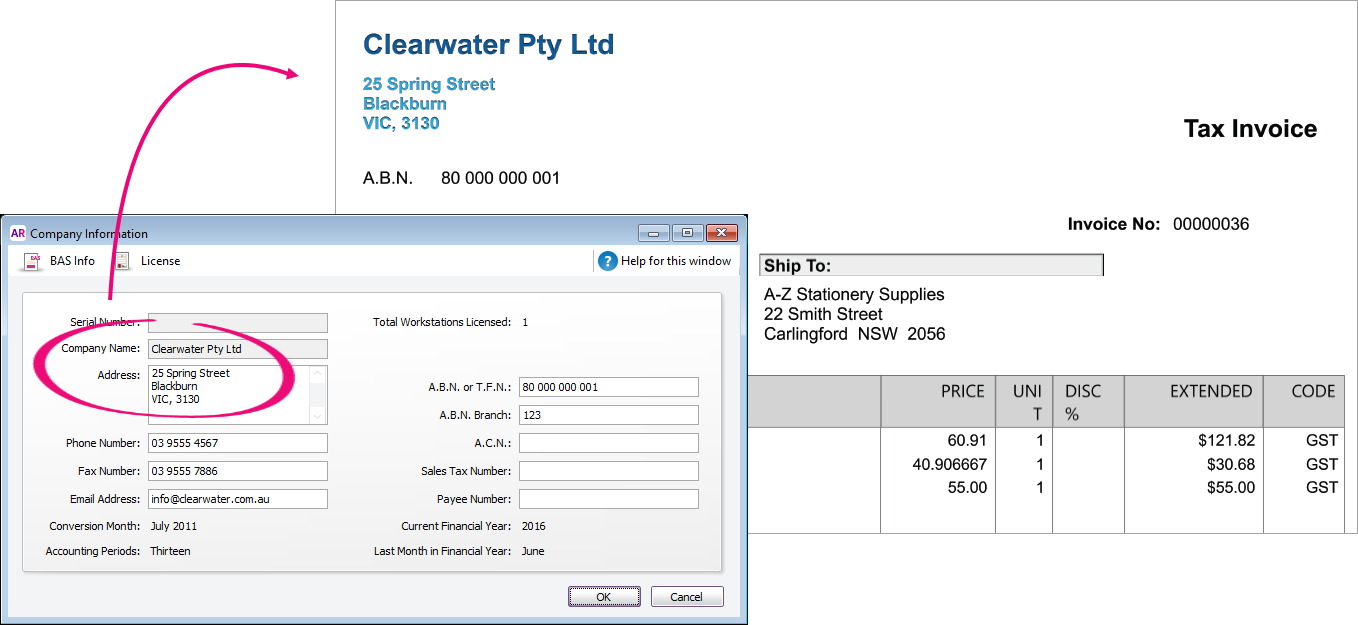 Image Added Image Added
You can add your business logo and a 'how to pay' section, or make your invoices stand out with a splash of colour. It's up to you. Take a look at this quick overview: | HTML |
|---|
<iframe width="560" height="315"
src="https://www.youtube.com/embed/zNFgTyBGq3k?rel=0" frameborder="0"
allowfullscreen></iframe> |
You can use one invoice form for all your sales or have separate forms for invoices, quotes and orders. You can also create different versions of an invoice form depending on what you're selling or who you're selling to. OK, let's step you through it. | UI Expand |
|---|
| title | To customise an invoice |
|---|
| To customise an invoice- Go to the Setup menu and choose Customise Forms. The Customise Forms window appears.
- Click the Invoices tab on the left.
Click the type of invoice form you want to customise (Service, Item, Professional, etc.). The forms for that invoice type will be listed.
 Image Added Image Added | UI Text Box |
|---|
| Choose the correct form Make sure you're customising the correct invoice form for your needs. For example, if you use the Service layout when entering an invoice, customise a Service invoice form. Also, choose a tax inclusive or tax exclusive form to reflect how you charge customers GST. |
- Select the form you want to customise then click Customise. The form opens, ready to be modified.
 Image Added Image Added Customise the form to suit your needs. | UI Text Box |
|---|
| Set up the page first We recommend setting your page margins, orientation and page size first (show me how). Otherwise, changing this later can throw out any other customisations you may have made. |
Here's some guidance on what you can do:
| If you want to... | Do this... |
|---|
| set page margins, orientation and page size | - Click the Print Preview tab.
- Set the page margins, orientation and page size.
To learn more, see Set the form size and background. | | add a picture (business logo, letterhead, etc.) | - In the Customise tab, click Picture.
- Locate and select the picture file and click Open.
- Move, resize or rotate the image as required.
To learn more about working with images, see Add pictures and shapes to forms. | | add or edit text fields | - In the Customise tab, click Text Box.
- Click and drag the mouse cursor to draw a box where you want the text field to appear.
- Double-click in the text box and type the text you want to appear.
- You can move or resize the text box as required.
To learn more about working with text fields, see Add text and fields to forms. | | add data fields | - In the Customise tab, click Fields.
- Select the fields you want to appear by clicking in the column next to them. For a description of each data field, see Fields and columns you can add to forms.
- For some fields you need to select where you want the field to appear when a form has multiple pages. You can choose to show the field on every page, or just at the start (first page) or end (last page).
- When you've finished making your selections, click OK. The selected data fields appear on the form.
- Move the field to the required position by clicking and dragging it, or entering placement coordinates in the Customise tab.
To learn more about working with data fields, see Add text and fields to forms. | | add or edit a table | - In the Customise tab, click Insert Table and choose the type of table you want to use from the list.
- Click the table box, and then drag the red cross to move the table into position.
- Click Table Layout and choose Show/HideColumns.
- Select a column you want to add to the table in the Available columns list and then click Show. Repeat this for other columns you want to add.
- Click OK. The columns appear in your table.
To learn more about working with tables, see Add tables to forms. | | edit the page background | - If you want to change the page colour, click Page Colour and select the required background colour.
- If you want to add a watermark (transparent image or text), click Watermark and choose one of the predefined watermarks, or select Custom Watermark.
- If you're adding a custom watermark, choose a picture or enter the watermark text and select the required formatting options.
- Click OK.
To learn more, see Set the form size and background. | | move, arrange, align, cut, copy, delete or paste form elements | See Editing form elements. |
To preview your form, click the Print Preview tab. - When you've finished customising your form, click the Save
 Image Added button (top-left corner). The Save Form As window appears: Image Added button (top-left corner). The Save Form As window appears: - Enter a name and a description for the form.
- Click Save then click OK to the confirmation message.
To close the form, go to the File menu  Image Added and choose Exit. If prompted to save again, click No. Image Added and choose Exit. If prompted to save again, click No.
The Customise Forms window reappears. Your customised invoice will be listed. 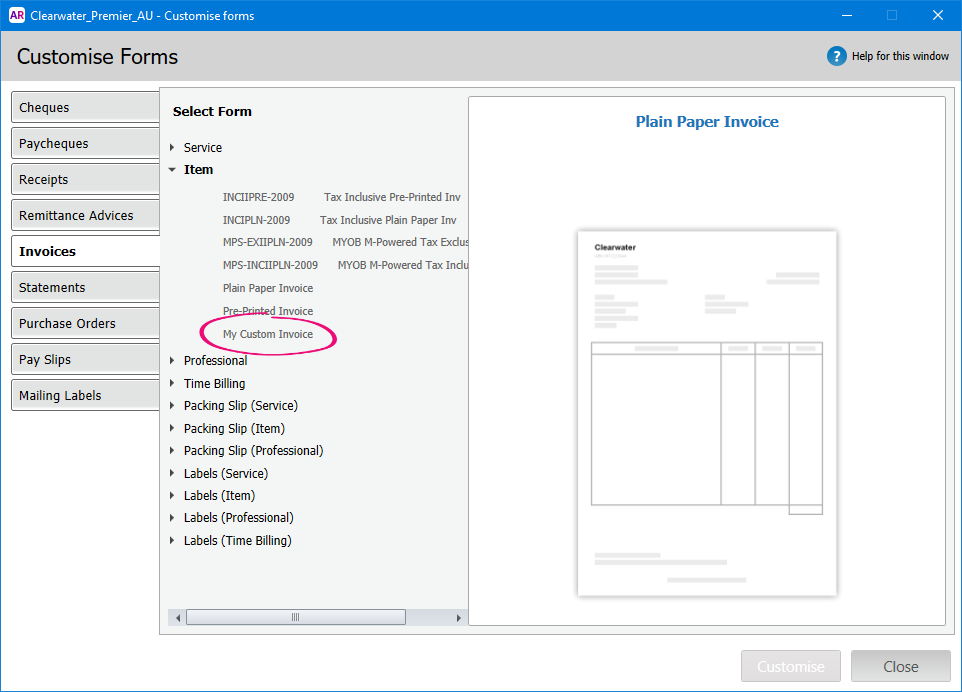 Image Added Image Added
|
| UI Expand |
|---|
| title | To add direct deposit banking details to your invoice |
|---|
| To add direct deposit banking details to your invoiceDirect deposit is a popular payment option which lets your customers pay directly into your bank account. In Australia, the New Payments Platform is making this even easier. Here's how to add banking details to your invoice form. - Go to the Setup menu and choose Customise Forms. The Customise Forms window appears.
- Click the Invoices tab on the left.
- Select the form you want to use then click Customise. The form opens, ready to be modified.
Image Added - Click Text Box in the toolbar.
 Image Added Image Added - In the applicable place on your form, drag a box that's large enough to include your payment instructions.
 Image Added Image Added Double click the text box and type your payment instructions, for example:
For Direct Deposit:
BSB: 013000
Account: 12345678
Payment Reference: Invoice number or customer name
 Image Added Image Added | UI Text Box |
|---|
| Using bank feeds? To help make it easy to identify customer payments coming through in your bank feeds, encourage your clients to include additional details in the payment, such as their name and invoice number. |
- You can resize the text box, or format the text size, font and colour using the options in the Customise tab.
- Click the Print Preview tab to check how the new section will look.
 Image Added Image Added - When you're done, click the Save Image Added button (top-left corner).
- If prompted, enter a name for this customised form then click Save then click OK to the confirmation message.
To close the form, go to the File menu Image Added and choose Exit. If prompted to save again, click No. Repeat this process for any other invoice forms you want to add your payment details to.
|
| UI Expand |
|---|
| title | To add payment terms to your invoice |
|---|
| To add payment terms to your invoiceThe credit terms that appear on the top of a sale transaction in AccountRight can easily be added to your customised invoice. 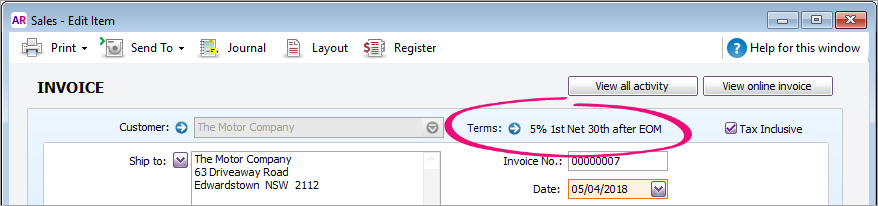 Image Added Image Added
Here's how to do it: - Go to the Setup menu and choose Customise Forms. The Customise Forms window appears.
- Click the Invoices tab on the left.
- Select the form you want to use then click Customise. The form opens, ready to be modified.
- Click Fields. The Insert Fields window appears.
On the Data Fields tab, select the Terms field and choose a display option (appear on every page, appear at start of form or appear at end of form).
 Image Added Image Added - Click OK. The Terms data field appears on the form.
- Move the data field to the required position by clicking and dragging it.
- (Optional) Add a text field which states "Terms:" (or similar) next to the Terms data field.
 Image Added Image Added - Click Print Preview to view your handy work.
 Image Added Image Added
|
| UI Expand |
|---|
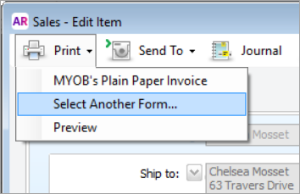
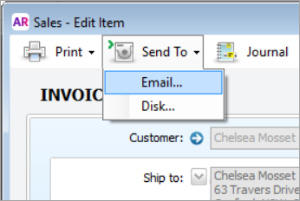
| title | To use your customised invoice when printing or emailing |
|---|
| To use your customised invoice when printing or emailingYou've made the effort to personalise an invoice, so here's how to use it when printing or emailing. | UI Text Box |
|---|
| Saving invoices To save an invoice as a PDF, open the invoice, click Send To > Disk, then choose where you want to save the PDF.  Image Added Image Added
|
| UI Text Box |
|---|
| Can't see your customised invoice? Check that you've customised the correct invoice form type. For example, if you're emailing or printing an item invoice (using the Item layout), only item invoice forms will be available for use. |
|
| UI Expand |
|---|
| title | To set a customer's default invoice form |
|---|
| If you have different invoice forms for different customers, you can set the default form to use in the customer's card. To set the default form to use for all customers, see Set the default forms to use when emailing or printing. To set a customer's default form - Go to the Card File command centre and click Cards List.
- Click the Customer tab.
- Click the zoom arrow to open the customer's card.
- Click the Selling Details tab.
- In the Printed Form field, select the customised invoice for this customer.
 Image Added Image Added
If you can't see your customised form, make sure the applicable Sale Layout is selected. - Click OK.
|
| HTML |
|---|
<h2><i class="fa fa-comments"></i> FAQs</h2><br> |
| UI Expand |
|---|
| title | How do I show the currency code on my invoices? |
|---|
| If you're using multi-currency in AccountRight Premier, you'll want to show the currency code on your invoices. To do this, add the [Currency Code] data field and a text field to show "Amounts in" (or similar). Learn more about adding text and fields to forms. Here's our example:  Image Added Image Added
|
|
| HTML |
|---|
<div style="display:none;" data-swiftype-name="keywords" data-swiftype-type="enum">invoice setup</div>
|
| html-wrap |
|---|
| width | 15% |
|---|
| class | col span_1_of_5 |
|---|
| | |
| HTML Wrap |
|---|
| float | left |
|---|
| class | col span_1_of_5 |
|---|
| | Panelbox |
|---|
| name | green |
|---|
| title | Related topics |
|---|
| |
|
|


 Yes
Yes
 No
No
 Thanks for your feedback.