You can use AccountRight to record trade-ins made to your business. Before any trade-in can be recorded, you'll need to setup your company file with a clearing account that 'holds' the value of the trade-in, as well as create a new inventory item to help you move the trade-in amount into that clearing account. For more information on setting up your trade-in clearing account, see our page on Setting up accounts. Select the Asset tab from the Accounts List, and Bank as the account type. And remember to give it an easily identifiable name, like Trade-in Clearing Account. For more information on setting up a new inventory item, see our page on Creating items. When setting up this item, select the I Sell This Itembecause you'll want to include it on your invoice. In the Income Account for Tracking Sales field, enter the clearing account you created. If you receive any warning messages regarding the type of account selected, click OK. Finally, click the Selling Details tab and enter the relevant Tax Code When Sold.Now that your company file is setup, you're three easy steps away from accurately recording the trade-in item. These steps will have you deduct the value of the trade-in from the sale and deposit it into the clearing account, and then use that account to pay the bill for the purchase of the trade-in itemSome businesses accept customer trade-ins to reduce the selling price of goods sold. For example, a car dealer might accept a vehicle trade-in and deduct the trade-in value from the price of a new car. The steps below can be used for most trade-in situations, but you should also check with your accounting advisor about your tax/GST reporting obligations associated with trade-ins for your business. | UI Expand |
|---|
| title | 1. Set up for trade-ins |
|---|
| Set up for trade-insBefore recording a trade-in, there's a couple of things you need to do. - Create an asset account with the Account Type set to Bank. This account will be used as a clearing account to hold the value of the trade-in.
 Image Added Image Added - Create an inventory item to represent a default trade-in item. You'll use this item when recording sales which include a trade-in to deduct the trade-in value from the sale price.
- Select the option I Sell This Item
- For the Income Account for Tracking Sales, select the asset account created above (ignore the warning about this account usually being an income account)
- On the Selling Details tab, select the relevant Tax/GST Code When Sold.
 Image Added Image Added
You're now ready to record sales which include trade-ins. |
| UI Expand |
|---|
| title | 12. Record the a sale Invoice that includes the a trade-in deduction |
|---|
| Go to the Sales command centre and click Enter Sales.Select the Customer's Card. | UI Text Box |
|---|
| If a Customer Card has not been created, you must create one before recording the trade-in. For more details, see our page on Adding a customer. |
Enter the Invoice # and Date | Record a sale that includes a trade-inIf the trade-in is from a new customer, create a customer card for them. You can then enter an invoice to record the sale. the Ship quantity of the item being sold, enter the Item Number, Description and Price- details of the item being sold.
- On the second line
, - :
- enter a negative one (-1) in the Ship field
. Enter the Item Number of the new Item that was setup and then enter the Price, being - select the Trade-In item created earlier
- enter the trade-in value in the Price field
 Image Added Image Added
Recording this sale will: - deduct the value of the trade-in
.Enter the other transaction details as required then click Record.The window below shows a sample Invoice with the trade-in deduction.  Image Removed Image Removed
- from the amount the customer needs to pay, and
- deposit the value of the trade-in into the Trade-in Clearing account.
|
| UI Expand |
|---|
| title | 23. Create Record a Bill bill for the purchase of trade-in item |
|---|
| | UI Expand |
|---|
| title | 3. Close the Bill Record a bill for the trade-in item |
|---|
Before recording the Bill, you will first need to setup a Supplier type Card for the customer, and an Item for the 'thing' being traded in. When setting up this Item, ensure that the I Purchase This Item option is activated and that the relevant cost of sales account (5-xxxx) is selected (You may also want to select the I Inventory This Item and also the I Sell This Item options). - Go to the Purchases command centre and click Enter Purchases.
- Select the Supplier Card that was specifically setup for the customer.
- Click the Layout button, choose Item and click OK.
- Enter the Purchase #, Date, Memo and the other purchase details.
- Enter the quantity Received, Item Number, and then enter the Price - using the same price as entered for the trade Item on the sales Invoice. Enter this amount as a positive, for example $2500.00.
- Check the transaction then click Record.
The window below shows a sample Bill for a traded-in item. 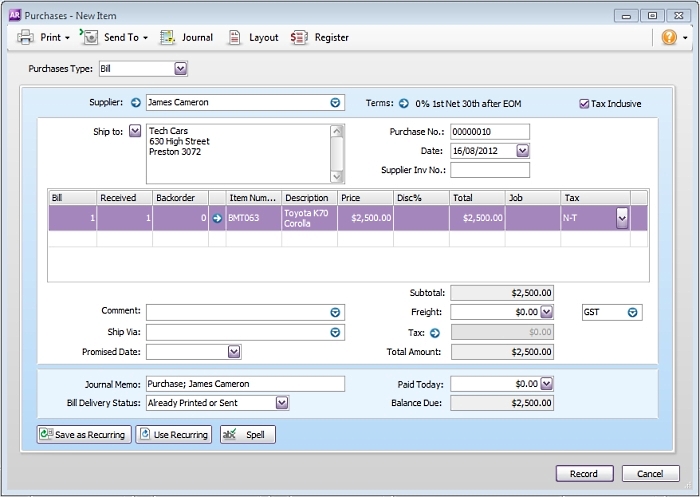 Image Removed Image Removed
| When you receive a trade-in, you're effectively buying that item from the customer. Here's how you can record that purchase: - Create a supplier card for the customer. This will allow you to select this supplier when recording the purchase.
- Create an inventory item for the trade-in item.
- Select the option I Buy This Item. Depending on what you do with your traded-in items, you can also select I Sell This Item and I Inventory This Item.
- Select the applicable Expense Account for Tracking Costs.
- On the Buying Details tab, select the relevant Tax/GST Code When Bought.
 Image Added Image Added - Enter a bill for the trade-in item.
- In the Supplier field, select the supplier card you created for the customer.
- Select the trade-in item in the Item Number field.
- Enter the trade-in value in the Price field.
 Image Added Image Added
Recording this purchase will account for the receipt of the trade-in item. |
| UI Expand |
|---|
| title | 4. Close the bill for the trade-in item |
|---|
| Go to the Purchases command centre and click Pay Bills.Select the Supplier Card that was specifically created for the customer.Select the Pay From Account option then enter the Close the bill for the trade-in itemYou can now close the bill using the funds which were allocated to the Trade-in Clearing account when you recorded the sale. On the Pay Bills window: - Select the Pay From Account option and select the Trade-in Clearing account
in the adjacent Account fieldEnter the Memo, Date and Amount.Enter the Amount Applied against the Bill for the trade-in item.Check the transaction details then click Record.The window below shows a sample of the Pay Bills transaction. This will close the Bill and clear the Trade-in clearing account balance.  Image Removed Image Removed |
| HTML |
|---|
<h2><i class="fa fa-comments"></i> FAQs</h2><br> |
| UI Expand |
|---|
| title | How do I add the items and expenses related to a job onto the customer’s invoice? |
|---|
| Click Reimburse to see a list of all the job purchases and expenses you have assigned a job number to, that can now be reimbursed on the sale. |
| UI Expand |
|---|
| title | How do I set a credit limit or put an account on hold? |
|---|
| You should enter the credit limit you've assigned in each customer's card. If you want to stop sales from being recorded for customers who have exceeded their credit limit, you can place them on hold. |
- In the Supplier field, choose the supplier card you created for the customer. Their open bill will be listed.
- In the Amount field, enter the trade-in value.
- Apply this amount against the bill.
 Image Added Image Added
Recording this payment will: - close the bill, and
- clear the balance of the Trade-in Clearing account.
|
|

 Yes
Yes
 No
No
 Thanks for your feedback.