
You are viewing an old version of this page. View the current version.
Compare with Current View Page History
« Previous Version 20 Next »
https://help.myob.com/wiki/x/JwHW
How satisfied are you with our online help?*
Just these help pages, not phone support or the product itself
Why did you give this rating?
Anything else you want to tell us about the help?
This information only applies to the AccountRight Server Edition, and relates to errors or warnings which specifically refer to the 'AccountRight library service'.
The AccountRight library service is a Windows service installed with AccountRight. AccountRight uses this service to access and open your company files.
Errors can occur if the library service hasn't installed properly or isn't working as intended.
The first thing to check is that you're using the latest AccountRight version.
Some library service issues can be fixed quickly, while others require a few more steps. Perform each of the numbered tasks below until your library service issue is fixed. Some of these tasks are a bit technical, so you might also need help from an IT person.
Before you start, you'll need to log into Windows as an administrator or a user with administrator privileges.
A lot of library service issues are fixed by simply changing your library location, then changing it back to its original location. To do this, you need to know the current location of your AccountRight library (the folder where your AccountRight company files are stored).
By default, your AccountRight library is the My AccountRight Files folder here:
C:\users\Public\Documents\MYOB\My AccountRight Files
You should confirm your AccountRight library location before completing the steps below. There's a couple of ways to do this:
- Navigate to C:\users\Public\Documents\MYOB\My AccountRight Files and confirm that your company file is stored in this location (the file will end with ".myox", for example "MyCompanyFile.myox"
- Click the MYOB Add-on Connector icon
 (in your computer's system tray, near the clock) and choose Status. The displayed window will show you your current library location.
If you can't confirm your current AccountRight library location, skip to task 2 "Reset your network configuration" below.
Once you have confirmed the location of your current AccountRight library, here's what to do:
- Close AccountRight.
- Open the Set Library Location window:
- [Windows 7] Go to the Windows Start menu > All Programs > MYOB > MYOB AccountRight (your version) > Tools > Set Library Location.
- [Windows 8] Open the All apps view and locate the Set Library Location tool (you'll find it in the MYOB group).
- [Windows 10] Go to the Windows Start menu, click All apps, open the MYOB folder and click Set Library Location.
- Click Browse and select a folder (any folder) as the new library location.
- Click OK. The Set library location window reappears.
- Click Set Location. A message appears reminding you that the new library location must be on a local drive.
- Click OK.
- Once this is complete, repeat steps 2 - 6 to set the library location back to its original location.
If the library service issue persists, continue to the next task.
This task resets the networking information on your computer back to its default state. This can often resolve issues with the AccountRight library service.
- Open a Command Prompt (as administrator)
In Windows 8.1 and later:- Right-click in the lower left-corner of the screen (the Start button) and choose Command Prompt (Admin).
- Click the Windows Start button and choose All Programs then choose Accessories.
- Right-click Command Prompt and choose Run as Administrator.
- In the displayed window (at the flashing cursor), type NETSH WINSOCK RESET and press Enter. The following message will display: "Successfully reset the Winsock Catalog. You must restart the computer in order to complete the reset."
- At the flashing cursor, type ipconfig /flushdns then press Enter. The following message will display: "Windows IP Configuration. Successfully flushed the DNS Resolver Cache."
- Type Exit and press Enter.
- Restart your computer.
If the library service issue persists, continue to the next task.
This task checks if the AccountRight library service has installed properly.
- Close all programs.
- Simultaneously press the Windows
 and R key on your keyboard (the Windows key is between the Ctrl and Alt keys). The Run window appears.
 - In the Open field, type services.msc then click OK.

The Services window appears. - In the list of services, look for MYOB AccountRight Library. Here's an example:
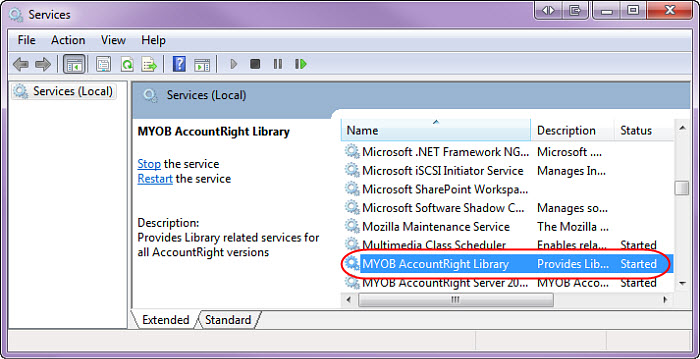
If MYOB AccountRight Library is not listed, the service has failed to install and you'll need to repair the AccountRight installation as described in task 7 (repair the AccountRight installation) below.
If MYOB AccountRight Library is listed, continue to the next task.
This task describes how to start the AccountRight library service and ensures this service starts properly each time you start Windows. Even if the service already displays a status of Started or Running, you'll need to stop and then start the service.
With the Services window displayed (as described above), complete the following:
- If the Status of the service displays as Started or Running, right-click the service and choose Stop.
Right-click MYOB AccountRight Library and choose Start.

The service will start and now display a status of Started or Running. If the service starts but then stops immediately, you'll need to repair the AccountRight installation as described in repair the AccountRight installation below.- Double-click MYOB AccountRight Library. The Service Properties window appears.
- On the General tab at the Startup type field, select Automatic [Delayed Start].

- Click the Recovery tab.
- For Subsequent failures, select Restart the Service.

- Click OK.
- Repeat steps 1 - 7 to ensure the other 2 AccountRight services are started:
- MYOB AccountRight Server 201X.X (where 201X.X refers to your AccountRight version, such as 2015.2).
- MYOB AccountRight Server Locator
- Close the Services window.
If the library service issue persists, continue to the next task.
This task checks that your local AccountRight library has the required permissions to make it accessible when you open AccountRight.
- Simultaneously press the Windows
 and E key on your keyboard (the Windows key is between the Ctrl and Alt keys). The Windows Explorer window appears.
 - Navigate to your My AccountRight Files folder at C:\Users\Public\Public Documents\MYOB\My AccountRight Files) If you've moved your AccountRight library from this default location, you will need to navigate to the new location instead.
Right-click the My AccountRight Files folder and choose Properties.
- Click the Security tab.
- If Windows warns you that 'the permissions of My AccountRight Files are incorrectly ordered which may cause some entries to be incorrect", click OK.
- Click Edit. If Windows warns with the same message as described in the previous step, click Reorder then proceed to step 7. If no warning message appears, proceed to the next task (Check the Windows "shares").
- Restart the MYOB AccountRight Library service:
- Simultaneously press the Windows and R key on your keyboard. The Run window appears.
- In the Open field, type services.msc then click OK.
- In the list of services, right-click MYOB AccountRight Library and choose Start.
If the library service issue persists, continue to the next task.
AccountRight requires specific Windows "shares" (shared folders) to be able to perform specific tasks, and these shares are created when AccountRight installs. If these shares aren't created, AccountRight won't operate. It is known that malware or viruses can prevent these Windows shares from being created, so as a first step you should scan your computer with the most up to date anti-malware and anti-virus software.
You can check if the required Windows shares exist as follows:
- Click the Windows Start button, right-click Computer and choose Manage. The Computer Management window appears.
- In the left panel, click to expand System Tools then click to expand Shared Folders. Three folders will be displayed under this: Shares, Sessions and Open Files.

- Click Shares. If the required shared folders exist, they will be displayed as shown in the following example:
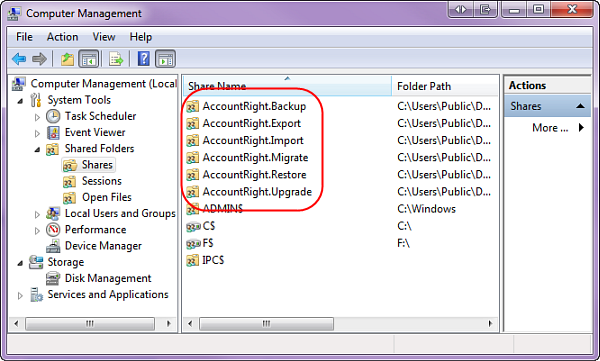
- If the AccountRight shares are listed, proceed to Task 6 below.
If the AccountRight shared folders are not listed, you can manually create the required shared folders using this table as guide:
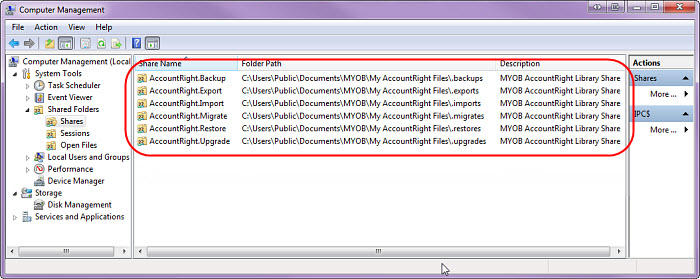
Share name Folder path Description AccountRight.Backup C:\Users\Public\Documents\MYOB\My AccountRight Files\.backups MYOB AccountRight Library Share AccountRight.Export C:\Users\Public\Documents\MYOB\My AccountRight Files\.exports MYOB AccountRight Library Share AccountRight.Import C:\Users\Public\Documents\MYOB\My AccountRight Files\.imports MYOB AccountRight Library Share AccountRight.Migrate C:\Users\Public\Documents\MYOB\My AccountRight Files\.migrates MYOB AccountRight Library Share AccountRight.Restore C:\Users\Public\Documents\MYOB\My AccountRight Files\.restores MYOB AccountRight Library Share AccountRight.Upgrade C:\Users\Public\Documents\MYOB\My AccountRight Files\.upgrades MYOB AccountRight Library Share In the Computer Management window, right-click Shares and choose New Share. The Create A Shared Folder Wizard appears.
Click Next.
- In the Folder path field, enter the folder path for the share being created. This information can be copied from the table above and pasted into the Folder path field.
- Click Next.
- If a warning displays about "The system cannot find the specified path", click Yes to create it.
- Enter the Share name and Description for the share being created. Refer to the table above for this information.
- Click Next.
- Click Finish then click Finish again.
- Repeat steps 6 - 13 to create all required shares as listed in the table above. The shares will then be listed in the Computer Management window as shown below.
If the library service issue persists, continue to the next task.
Performing a "repair" installation installs files which are missing or have become corrupt from the original AccountRight installation.
Before completing the steps below, temporarily disable your antivirus and firewall software as these may interfere with the installation. You can enable these programs again once the repair installation is complete.
- Access the list of programs installed on your computer.
- Windows 10 or 8: Right-click the lower-left corner of your screen and choose Programs and Features.
- Windows 7: Click Start > Control Panel > Programs and Features.
- Click the MYOB AccountRight version to be repaired, then click Change.
- At the following prompt, choose Repair then click Next.

- Follow the prompts to complete the repair.
- Restart your computer.
Still having trouble?
Call our Tech Support team on 1300 555 123 (Australia) or 0508 328 283 (New Zealand).
 Yes
Yes
 No
No
 Thanks for your feedback.