
- Created by MichelleQ, last modified by AdrianC on Nov 22, 2017
You are viewing an old version of this page. View the current version.
Compare with Current View Page History
« Previous Version 10 Next »
https://help.myob.com/wiki/x/HRNNAQ
How satisfied are you with our online help?*
Just these help pages, not phone support or the product itself
Why did you give this rating?
Anything else you want to tell us about the help?
AccountRight Plus and Premier, Australia only
Changing an employee from full time, part time or casual can be simple or complex, depending on your scenario. You can update the employee's card for changes to pay rate, hours worked, and entitlements. Keeping the same employee card also ensures the employee only receives a single payment summary at the end of the payroll year.
Check the rules with an expert
If you're not sure what an employee is entitled to under their new arrangement, the Fair Work website is a good place to start. You might also need some expert advice on the tax implications of paying out unused leave.
If unsure, speak to an accounting advisor or ask the experts on our community forum for clarification on your best course of action.
Each scenario is different, so we can't tell you exactly what to do. But we can provide some general guidelines and tell you how to make the changes in AccountRight.
Here's a few common scenarios and how to treat them.
| Scenario | Details |
|---|---|
| An employee changes from part time to full time (or vice-versa) | The employee may still be entitled to annual leave and personal leave. If so, change the Employment Status in the employee's card and check their other payroll information. See To change the Employment Status below |
| An employee changes from casual to permanent | Unlike casual employees, full time and part time employees generally accrue entitlements. In this case, change the Employment Status in the employee's card, assign them the applicable entitlements, and update their other payroll information. If the employee is changing from an hourly pay rate to a annual salary, you'll also need to change the Pay Basis in their card. See To change the Employment Status and To change the Pay Basis below. |
| An employee changes from permanent to casual | Full time and part time employees generally accrue entitlements, but casual employees typically don't. This means when an employee changes to a casual basis, any unused annual leave might need to be paid out. |
To change the Employment Status
- Go to the Card File command centre and click Cards List.
- Click the Employee tab.
- Click the zoom arrow to open the employee's card.
- Click the Payroll Details tab.
- Change the Employment Status.

- Choose the applicable Employment Category (Permanent or Temporary).
- Ensure all other payroll details are correct for the new employment status. See Enter employee payroll information for details.
- On the Contact Log tab, click New Log Entry and record details of this change. Learn more about the contact log.
- Click OK when done.
To change the Pay Basis
Go to the Card File command centre and click Cards List.
- Click the Employee tab.
- Click the zoom arrow to open the employee's card.
- Click the Payroll Details tab.
- Click the Wages tab on the left.
Change the Pay Basis.

Using timesheets?
If you've paid an hourly-based employee using timesheets and you change their Pay Basis to Salary, you can click OK to the following message.
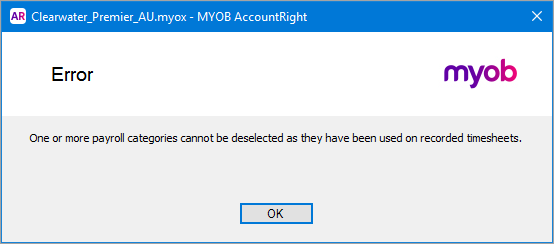
This just means all wage categories you've used to pay the employee must remain selected, and will continue to show on the employee's pay (such as Base Hourly). Check the employee's standard pay details to ensure no amounts appear next to any of the wage categories you can't deselect.
- Ensure all other payroll details are correct for the new pay basis. See Enter employee payroll information for details.
- On the Contact Log tab, click New Log Entry and record details of this change. Learn more about the contact log.
- Click OK when done.
 Yes
Yes
 No
No
 Thanks for your feedback.