
https://help.myob.com/wiki/x/WIJsB
How satisfied are you with our online help?*
Just these help pages, not phone support or the product itself
Why did you give this rating?
Anything else you want to tell us about the help?
AccountRight Plus and Premier online company files, Australia only
Employee self-onboarding is where a new employee submits their personal, banking, tax and superannuation details straight into your AccountRight company file*.
The self-onboarding request is sent via email and an optional text message to ensure the employee sees it – and responds – as soon as possible.
Self-onboarding is the quickest way to set up a new employee – it's safe, secure, and eliminates a lot of paperwork. It also reduces your data entry and reduces errors, because the employee provides the information directly.
How it works
- Send the employee a request to submit their details.
- A new employee card is automatically created - ready for the employee's submitted details.
- Add the employee's pay details to finish their setup.
- Enter your business's general payroll information, including a default super fund (Setup menu > General Payroll Information).
- Initiate the self-onboarding request via either:
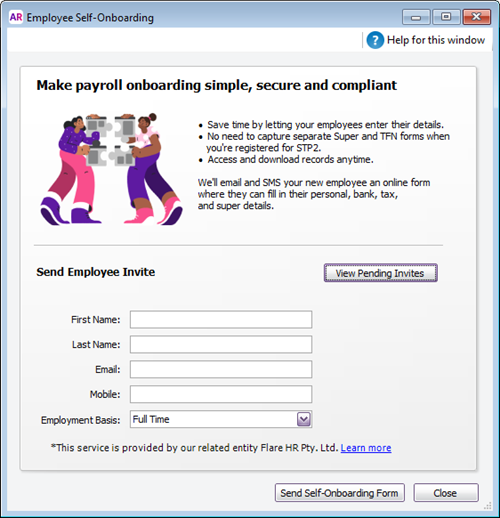
- the Payroll or Card File command centre > Employee Self-Onboarding. You'll see this window:
the Card File command centre > Cards List > Employee tab > New. You'll see this window:
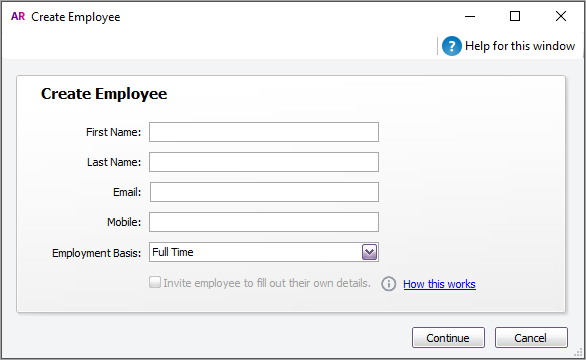
The option Invite employee to fill out their own details becomes active and is selected when you enter the employee’s email address.
- the Payroll or Card File command centre > Employee Self-Onboarding. You'll see this window:
Enter the employee's name and email address.
- If you'd like to also send the self-onboarding form via SMS text, enter the employee's mobile number.
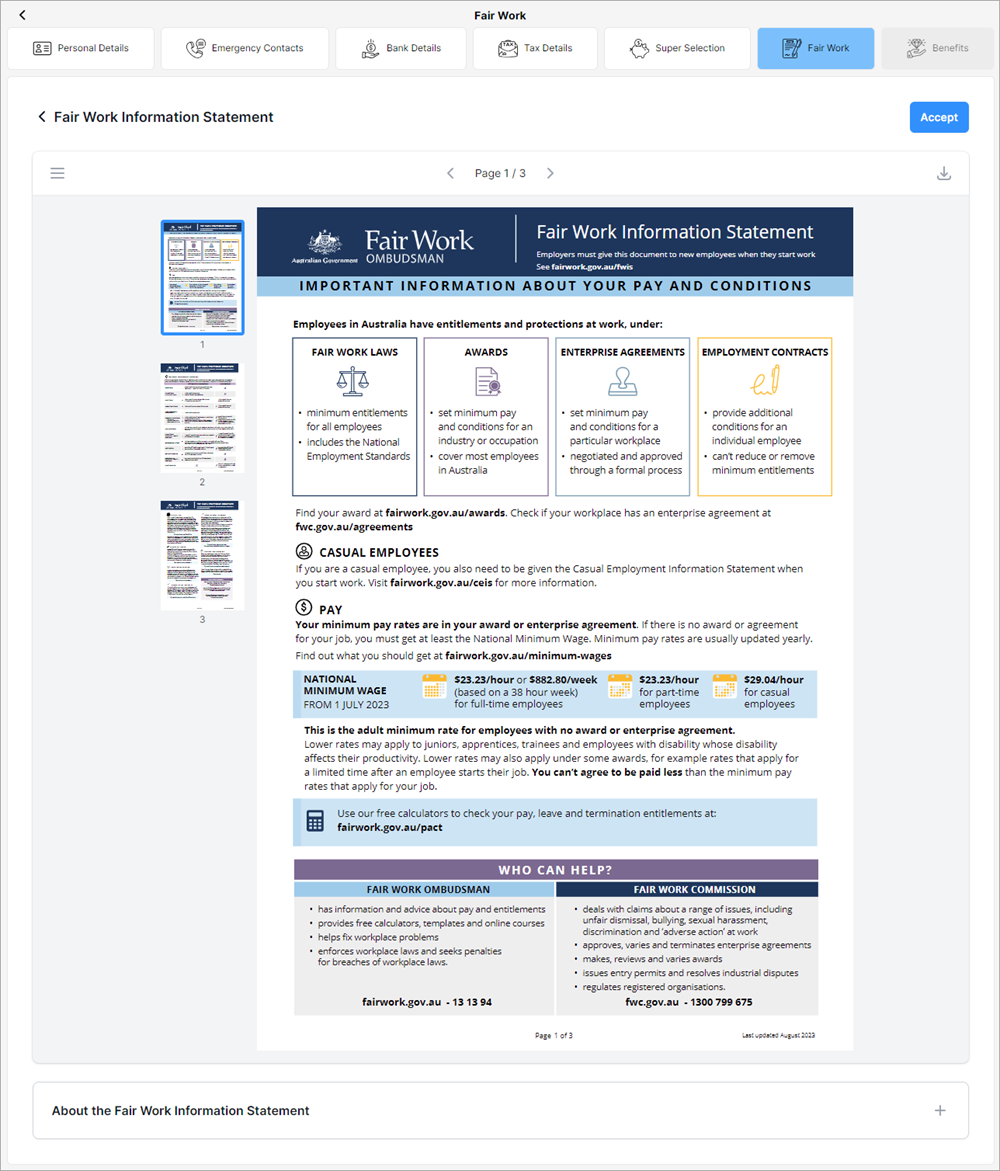
Choose the employee’s Employment Basis. When the employee self-onboards, they'll be provided the Fair Work Information Statement (as required by Fair Work). If you choose Casual the employee will also be provided the Casual Employee Information Statement.
- If you see the option Provide access to employee benefits and you’re inviting the employee to fill out their own details, choose whether you want to give the employee access to employee benefits. If you’ve already set up employee benefits you won’t see this option as your employee will already get access to employee benefits via the Flare app once they’ve completed entering their own details.
- Click Send Self-Onboarding Form or Create Employee (as applicable).
Don't want to send a self-onboarding request?
If you'd prefer to enter all the employee's details yourself, go to the Card File command centre > Cards List > Employee tab > New. Enter the employee's name and email address, then deselect the option Invite employee to fill out their own details.
Click Continue and manually enter the employee's details.
What happens now?
An email (and text message, if you entered a mobile number) is sent to the employee, guiding them through the submission process. What does the employee see?
A new card is created for the employee in AccountRight. This is where the employee's submitted details will be stored. It's also where you'll add the employee's payroll information as described in the next task.
You can check the status of an employee's self-onboarding in their employee card (Card File > Cards List > Employee tab > click to open the employee's card > Profile tab).
Within an hour of the employee submitting their details:
- you'll receive an email notification that the employee has completed their self-onboarding, and
- the submitted details will be added to the employee's card.
Adding payroll information for a self-onboarded employee
Once you've sent the employee their self-onboarding form, you can add their pay details. This ensures they're paid correctly and you'll meet the ATO's requirements for Single Touch Payroll (STP) reporting.
Here's what the employee will submit via self-onboarding, and the payroll information you'll need to add.
| The employee submits this | You need to add this | |
|
|
Adding information before the employee submits their details
When your employee submits their details, they'll be entered straight into your AccountRight company file. If you've already entered any of these details, the employee's version will overwrite what you entered.
We'll tell you which fields the employee will be completing below, so you don't have to do it yourself.
To add payroll information
- If it's not already, open the new employee's card (Card File command centre > Cards List > Employee tab > click to open their card).
- If you have a numbering or code system to identify your employees, enter the employee's Card ID on the Profile tab. All other fields on this tab will be populated with details submitted via self-onboarding.
- Click the Payroll Details tab.
Enter the required information on each tab. Every employee is different, so some tabs might not be applicable. But we suggest checking each one – just to be sure.
 Personal Details
- Enter the employee's Start Date (their first day of employment).
(Optional) Choose an Employment Classification. This is like a job title or used to classify workers who are employed under a specific award or agreement. AccountRight comes with a default list of employment classifications, but you can customise this list to suit your business (Lists menu > Employment Classifications). Once you've set up your employment classification list, you can assign them to your employees and it'll display on their pay slips.
All other fields on this tab will be filled in with the information the employee enters during their self-onboarding.
Wages- Choose whether you're paying the employee an annual Salary or an Hourly rate and how much they'll be paid.
- Choose their Pay Frequency and the usual number of hours in a pay cycle. If their hours vary, the amount you enter here can be changed each time you process their pays. You'll still be able to pay an employee outside of this cycle, for things like bonuses or one-off payments.
- Choose your Wages Expense Account. If you're not sure which account to choose, check with the person who set up your accounts list.
- Select each wage category the employee will be paid. This is for things like allowances, overtime, and annual leave pay. If needed, you can create additional wage categories. By default, the Base Salary wage category is assigned to salaried employees and Base Hourly is assigned to hourly-based employees. If you're not sure what an employee is entitled to, the FairWork website is a good place to start.
None of the employee's self-onboarding information will go into this tab.
Superannuation- By default, the Superannuation Guarantee category is assigned to new employees (this is for the mandatory superannuation contributions you need to pay for them). If the employee isn't eligible for super guarantee contributions, deselect the superannuation guarantee category.
- If the employee has chosen your default super fund, contact the fund to obtain a membership number for them and enter it here.
- If the employee will have additional super contributions, like salary sacrifice, choose the additional super pay items here. Learn more about additional superannuation contributions.
These fields will be filled in with the information the employee enters during their self-onboarding:
Superannuation Fund
Employee Membership No (unless they've chosen your default super fund)
EntitlementsSelect the types of leave the employee is entitled to. For example, if they'll accrue annual leave and personal leave, choose these entitlement categories.
If needed, you can set up new leave entitlements. To check which leave entitlements apply to an employee, visit the FairWork website.
None of the employee's self-onboarding information will go into this tab.
Deductions- If any amounts need to be deducted from the employee's pay, like union fees, select them here.
- If needed, you can set up new deductions.
None of the employee's self-onboarding information will go into this tab.
Taxes- Choose the applicable Income Type (Salary and wages, Closely held payees, Working holiday maker, Seasonal worker program or Labour hire). If unsure, check with your accounting advisor or the ATO. If you choose Working holiday maker, also choose the employee's Country of origin.
- If the employee has a withholding variation, tax rebate or extra tax to be withheld, record it here.
These fields will be filled in with the information the employee enters during their self-onboarding:
Tax File Number
Tax Table
Income Type and Country of origin (only if the employee chose Working holiday maker in their self-onboarding)
What about the tax file number declaration?
Until you're on STP Phase 2, you'll need to continue sending TFN declarations to the ATO for new employees. Once you're on STP Phase 2, a new employee's tax details will be sent to the ATO when you declare their first pay run from AccountRight, so you won't need to submit a TFN declaration.
Learn how to get ready for STP Phase 2.
Standard Pay- If you'd like a message to appear on this employee's pay slip, enter it in the Memo field.
- Confirm the payroll categories and amounts that will make up the employee's regular pay. <Calculated> amounts will be calculated each pay. If you change an amount on this tab it'll be changed for each pay. You'll be able to review and update pay amounts when you do a pay run. Learn more about reviewing standard pay details.
- Assign Jobs to pay items if you want to track the wage expense of work performed on that job. You can also assign amounts to jobs when you do a pay run. Tell me more about jobs.
- If the employee will be submitting timesheets, remove all hours from their standard pay.
None of the employee's self-onboarding information will go into this tab.
Pay History- If you've started using AccountRight part way through the payroll year and you've already paid the employee in the current payroll year, click the Pay History tab and enter their payroll history. Once you've started paying an employee using AccountRight, this tab shows what they've been paid for each payroll category for a chosen period.
None of the employee's self-onboarding information will go into this tab.
When you're done, click OK.
You can check the status of an employee's self-onboarding in their employee card (Card File > Cards List > Employee tab > click to open the employee's card > Profile tab).

You can see a list of all the self-onboarding invites you've sent and their status by clicking View Pending Invites on the Employee Self-Onboarding window (Payroll command centre > Employee Self-Onboarding > View Pending Invites).

You'll view this list in a web browser so you might be prompted to sign in with your MYOB account details. Learn more about accessing an AccountRight company file in a web browser.

Resending or cancelling an invitation
While viewing the pending invitations in a web browser (see above) click the ellipsis button to the right of the request and choose Resend invite or Cancel invite.

If you resend an invitation and the employee was part way through completing their first invitation, their progress will be saved and they'll be able to continue filling in their details when they receive the resent invitation.
Cancelling an invitation removes it from the Self-onboarding invites list, but the employee's card will remain. If you haven't paid the employee you can delete their card or mark the card as inactive.
Viewing a self-onboarded employee's details or super choice form
You can see the employee's submitted details on the applicable tabs in their employee card (Card File command centre > Cards List > Employee tab > open the employee's card).

For example:
- on the Profile tab you'll see their personal and contact details
- on the Card Details tab > Notes field you'll see their emergency contact details.
- on the Payroll Details tab > Personal Details tab you'll see their personal employee information
- on the Payroll Details tab > Superannuation tab you'll see their chosen super fund details
- on the Payroll Details tab > Taxes tab you'll see their tax file number and tax table (used to calculate the right amount on their pay)
- on the Payment Details tab you'll see their bank details
Download a PDF of the employee's submitted details
If you'd like to retain a record of what the employee submitted, you can download a PDF:
- Go to the Card File command centre > Cards List > Employee tab.
- Click the blue zoom
 arrow to open the new employee's card.
 - Click the Payroll Details tab.
- Click View PDF. The PDF opens in your default PDF viewer where you can print or save it.
Getting an error? A PDF can only be generated for employees who self-onboarded after May 2022.
Download a completed super choice form
If you'd like to retain a record of the employee's submitted superannuation details, you can download a completed Superannuation Standard choice form (PDF).
- Go to the Card File command centre > Cards List > Employee tab.
- Click the blue zoom arrow to open the new employee's card.
- Click the Payroll Details tab > Superannuation tab.
- Click View completed super choice PDF. The PDF opens in your default PDF viewer where you can print or save it.
What about the tax file number declaration form?
You'll only need to send a TFN declaration (available from the ATO) to the ATO for new employees if you're on STP Phase 1. Once you're on STP Phase 2, a new employee's tax details will be sent to the ATO when you declare their first pay run from AccountRight, so you won't need to submit a TFN declaration. Learn how to move to STP Phase 2.
FAQs
The employee will receive an email from noreply@flarehr.com, like this one, containing a link to complete their pay setup. If you entered their mobile number, they'll also receive the link via text message.
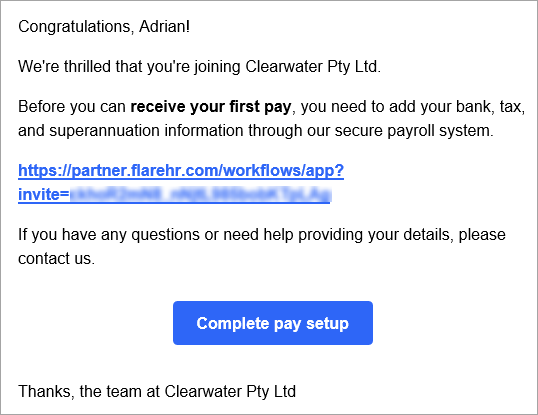
When they click the link, they'll be prompted to authenticate their account. This ensures only the employee can access the secure online form.
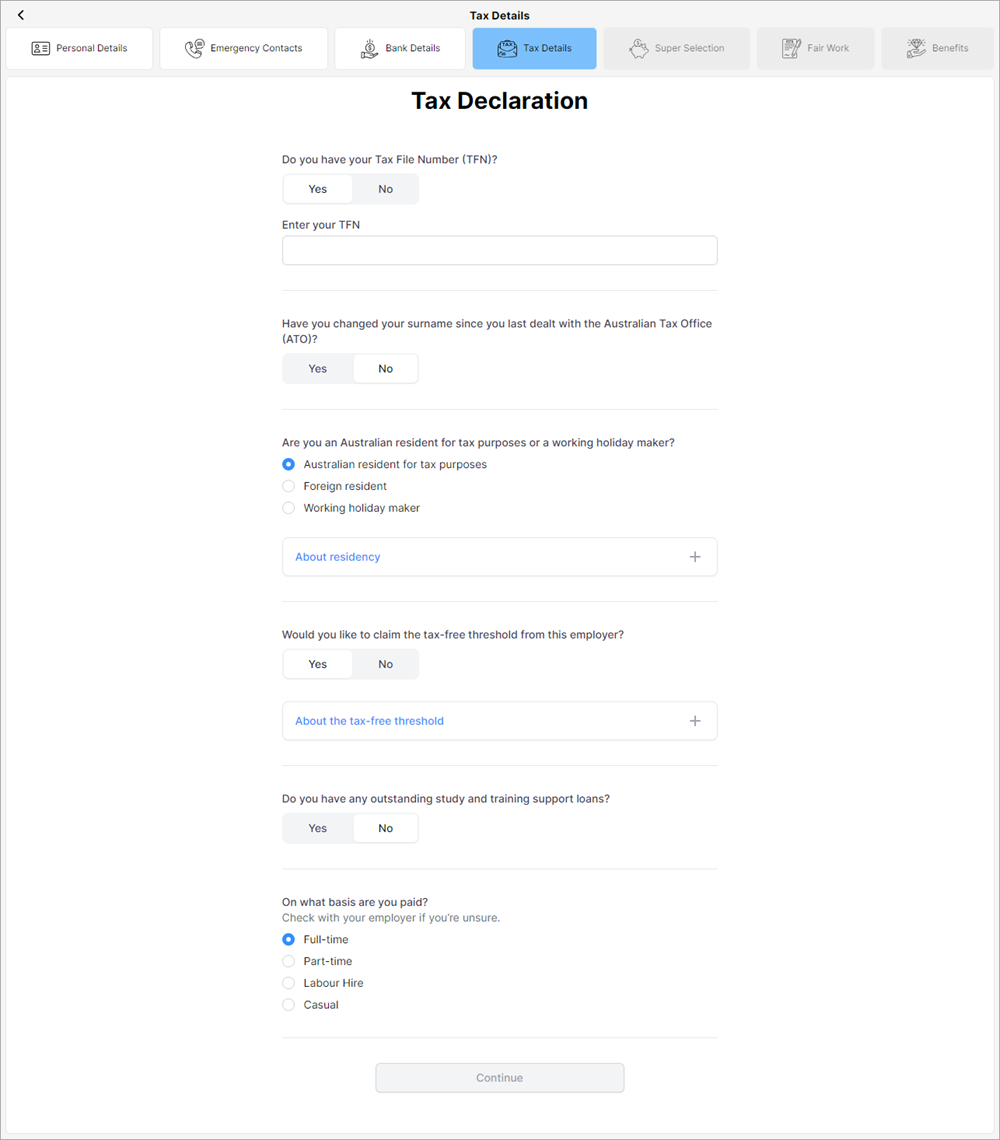
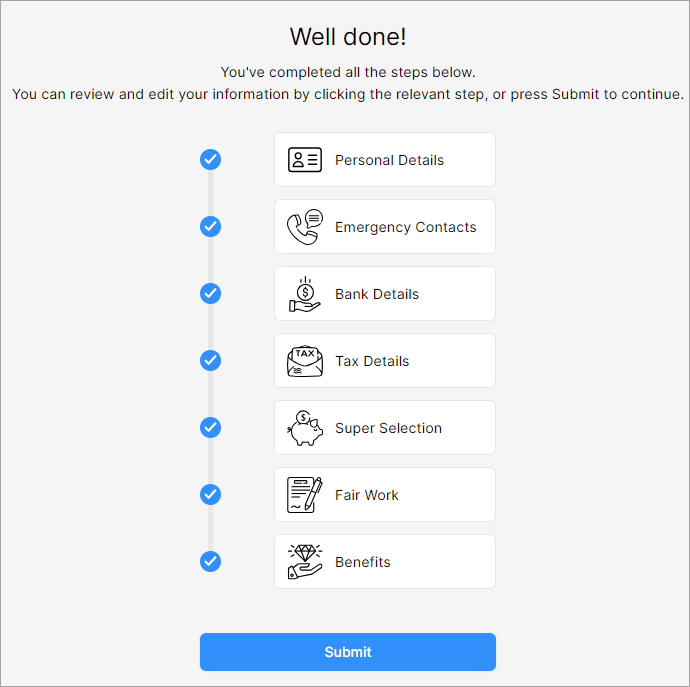
The form opens and the employee can complete their details on each tab. They need to complete all mandatory information (marked with an asterisk) on each tab before they can click Save and continue to progress to the next tab, until finally submitting the info.


This tab will only be available if the employee doesn't already have a valid tax file number in AccountRight.
First screen:
After clicking Continue:

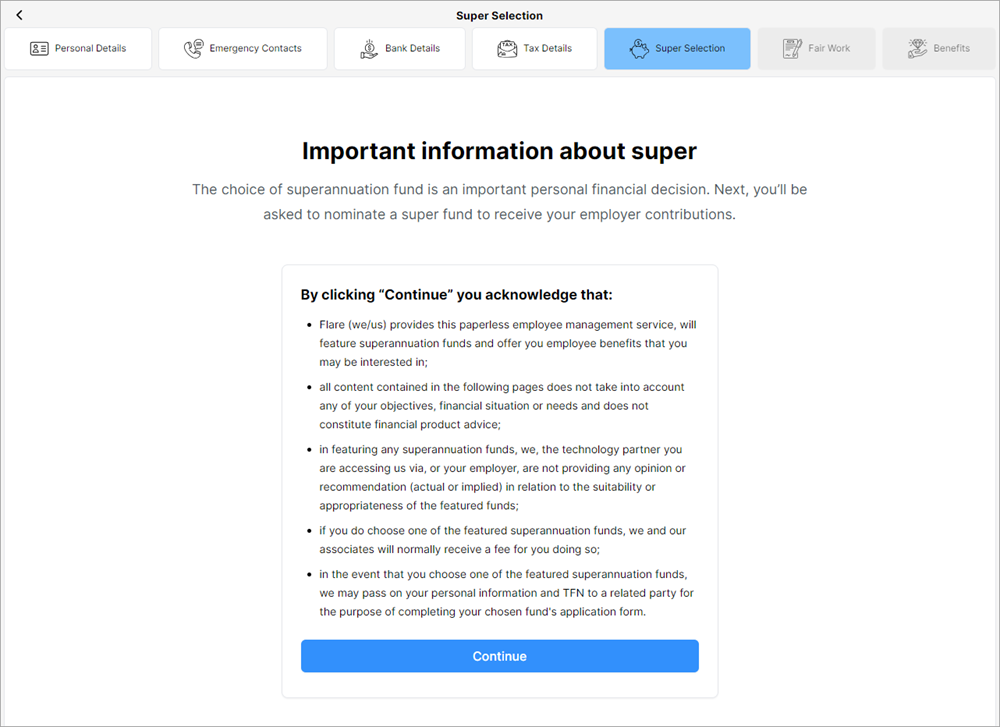
Any superannuation funds that may be referenced anywhere in in this onboarding help document are strictly for example purposes only. MYOB does not endorse or promote any these super funds.
First screen:
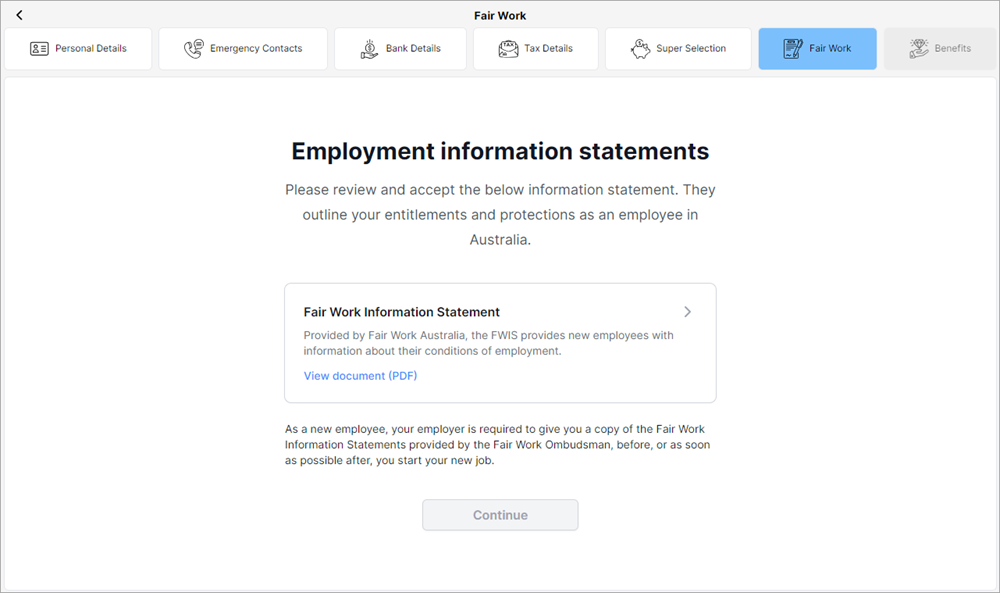
After clicking Fair Work Information Statement. Employee must click through to read all pages, then click Accept to be able to continue.
This tab will only be available if you've set up employee benefits or selected the option Provide access to employee benefits when inviting the employee to submit their own details.
First screen:

After clicking Next the employee is prompted to download the Flare app to access employee benefits:

Once the employee has completed all mandatory information, they can click Submit.
*This service is provided by our related entity Flare HR Pty. Ltd.

 Yes
Yes
 No
No
 Thanks for your feedback.